eMod#
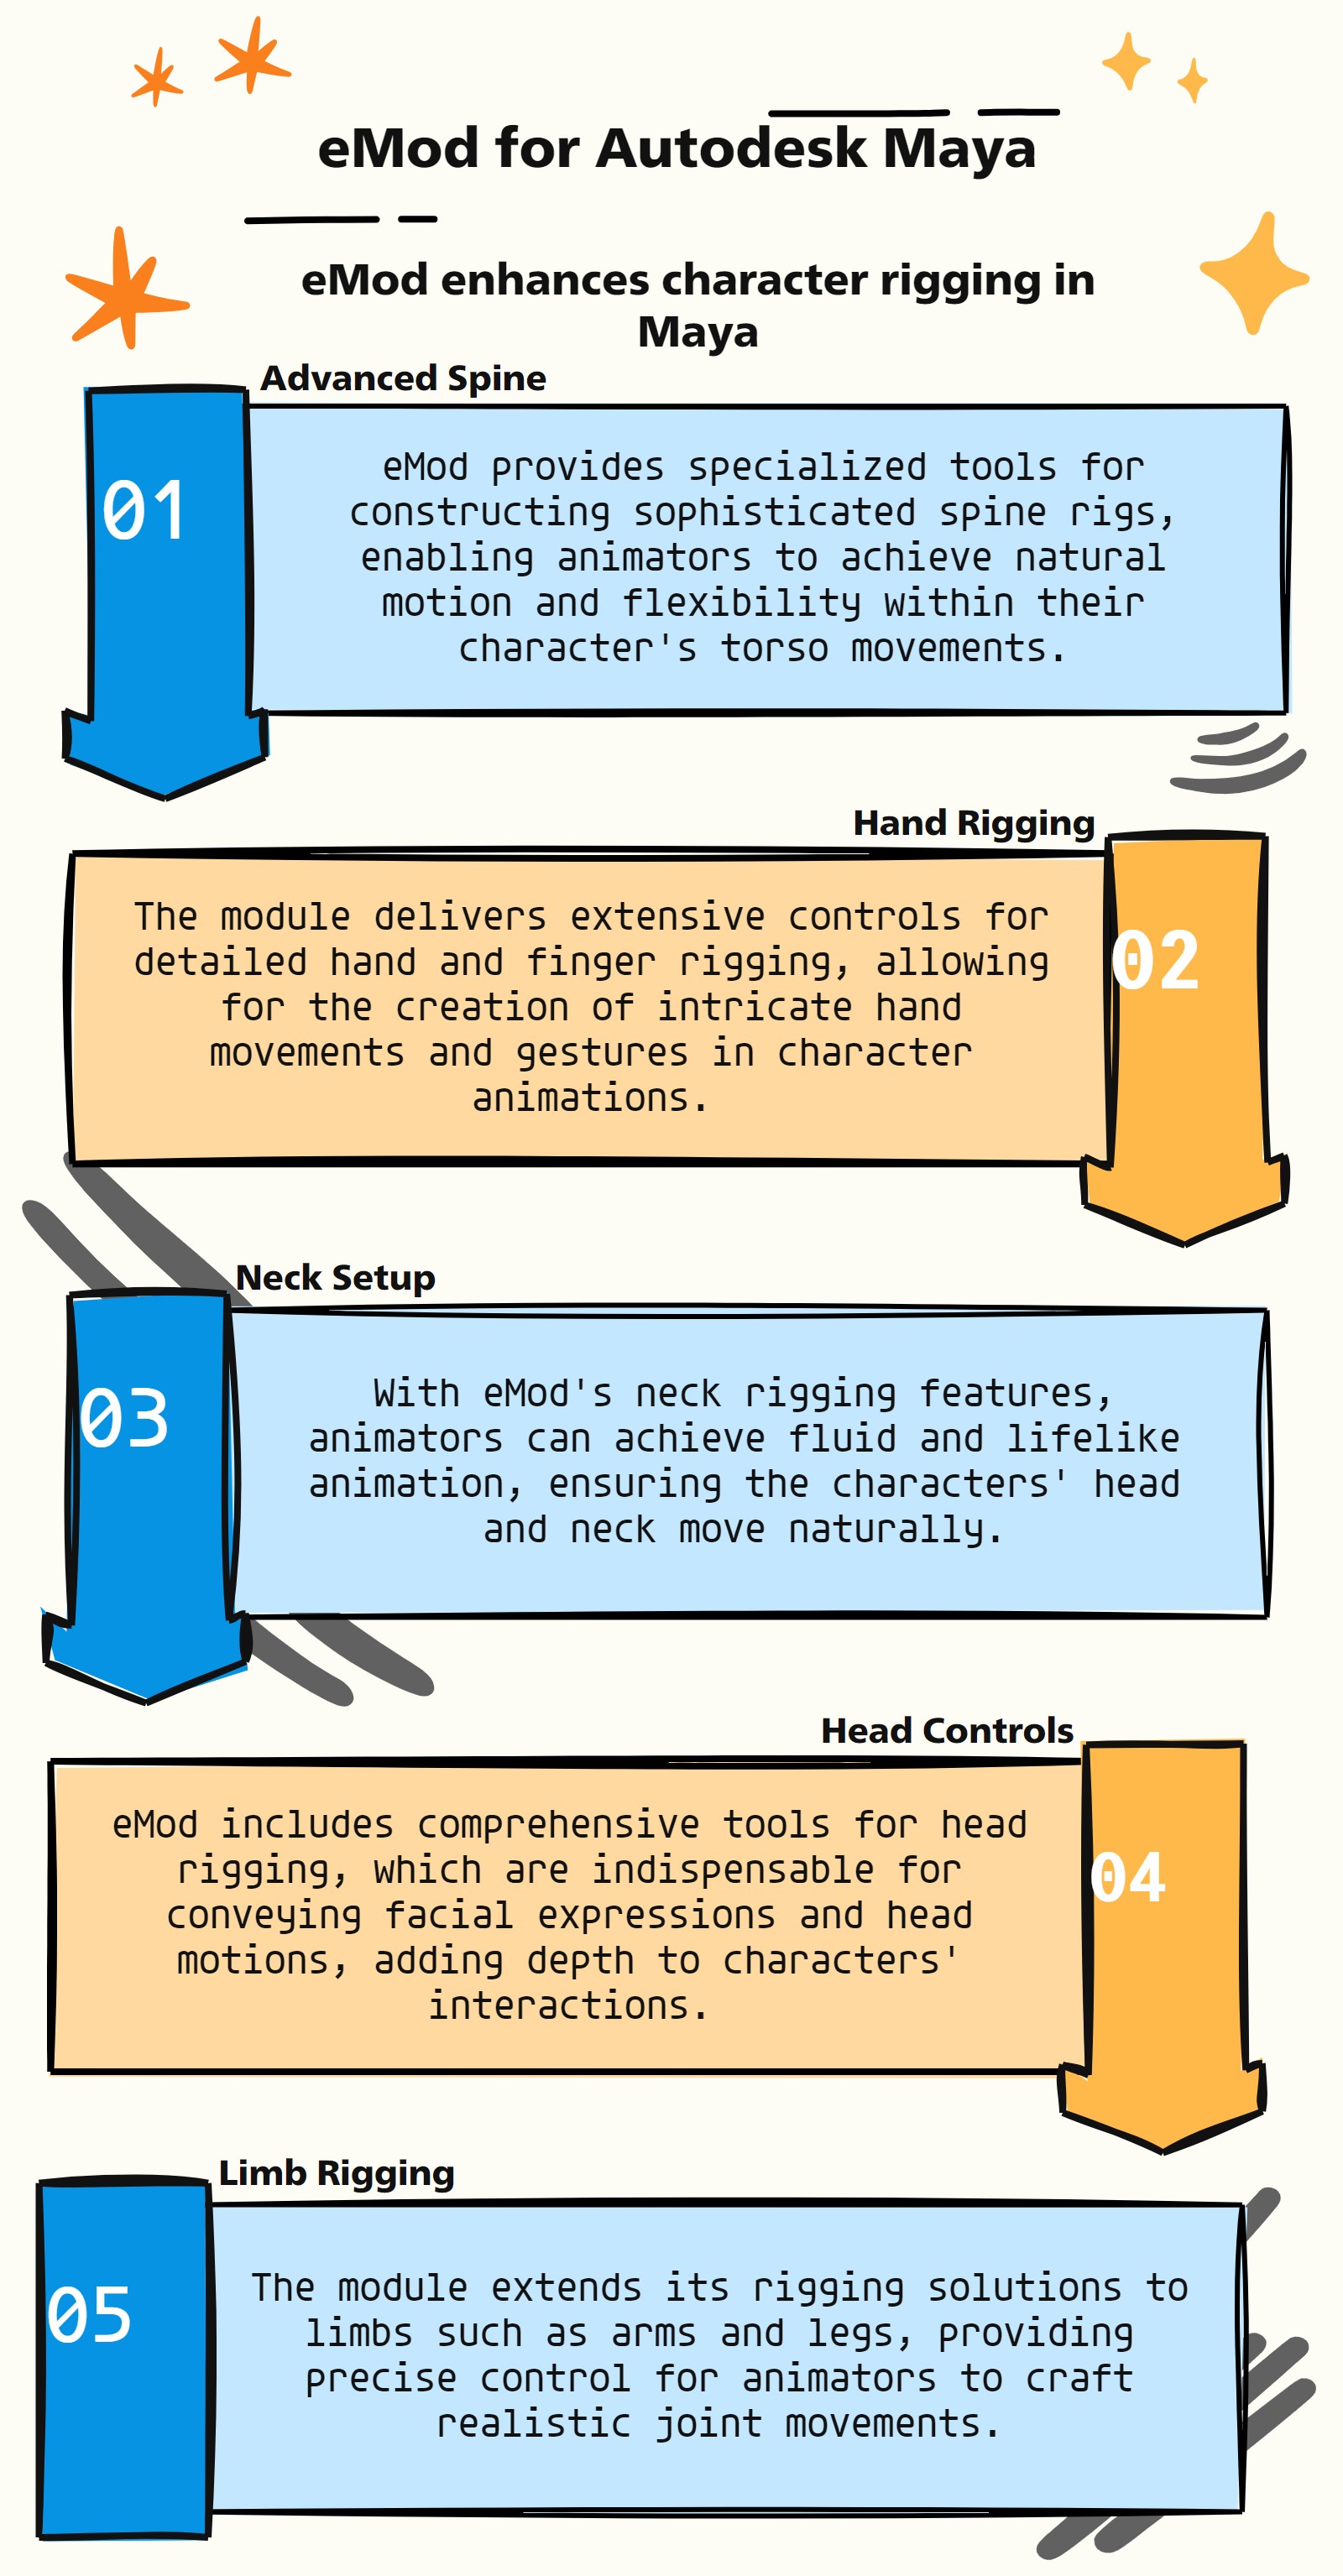
eMod Features
:Advanced Limb Level Module:
eMod module, specifically engineered for Autodesk Maya, plays a pivotal role in character rigging by offering limb-level rig functions. Here’s a refined overview of its key features:
Sophisticated Spine Setup: eMod is equipped with advanced tools for crafting spine rigs, crucial for enabling realistic and flexible movement in character animations.
Detailed Hand Rigging: The module provides comprehensive functionalities for hand setup, encompassing intricate controls for fingers, essential for achieving detailed hand and finger animations.
Neck Rig Functionality: eMod offers specialized features for creating neck rigs, ensuring smooth and natural movements for character head and neck animation.
Comprehensive Head Rigging: The module includes robust functions for head rigging, a critical component for facial expressions and head movements, enhancing character interaction and expressiveness.
Advanced Limb Rigging Tools: eMod also extends its capabilities to other limbs, such as arms and legs, offering detailed control over joint movements for realistic animation.
Automated Rigging Processes: The module aids in automating the rigging process for various body parts, significantly boosting efficiency and ensuring rigging consistency.
Customizable Rigging Solutions: eMod allows for a high degree of customization in rig setups, enabling riggers to tailor rigs to meet specific character design requirements.
Seamless Integration with Core Rigging Tools: Designed to work in harmony with Maya’s main rigging tools, eMod ensures a fluid and cohesive workflow in the construction of complex character rigs.
These features make eMod an invaluable asset in the rigging toolkit, particularly for professionals focusing on creating nuanced and lifelike character animations in Maya.
- eMod.__confirmAction(self, action)#
- eMod.__init__(self)#
This is to support as_EasyRig.. like Packages by providing main functions like SpineSetup, headSetup and tailSetup etc
- eMod._isInTime(self, startDate=[2017, 1, 1], endDate=[2018, 1, 1], onlineTime=1, showDaysLeft=1, bufferTime=0)#
- eMod._mayaVer(self)#
- eMod.add_Selection(self, textFld, multiSelect=False)#
Adds selected object’s name as Input in any Window for <== button Usage: —— obj10 # Adds ‘obj10’ While pressing Enter.. <== button box25 # Adds ‘box25’ While pressing Enter.. <== button
- eMod.as_ApplyB4Publish(self)#
[shArgs : sn=spineName, sp=sidePos]
Purpose:
:: Prepares a Maya scene for publishing by applying various clean-up and optimization steps.
Ensures the scene is in a standardized state suitable for sharing or further processing.
Removes unnecessary elements, optimizes visibility settings, and sets default poses for rig controls.
Function Operations:
Removes unwanted namespaces and expressions.
Sets specific attributes of ‘Placer’ and other nodes to predefined values.
Places the scene content within a bounding box for efficient handling.
Sets hand rigs to IK mode and zeros out all hand controllers in both IK and FK modes.
Deletes unnecessary nodes like ‘bindPose’ and ‘nameSpace:’.
Disables jiggle effects on relevant nodes.
- Parameters:
spineName – <list> # List of spine control names for pose setting.
sidePos – <str> # Side indicator for rig controls (e.g., ‘L’ for left, ‘R’ for right).
- Returns:
None # This function does not return any value.
Code Examples:
>>> spine_controls = ["spine1_ctrl", "spine2_ctrl"]
>>> side_position = "L"
>>> as_ApplyB4Publish(spine_controls, side_position)
# Applies the necessary cleanup and settings adjustments for publishing the scene.
- eMod.as_BendySetup(self, baseJnt, bendyCount=4, elbowBendy=False, deleteUnwanted='hands', globalCtrl='Global_Control', bendySwitch=None, setupType='hands')#
[shArgs : bj=baseJnt, bc=bendyCount, eb=elbowBendy, du=deleteUnwanted, gc=globalCtrl, bs=bendySwitch, st=setupType]
Purpose:
:: Configures a bendy setup for rigging in Autodesk Maya, particularly useful for hands and arms.
Automates the process of creating bendy joints and controls for more fluid and flexible character movements.
Provides options for customizing the setup according to specific rigging requirements.
Function Operations:
Sets up bendy joints based on the base joint provided.
Allows for deletion of unwanted joints and constraints for a cleaner rig setup.
Creates a bendy system with groups for curves, twist, and bendy controls.
Applies constraints and attributes to ensure proper functioning of the bendy system.
- Parameters:
baseJnt – <str> # The base joint from which the bendy setup originates.
bendyCount – <int> # Number of bendy segments to create.
elbowBendy – <bool> # Flag to indicate if elbow bendy setup is required.
deleteUnwanted – <str> # Determines if and what unwanted joints and constraints should be removed.
globalCtrl – <str> # The global control to which the bendy group is constrained.
bendySwitch – <str> # Control for switching the visibility of bendy controls.
setupType – <str> # Type of setup, e.g., ‘hands’ or ‘legs’, to specify the setup focus.
- Returns:
None # This function does not return any value.
Code Examples:
>>> base_joint = "L_Shoulder_Jnt"
>>> bendy_segments = 4
>>> is_elbow_bendy = True
>>> remove_unwanted = 'hands'
>>> global_control = 'Global_Control'
>>> visibility_switch = 'Visibility_Switch'
>>> setup_focus = 'hands'
>>> as_BendySetup(base_joint, bendy_segments, is_elbow_bendy, remove_unwanted, global_control, visibility_switch, setup_focus)
# Configures a bendy setup for the specified base joint with the given parameters.
- eMod.as_BendySetupBiped_Legs(self, globalCtrl='Global_Control')#
[shArgs : gc=globalCtrl]
Purpose:
:: Facilitates the setup of bendy rigging for biped legs in Autodesk Maya.
Streamlines the rigging process by providing a specialized function for creating bendy setups in biped legs.
Allows for easy customization and control over the rigging of both left and right legs.
Function Operations:
Utilizes the as_CreateBendySetup function for each leg joint (knee and hip) of a biped character.
Sets up bendy joints with specified parameters for knee and hip joints on both left and right sides.
Incorporates options for elbow bendy setups and the deletion of unwanted joints.
- Parameters:
globalCtrl – <str> # The global control to which the bendy system of the legs is linked.
- Returns:
None # This function does not return any value but configures bendy setups for both legs.
Code Examples:
>>> global_control = 'Global_Control'
>>> as_BendySetupBiped_Legs(global_control)
# Executes the bendy setup for both left and right legs with the given global control.
- eMod.as_CreateArmsSetup(self, upStreamJnt=None, autoClavicle=True)#
[shArgs: ]
Purpose:
:: Creates the arm setup for a character rig in Autodesk Maya, including IK/FK switching, clavicle controls, and pole vector controls.
This function facilitates the creation of an advanced arm rig, providing animators with IK and FK options, auto clavicle movement, and pole vector controls for precise arm positioning.
It also handles the mirroring of arm components for the opposite side, ensuring symmetry and functionality in both arms.
- Returns:
None # This function does not return any value but constructs a comprehensive arm rig setup in the Maya scene.
Code Examples:
>>> as_CreateArmsSetup(upStreamJnt="Chest_Jnt", autoClavicle=True)
# Creates an arm setup with IK/FK switching and auto clavicle movement, parented to the specified chest joint.
- eMod.as_CreateBasicSetup(self, curveList=None, topGrp=0, mirror=1, boneType=2, movePiv=1, curvSuffx=0, mainCtrl=1, **shArgs)#
[shArgs : cl=curveList, tg=topGrp, m=mirror, bt=boneType, mp=movePiv, cs=curvSuffx, mc=mainCtrl]
Purpose:
:: The function as_CreateBasicSetup is designed for Autodesk Maya to create a basic rigging setup based on a given set of curves. This function is instrumental in initial rig setup stages, particularly for creating control handles, clusters, and basic bone structures.
This function is versatile and can be used for various rigging purposes, providing a foundational setup that can be expanded upon.
It includes options for mirroring controls, setting up bones, and adjusting pivot points, making it a flexible tool for different rigging requirements.
- Parameters:
curveList – <list, optional> #List of curves to base the rigging setup on. If not provided, selected curves in the scene will be used.
topGrp – <int> #Indicates if a top group should be created for the setup. A value of 0 means no top group, while 1 creates a top group.
mirror – <int> #Determines if the setup should be mirrored. A value of 1 enables mirroring.
boneType – <int> #Specifies the type of bone to create. Different values represent different bone types.
movePiv – <int> #Indicates if pivot points should be moved. A value of 1 enables moving of pivot points.
curvSuffx – <int> #Determines if a suffix should be added to the curve names. A value of 0 adds no suffix.
mainCtrl – <int> #Indicates if a main control should be created. A value of 1 creates a main control.
- Returns:
<list> #Returns a list of main handle controls created during the setup process.
Code Examples:
>>> as_CreateBasicSetup(curveList=["curve1", "curve2"], topGrp=1, mirror=1, boneType=2, movePiv=1, curvSuffx=0, mainCtrl=1)
# This example demonstrates the function being called with a specific set of curves, creating a top group, enabling mirroring, setting bone type to 2, moving pivot points, not adding a suffix to curve names, and creating a main control.
- eMod.as_CreateBendySetup(self, baseJnt, bendyCount=4, elbowBendy=False, deleteUnwanted='hands', globalCtrl='Global_Control', bendySwitch=None, setupType='legs')#
[shArgs : bc=bendyCount, eb=elbowBendy, du=deleteUnwanted, gc=globalCtrl, bs=bendySwitch, st=setupType]
Purpose:
:: Creates a detailed bendy rig setup for character limbs in Autodesk Maya, enhancing the flexibility and control for animation.
This function is designed to build complex bendy rigs that are ideal for limbs like arms and legs.
It offers various options to customize the rig, including the number of bendy segments, elbow/knee bending, and options to delete specific joints.
- Parameters:
baseJnt – <str> #The base joint from where the bendy setup initiates, such as a shoulder or hip joint.
bendyCount – <int, optional> #Number of bendy segments to create, defaulting to 4.
elbowBendy – <bool, optional> #Boolean to determine if the setup includes an elbow/knee bend feature.
deleteUnwanted – <str, optional> #Specifies unwanted joints or parts to be deleted, like ‘hands’ or ‘legs’.
globalCtrl – <str> #The global control to which the bendy setup is constrained.
bendySwitch – <str, optional> #Control attribute for toggling the visibility of bendy controls.
setupType – <str> #Type of setup (e.g., ‘legs’ or ‘hands’) to configure the rig appropriately.
- Returns:
None #Does not return a value but creates a bendy rig setup in Maya.
Code Examples:
>>> as_CreateBendySetup('L_Shoulder_Jnt', bendyCount=3, elbowBendy=True, deleteUnwanted='hands', globalCtrl='Global_Control', bendySwitch='Bendy_Switch', setupType='hands')
# Example of setting up a bendy rig for the left arm starting from the shoulder joint with 3 segments, elbow bending, deleting hand joints, and linking to a global control.
- eMod.as_CreateBirdWingSetup(self, upStreamJnt='')#
[shArgs: ]
Purpose:
:: Constructs a comprehensive bird wing setup in Autodesk Maya, incorporating advanced rigging features for both FK and IK controls. This function is particularly useful for animating bird or wing-like characters, offering a high degree of control and flexibility.
The function covers the creation of IK/FK systems, clavicle controls, and bendy connections, enabling detailed manipulation of wing movements.
It is designed to facilitate the animation of bird wings with options for various rigging requirements and can be customized based on the specific needs of the character model.
- Parameters:
upStreamJnt – <str> # Upstream joint to which the wing setup is connected, often used as a reference point for the rigging hierarchy.
- Returns:
<list> # Returns a list of skin joints for the wing setup, which can be used for skinning and further rigging processes.
Code Examples:
>>> as_CreateBirdWingSetup(upStreamJnt="COG_Jnt")
# This example creates a bird wing setup with the specified upstream joint as the reference point.
>>> as_CreateBirdWingSetup()
# Here, the bird wing setup is created without specifying an upstream joint.
- eMod.as_CreateDeformJoints(self, topJntList=['Root_Jnt'], jntSuffix=['_Jnt', '_BaseJnt', '_EndJnt'], replaceSuffix='_BindJnt', trgtPrefix='Rebuild_', parentGrp='', **shArgs)#
[shArgs : tjl=topJntList, js=jntSuffix, rs=replaceSuffix, tp=trgtPrefix, pg=parentGrp]
Purpose:
:: Generates deform joints in Maya based on a given list of top-level joints and suffix naming conventions.
Useful for creating a secondary joint chain for deformation purposes.
The function duplicates the specified joint hierarchy and renames the joints according to the provided suffixes.
- Parameters:
topJntList – <list> # List of top-level joints from which to generate deform joints.
jntSuffix – <list> # List of suffixes to identify joints in the original hierarchy.
replaceSuffix – <str> # Suffix to be used for renaming the duplicated joints.
trgtPrefix – <str> # Prefix to be added to the duplicated joints.
parentGrp – <str> # Name of the group to which the duplicated joints will be parented.
- Returns:
None # Creates deform joints and organizes them in the Maya scene.
Code Examples:
>>> as_CreateDeformJoints(['Spine_Jnt'], ['_Jnt', '_BaseJnt', '_EndJnt'], '_BindJnt', 'Deform_', 'DeformGrp')
# Duplicates and renames joints in the spine hierarchy for deformation.
- eMod.as_CreateDynamicChain(self, hairSys=None, attributeCtrl=None, ikCurv=None, ikFkType=None, numCtrlsIK=None, skinJntsFKCtrl=2, modPrefix='DynChain1', ikGrp=None)#
Usage: Create Joint Chain. Select start and end joints of that chain and Run
- Parameters:
hairSys –
- Returns:
- eMod.as_CreateEyeSetup(self, jawEndJnt=None, headJnt=None, gCtrlGrp=None, ikGrp=None)#
- eMod.as_CreateFeatherCtrls(self, upStreamJnt)#
[shArgs: ]
Purpose:
:: The function as_CreateFeatherCtrls creates feather controls for a character rig in Autodesk Maya. It’s specifically designed for bird-like characters, allowing riggers to generate and manipulate feathers on the wings efficiently.
This function is crucial in bird character rigging, providing detailed control over the feathers’ movement and orientation.
It creates feather controls for both left and right wings, aligning them with the respective joints and applying necessary transformations and constraints.
- Parameters:
upStreamJnt – (<str>) #Name of the upstream joint from where the feather controls will start being created.
- Returns:
None # The function does not return a value but generates feather controls on the character rig.
Code Examples:
>>> as_CreateFeatherCtrls("L_Shoulder_Jnt")
# This example demonstrates the function being called with the left shoulder joint as the starting point for creating feather controls on a bird character rig.
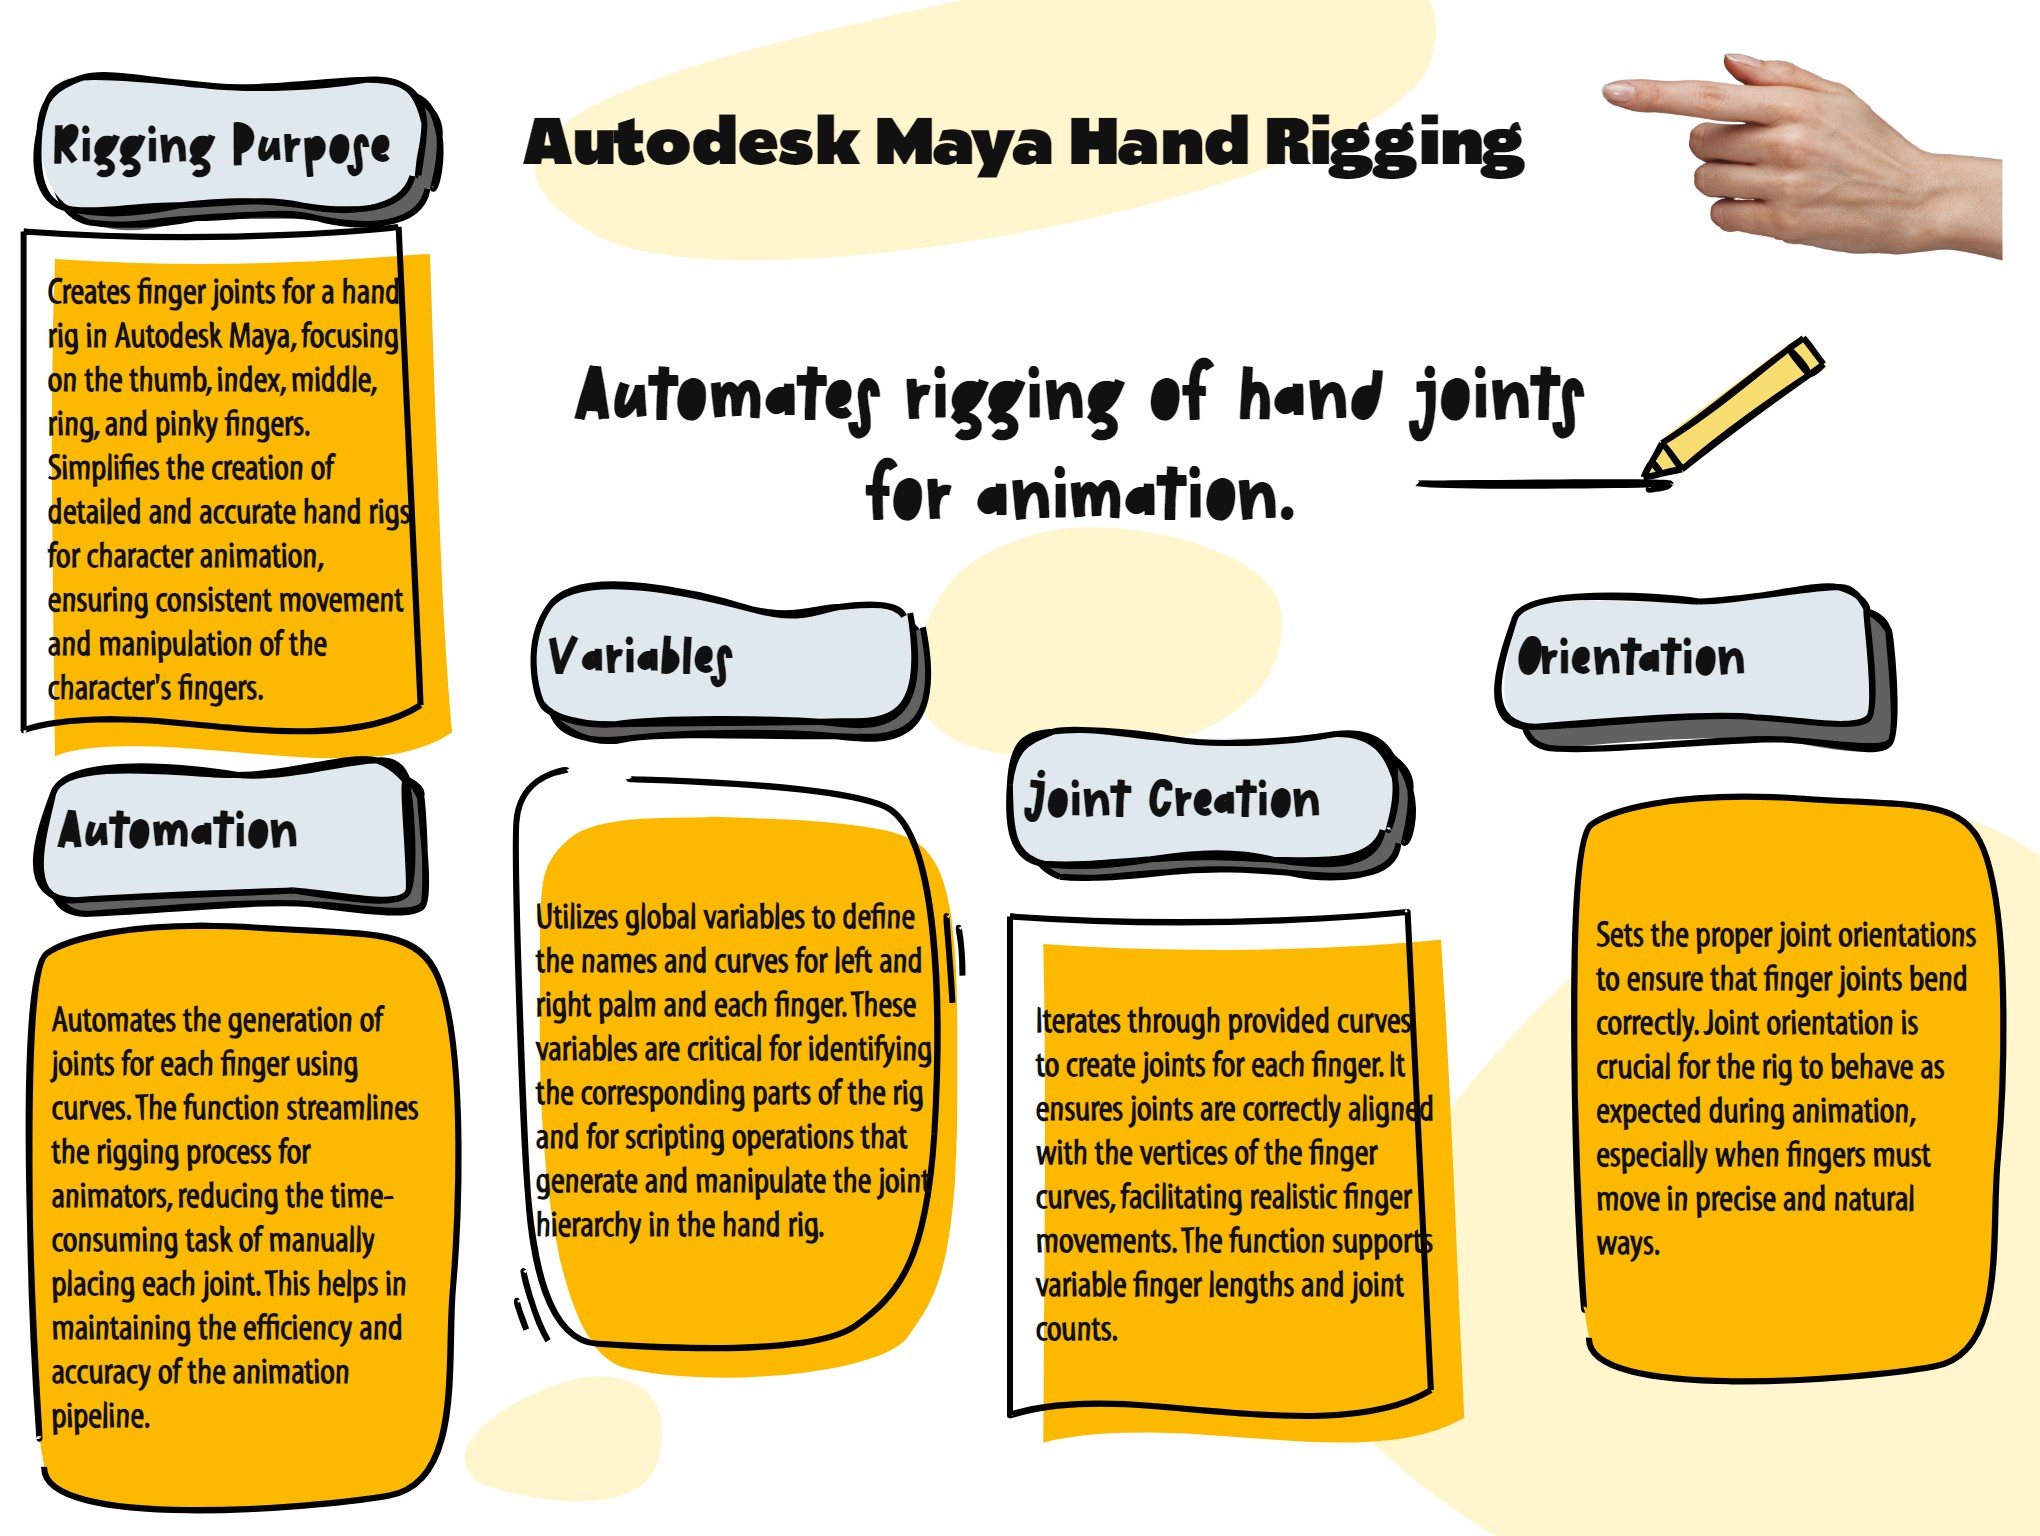
- eMod.as_CreateFingerJoints(self)#
[shArgs: ]
Purpose:
:: Creates finger joints for a hand rig in Autodesk Maya, including thumb, index, middle, ring, and pinky fingers.
This function automates the process of generating joints for each finger, including the thumb, based on specified curves.
It helps in creating a detailed and accurate hand rig for character animation.
- Returns:
None # This function creates finger joints in the scene but does not return any values.
Code Examples:
>>> as_CreateFingerJoints()
# Generates finger joints for a character's hand rig, based on predefined curves.
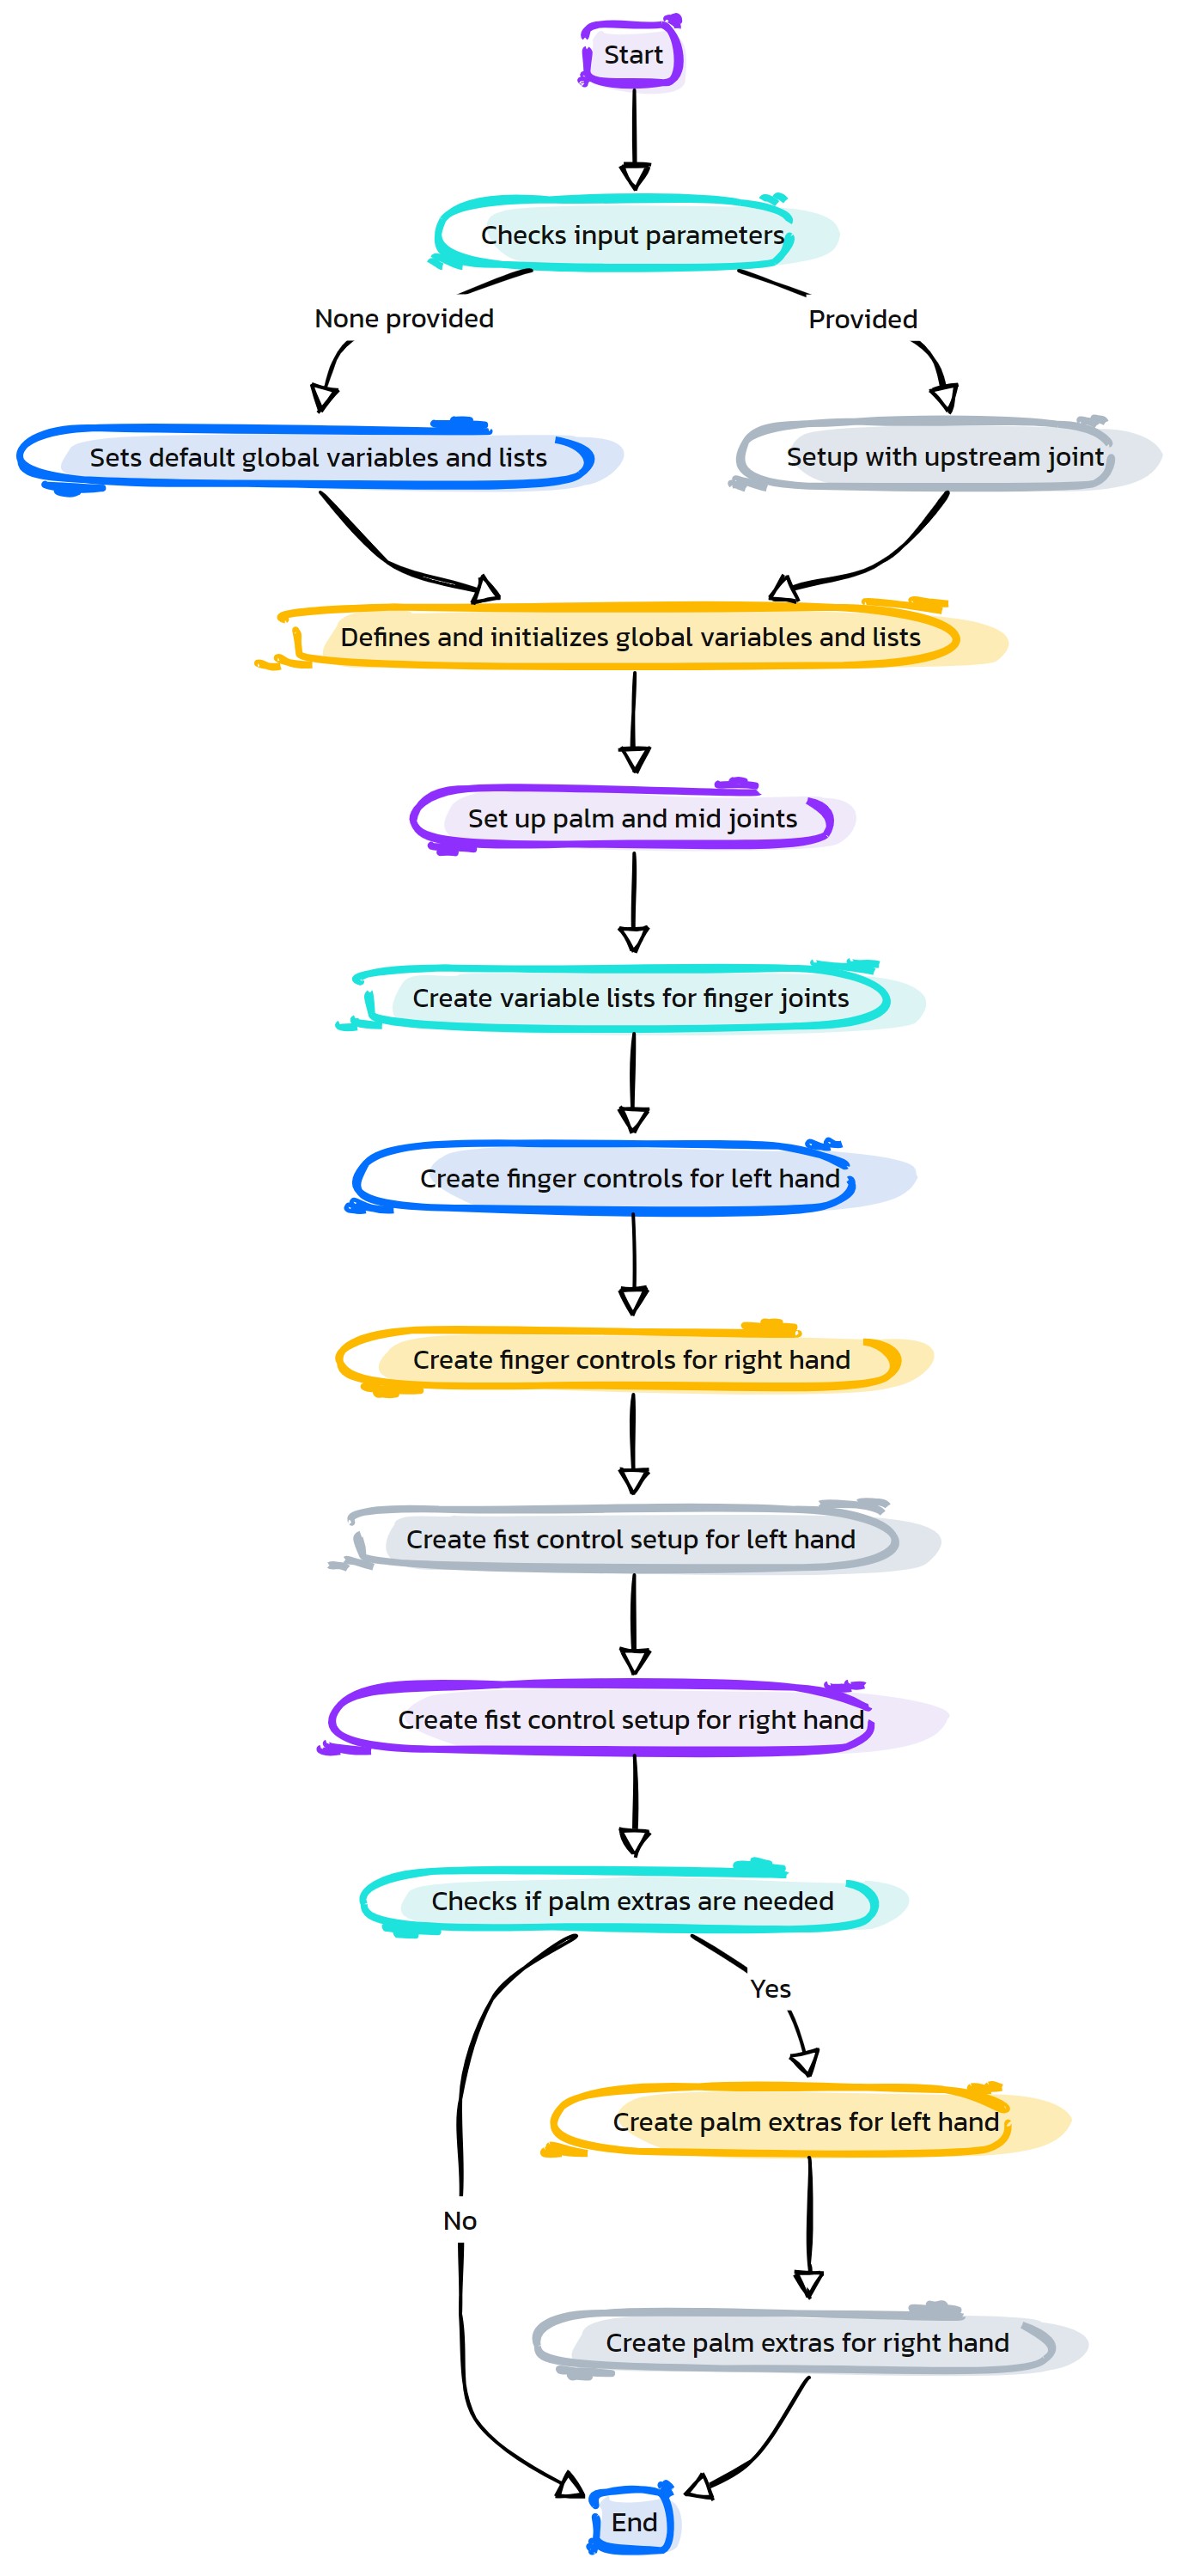
- eMod.as_CreateFingerSetup(self, upStreamJnt=None, palmExtras=None)#
[shArgs: ]
Purpose:
:: Creates a finger setup for a hand rig in Autodesk Maya, including controls for fingers and palm extras.
This function sets up finger controls for animation, ensuring smooth and realistic hand movements.
It includes creating IK handles, constraints, and control groups for fingers and palm extras, enhancing rig functionality.
- Returns:
None # This function does not return any value but creates finger and palm setups in the scene.
Code Examples:
>>> as_CreateFingerSetup(upStreamJnt="Arm_Jnt", palmExtras=True)
# Creates finger setup for a character's hand rig with upstream joint connections and palm extras.
- eMod.as_CreateHeadSetup_FKonIK(self, numCtrls=2, neckCurv=0, jawCurv=0, ikGrp=0, chestJnt=0, jointsGrp=0, setupType=0, globalCtrl=0, primAxis='x', secAxis='y', secAxisDir='y', **shArgs)#
[**shArgs : nct=numCtrls, nc=neckCurv, jc=jawCurv, ig=ikGrp, cj=chestJnt, jg=jointsGrp, st=setupType, gc=globalCtrl, pa=primAxis, sa=secAxis, sad=secAxisDir]
Purpose:
:: Creates a comprehensive head and neck rig setup for quadrupeds in Autodesk Maya, integrating both FK and IK systems.

This setup is ideal for animating complex movements in quadruped characters.
Provides a versatile rigging solution that accommodates a wide range of motion for the head and neck.
- Parameters:
numCtrls – <int> #Number of controls to create for the setup.
neckCurv – <Maya node> #Curve node representing the neck path.
jawCurv – <Maya node> #Curve node for the jaw.
ikGrp – <Maya node> #Group node for the IK setup.
chestJnt – <Maya node> #Joint representing the chest area.
jointsGrp – <Maya node> #Group containing the rig’s joints.
setupType – <int> #Type of setup to create, e.g., for different animal types.
globalCtrl – <Maya node> #Global control for the entire setup.
primAxis – <str> #Primary axis for joint orientation.
secAxis – <str> #Secondary axis for joint orientation.
secAxisDir – <str> #Direction for the secondary axis.
- Returns:
None. Constructs a full head and neck rig with FK on IK setup.
Code Examples:
>>> as_CreateHeadSetup_FKonIK(numCtrls=3, neckCurv='neckCurve1', jawCurv='jawCurve1', ikGrp='IK_Group1', chestJnt='Chest_Joint1', jointsGrp='Joints_Group1', setupType=1, globalCtrl='GlobalCtrl1', primAxis='x', secAxis='y', secAxisDir='y')
# Creates a head and neck setup with specific configurations for a quadruped rig.
graph TB Start[("fa:fa-play Start")] --> as_CreateHeadSetup_FKonIK{"/fa:fa-cogs as_CreateHeadSetup_FKonIK Function"} as_CreateHeadSetup_FKonIK --> shArgsCheck[Check if shArgs Exist] shArgsCheck --> SetDefaults[Set Default Values] SetDefaults --> CreateIKGrp[Create or Get IK Group] CreateIKGrp --> CreateGroups[Create Necessary Groups] CreateGroups --> CreateNeckJoints[Create Neck Joints] CreateNeckJoints --> SetNeckJointOrientations[Set Neck Joint Orientations] SetNeckJointOrientations --> CreateJawJoints[Create Jaw Joints] CreateJawJoints --> CreateHeadJoint[Create Head Joint] CreateHeadJoint --> CreateJawUpJoints[Create Jaw Up Joints] CreateJawUpJoints --> GenerateNeckCurve[Generate Neck Curve] GenerateNeckCurve --> CreateNeckIKHandle[Create Neck IK Handle] CreateNeckIKHandle --> CreateNeckCtrls[Create Neck Control Ctrs] CreateNeckCtrls --> CreateJawCtrl[Create Jaw Control] CreateJawCtrl --> ConnectJawMovement[Connect Jaw Movements to Head Control] ConnectJawMovement --> CreateJawUpCtrl[Create Jaw Up Control] CreateJawUpCtrl --> ConnectJawUpMovement[Connect Jaw Up Movements to Head Control] ConnectJawUpMovement --> CreateNeckTwistSetup[Create Neck Twist Setup] CreateNeckTwistSetup --> SkinNeckCurve[Skin Neck Curve] SkinNeckCurve --> Cleanup[Cleanup] style Start fill:#00cc00,stroke:#000,stroke-width:3px style as_CreateHeadSetup_FKonIK fill:#ffcc00,stroke:#000,stroke-width:2px style shArgsCheck fill:#ff9999,stroke:#000,stroke-width:2px style SetDefaults fill:#99ccff,stroke:#000,stroke-width:2px style CreateIKGrp fill:#cc99ff,stroke:#000,stroke-width:2px style CreateGroups fill:#99ff99,stroke:#000,stroke-width:2px style CreateNeckJoints fill:#ffcc00,stroke:#000,stroke-width:2px style SetNeckJointOrientations fill:#ff9999,stroke:#000,stroke-width:2px style CreateJawJoints fill:#cc99ff,stroke:#000,stroke-width:2px style CreateHeadJoint fill:#99ff99,stroke:#000,stroke-width:2px style CreateJawUpJoints fill:#ffcc00,stroke:#000,stroke-width:2px style GenerateNeckCurve fill:#ff9999,stroke:#000,stroke-width:2px style CreateNeckIKHandle fill:#cc99ff,stroke:#000,stroke-width:2px style CreateNeckCtrls fill:#99ff99,stroke:#000,stroke-width:2px style CreateJawCtrl fill:#ffcc00,stroke:#000,stroke-width:2px style ConnectJawMovement fill:#ff9999,stroke:#000,stroke-width:2px style CreateJawUpCtrl fill:#cc99ff,stroke:#000,stroke-width:2px style ConnectJawUpMovement fill:#99ff99,stroke:#000,stroke-width:2px style CreateNeckTwistSetup fill:#ffcc00,stroke:#000,stroke-width:2px style SkinNeckCurve fill:#ff9999,stroke:#000,stroke-width:2px style Cleanup fill:#cc99ff,stroke:#000,stroke-width:2px- Flow Chart Description:
This flowchart represents the Python function as_CreateHeadSetup_FKonIK, which creates a comprehensive head and neck rig setup for quadrupeds in Autodesk Maya, integrating both FK and IK systems. The flowchart outlines the various steps and decisions within the function.
The function begins by checking if the shArgs dictionary exists.
If shArgs exist, it updates the function’s arguments with values from shArgs.
It then creates or retrieves the IK group and sets up necessary groups.
The function proceeds to create neck joints and set their orientations.
Jaw joints, head joint, and optionally jaw-up joints are created.
The neck curve is generated along with control points.
The neck IK handle is created and connected to the curve.
Neck controls and jaw control are created.
Jaw movements are connected to the head control.
If applicable, jaw-up controls are created, and their movements are connected to the head control.
A neck twist setup is created.
The neck curve is skinned to the neck joints.
The function concludes with cleanup.
The flowchart provides a visual overview of the process and decisions made within the function.
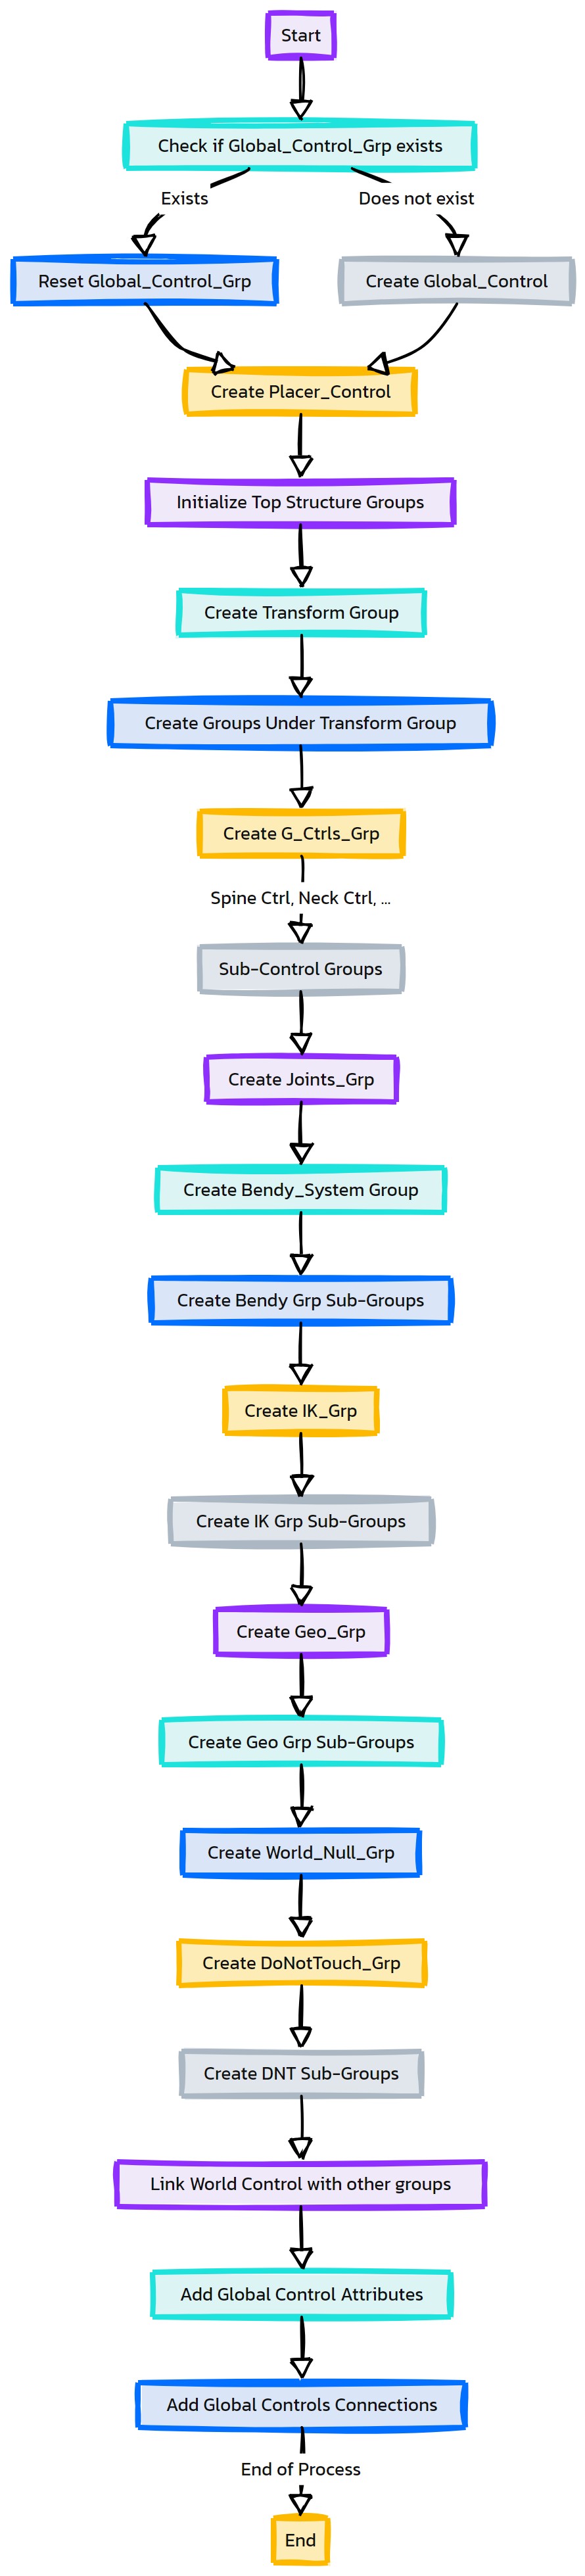
- eMod.as_CreateHierarchy(self)#
[shArgs: ]
Purpose:
:: Constructs the main hierarchy for a character rig in Autodesk Maya, organizing various rig components like controls, joints, and geometry.
This function is essential for maintaining a clean and organized rig structure, facilitating easier rig management and animation.
It creates and organizes groups for different rig components, such as global controls, joints, geometry, and specialized systems like IK handles and bendy setups.
- Returns:
None # This function does not return any value but constructs an organized hierarchy in the Maya scene.
Code Examples:
>>> as_CreateHierarchy()
# Creates and organizes the main hierarchy for a character rig, including control groups, joint groups, geometry groups, and more.
- eMod.as_CreateLegSetup(self, upStreamJnt='COG_Jnt', charType='biped')#
[shArgs: ]
Purpose:
:: Constructs a leg rig setup for a character in Autodesk Maya, accommodating different character types such as biped, quad, and bird. The setup includes IK/FK switching, reverse foot controls, and additional features like pole vector controls and ankle roll setups.
This function is designed to create a detailed and versatile leg rig, offering both IK and FK systems for animators to manipulate leg movements effectively.
It supports different character types, allowing for a customizable rigging process depending on the character’s anatomy (biped, quad, bird).
- Returns:
None # This function does not return any value but constructs a complex leg rig setup in the Maya scene.
Code Examples:
>>> as_CreateLegSetup(upStreamJnt="COG_Jnt", charType="biped")
# This example creates a leg setup for a biped character, parented to the center of gravity joint.
>>> as_CreateLegSetup(upStreamJnt="Root_Jnt", charType="quad")
# In this example, a leg setup is created for a quadruped character, parented to the root joint.
- eMod.as_CreateNeckHeadSetup(self, numCtrls=2, neckCurv=0, jawCurv=0, ikGrp=0, chestJnt=0, jointsGrp=0, setupType=0, globalCtrl=0, primAxis='x', secAxis='y', secAxisDir='y', **shArgs)#
[shArgs : nct=numCtrls, nc=neckCurv, jc=jawCurv, ig=ikGrp, cj=chestJnt, jg=jointsGrp, st=setupType, gc=globalCtrl, pm=primAxis, sa=secAxis, sad=secAxisDir]
Purpose:
:: Sets up the neck and head rigging in Autodesk Maya, offering various setup types like Basic, FK-On-IK, IK_FK, and Skeleton.
This function provides a flexible and customizable approach to neck and head rigging, catering to different animation and rigging requirements.
It leverages multiple setup types to accommodate a range of motion and control needs for character animation.
The function simplifies the rigging process for the neck and head, making it accessible for a variety of rigging scenarios.
- Parameters:
numCtrls – <int> #Number of controls to be created for the neck and head setup.
neckCurv – <PyNode> #Neck curve used as a guide for the setup.
jawCurv – <PyNode> #Jaw curve used in the rigging process.
ikGrp – <PyNode> #IK group for organizing the rig’s IK elements.
chestJnt – <PyNode> #Chest joint, serving as a starting point for the neck rig.
jointsGrp – <PyNode> #Group for organizing the joints in the setup.
setupType – <str> #Type of setup to be created (e.g., Basic, FK-On-IK).
globalCtrl – <PyNode> #Global control for the rig, influencing the entire neck and head setup.
primAxis – <str> #Primary axis for orientation in the rigging setup.
secAxis – <str> #Secondary axis for orientation.
secAxisDir – <str> #Direction of the secondary axis.
- Returns:
None #The function does not return a value but creates the neck and head setup in the scene.
- eMod.as_CreateSpineSetup(self, modPrefix='', upStreamCtrl='', cogCtrl='', **shArgs)#
[shArgs : uc=upStreamCtrl, cc=cogCtrl, mp=modPrefix]
Purpose:
:: Creates a spine setup for a character rig in Autodesk Maya, offering multiple setup types including Basic, IK_FK, and Skeleton.
This function provides a versatile approach to spine rigging, allowing the user to choose from different types of spine setups.
It dynamically adjusts to the selected setup type and the specific requirements of the character’s spine rig.
The setup process is streamlined and customizable, making it ideal for various rigging scenarios in character animation.
- Parameters:
modPrefix – <str> #Prefix for naming the elements in the spine setup.
upStreamCtrl – <str> #The upstream control for the spine setup, typically used in IK_FK setups.
cogCtrl – <str> #The center of gravity control for the spine setup, often used in IK_FK and Skeleton setups.
shArgs – <dict, optional> #Dictionary of short arguments for dynamic assignment.
- Returns:
None #The function does not return a value but creates the spine setup in the scene.
- eMod.as_CreateSpineSetup_Basic(self, spineName=None, gCtrlGrp=None, jntGrp=None)#
[shArgs : None]
Purpose:
:: Establishes a basic spine setup in Autodesk Maya, utilizing a spine curve to define the joint positions and orientations.
This function is designed for creating a fundamental spine rigging structure, ideal for basic character movement and animation.
It generates a series of joints along the spine curve and sets up IK controls for manipulating the spine.
The setup includes clustering and parenting of controls to facilitate easy animation and rig manipulation.
Argument | Description :param spineName: <list/None> #List of names for the spine joints, or None to use default naming. :param gCtrlGrp: <str/None> #Name of the global control group, or None to use a default group. :param jntGrp: <str/None> #Name of the joint group, or None to use a default group.
- Returns:
None #The function does not return a value but creates the basic spine setup in the scene.
- eMod.as_CreateSpineSetup_IK(self, spineCurv, ikJntList=None, numIKJnts=12, numIKCtrls=6, scaleVal=1, modPrefix='Spine_', ikGrp=None)#
[shArgs : ]
Purpose:
:: Sets up an IK spine rig using a curve, joints, and controls, providing a dynamic and flexible spine animation setup.
This function dynamically creates an IK spine setup based on a specified curve, joint list, and control parameters.
It generates joints aligned with the spine curve, IK handles, and controls for precise and smooth spine animations.
The setup is ideal for creating realistic and versatile spine movements in character rigging.
- Parameters:
spineCurv – <str> #The name of the spine curve to be duplicated and used for the IK setup.
ikJntList – <list, optional> #A list of joints to be used in the IK system. If not provided, they will be created based on the spine curve.
numIKJnts – <int> #The number of IK joints to create if ikJntList is not provided.
numIKCtrls – <int> #The number of IK controls to create along the spine curve.
scaleVal – <float> #Scaling factor for the IK controls.
modPrefix – <str> #Prefix for naming the elements in the IK spine setup.
ikGrp – <str, optional> #The group for organizing the IK spine elements.
- Returns:
<list> #A list containing the IK control list, IK joint list, and the IK handle.
- eMod.as_CreateSpineSetup_IKFK(self, spineCurv='Spine_Curve', spineName=None, gCtrlGrp=None, jntGrp=None, ikGrp=None, switchCtrl=None, rootCtrl=False, cogCtrl=False, modPrefix='', **shArgs)#
Purpose:
:: Constructs an IK-FK spine setup in Autodesk Maya, allowing for dynamic and flexible control over the spine rig.
This function offers a sophisticated rigging solution for the spine, combining both inverse kinematics (IK) and forward kinematics (FK) systems.
It is ideal for creating complex spine movements and animations, providing animators with versatile control options.
Argument | Description :param spineCurv: <str> #The name of the spine curve used for the setup. :param spineName: <list/str> #List of names for the spine joints. Defaults are provided if not specified.
spineName: [‘Root_Jnt’, ‘Spine_01_Jnt’, ‘Spine_02_Jnt’, ‘Spine_03_Jnt’, ‘Spine_04_Jnt’, ‘Spine_05_EndJnt’, ‘Chest_Jnt’]
- Parameters:
gCtrlGrp – <str> #Global control group name. A default name is used if not specified.
jntGrp – <str> #Joint group name. A default name is used if not specified.
ikGrp – <str> #IK group name. A default name is used if not specified.
switchCtrl – <str> #Name of the control for IK-FK switching.
rootCtrl – <bool/str> #Indicates whether to create a root control, or specifies its name.
cogCtrl – <bool/str> #Indicates whether to create a center of gravity (COG) control, or specifies its name.
modPrefix – <str> #Prefix used for naming conventions in the rig.
shArgs – <dict> #Additional short arguments for customization.
- Returns:
None #The function sets up the spine rig in the scene without returning a value.
- eMod.as_CreateSpineSetup_IKonFK(self, IKJnt=None, fkSkipCount=2, ikSuffix='Ik', jntSuffix='_Jnt', ikGrp=None, modPrefix='')#
[shArgs : ]
Purpose:
:: Creates a spine setup with both IK and FK controls, including joint chains and control groups.
This function generates a dynamic spine rig with FK controls skipping at a specified count and aligns them with corresponding IK joints.
It includes creating duplicate joint chains for FK, setting up control groups, and matrix connections for accurate deformation.
The spine setup is designed to offer flexibility and control for animating complex spine movements.
- Parameters:
IKJnt – <str, optional> #The base joint of the IK spine chain. If not provided, it uses the first selected object.
fkSkipCount – <int> #The count of joints to skip for creating FK controls.
ikSuffix – <str> #Suffix used for IK joints in the naming convention.
jntSuffix – <str> #Suffix used for joints in the naming convention.
ikGrp – <str, optional> #The group for IK joints, if provided.
modPrefix – <str> #Prefix used for naming the modules in the spine setup.
- Returns:
<list> #A list containing the top control group of the FK setup and the list of FK joints.
- eMod.as_CreateSpineSetup_Quad(self, spineCurve, rebuild=False)#
[shArgs: sc=spineCurve, rb=rebuild]
Purpose:
:: Constructs a quadruped spine setup using a given spine curve in Autodesk Maya.
Designed specifically for creating realistic and dynamic spine rigs for quadruped characters.
Provides the ability to rebuild the spine curve for different configurations and requirements.
- Parameters:
spineCurve – <str> # The spine curve used as the basis for the spine setup.
rebuild – <bool> # Indicates whether the spine curve should be rebuilt during the setup process.
- Returns:
None # This function does not return any value but constructs the quadruped spine rig.
Code Examples:
>>> spine_curve_name = "mainSpineCurve"
>>> as_CreateSpineSetup_Quad(spine_curve_name, rebuild=True)
# Creates a quadruped spine setup using 'mainSpineCurve' and rebuilds the spine curve.
- eMod.as_CreateSpineSetup_Snake(self, jntPrefix=0, ctrlDir='x', ctrlType=0, ctrlParent=0, ctrlShape=0, sizeCtrl=1, numJnts=0, numCtrls=0, secAxis='y', secAxisWorld='y', flexAtEnds=0, createIK=1, mirrSetup=0, mirrPrfxs=['L_', 'R_'], extraConGrps=0, orientTo=None, fkIkType=None, **shArgs)#
[shArgs: jp=jntPrefix, cd=ctrlDir, ct=ctrlType, cp=ctrlParent, cs=ctrlShape, sc=sizeCtrl, nj=numJnts, nc=numCtrls, sa=secAxis, saw=secAxisWorld, fae=flexAtEnds, cik=createIK, ms=mirrSetup, mp=mirrPrfxs, ecg=extraConGrps, ot=orientTo, fit=fkIkType]
Purpose:
:: Creates a dynamic and flexible snake-like spine setup in Autodesk Maya, suitable for complex rigging requirements.
This function is designed to construct a spline-based rig system, mimicking the movement of a snake’s spine.
It offers various options for joint prefixes, control direction, type, and parent, as well as flexibility at the ends of the spine.
- Parameters:
jntPrefix – <str> # Prefix for the joints created in the setup.
ctrlDir – <str> # Direction of the controls (e.g., ‘x’, ‘y’, ‘z’).
ctrlType – <str> # Type of the control to be used.
ctrlParent – <str> # Specifies the parent for the control.
ctrlShape – <str> # Shape of the control.
sizeCtrl – <int> # Size of the control.
numJnts – <int> # Number of joints in the spine setup.
numCtrls – <int> # Number of controls in the spine setup.
secAxis – <str> # Secondary axis for orientation.
secAxisWorld – <str> # World space orientation for the secondary axis.
flexAtEnds – <bool> # Determines if there is flexibility at the ends.
createIK – <bool> # Specifies if IK should be created.
mirrSetup – <bool> # Indicates if the setup should be mirrored.
mirrPrfxs – <list> # Prefixes for the mirrored setup.
extraConGrps – <bool> # Determines if extra control groups should be created.
orientTo – <str> # Object to orient the setup to.
fkIkType – <str> # Specifies the type of FK/IK setup.
- Returns:
<list> # Returns a list of created joints, IK curve, and control list.
Code Examples:
>>> jntPrefix = "Snake_"
>>> ctrlDir = "x"
>>> as_CreateSpineSetup_Snake(jntPrefix, ctrlDir, numJnts=5, numCtrls=3)
# Creates a snake-like spine setup with specified joint prefix and control direction.
- eMod.as_CreateStickyLips_Adv(self, upperCurv=None, lowerCurv=None, headCtrl=None, skinMesh=None)#
- eMod.as_CreateStickyLips_Basic(self, upCurv=None, loCurv=None, skinMesh=None, stickyMesh=None, switchCtrl=None, globalCtrl=None, **shArgs)#
- Parameters:
upCurv –
loCurv –
skinMesh –
stickyMesh –
shArgs –
globalCtrl –
- Returns:
- eMod.as_CreateTailSetup(self)#
[shArgs : ]
Purpose:
:: Creates a setup for animating a tail in a rig, including FK and IK controls, joints, and a spline IK handle.
This function sets up controls and joints based on a given curve for the tail.
It involves creating FK and IK joint chains, clusters, and controls for animating the tail.
The function also includes options for the control type, parent type, and control shape.
- Returns:
None #The function sets up the tail rig but does not return any value.
- eMod.as_CreateToeJoints(self, charType='biped')#
[shArgs : ct=charType]
Purpose:
:: Creates and sets up toe joints for a character in Autodesk Maya, suitable for biped or quadruped characters.
Configures toe joints, including their orientation and hierarchy.
Supports custom joint creation for different toe types, like thumb, index, middle, ring, and pinky.
- Parameters:
charType – <str> # Specifies the character type (e.g., ‘biped’ or ‘quad’) to determine the setup style.
- Returns:
None # Generates toe joints and their respective controls in the Maya scene.
Code Examples:
>>> as_CreateToeJoints('biped')
# Generates toe joints for a biped character.
- eMod.as_CreateToesSetup(self)#
[shArgs : None]
Purpose:
:: Establishes a complete toe setup in Autodesk Maya, integrating both FK and IK controls for animation.
This function configures the toe joints, controls, and IK setups for improved animation control.
Suitable for characters requiring detailed toe animations.
- Returns:
None # Creates and configures the toe setup in the Maya scene.
Code Examples:
>>> as_CreateToesSetup()
# Sets up the toes with both FK and IK controls for a character.
- eMod.as_CreateToesSetupIK(self, upStreamCtrl='', upStreamJnt='', leftSide='L_', rightSide='R_', toesPrefix='Toes_')#
[shArgs : uc=upStreamCtrl, uj=upStreamJnt, ls=leftSide, rs=rightSide, tp=toesPrefix]
Purpose:
:: Creates an IK setup for toe controls in Autodesk Maya, providing dynamic movement for character animation.
Integrates IK controls for toes to enable realistic and flexible toe animations.
Supports customization for different character types and toe configurations.
- Parameters:
- Returns:
None # Generates IK controls for toe animation in the Maya scene.
Code Examples:
>>> as_CreateToesSetupIK('FootCtrl', 'AnkleJnt', 'L_', 'R_', 'Toes_')
# Creates an IK toe setup based on specific control and joint names.
- eMod.as_CreateTongueSetup(self, nameTongue='Tongue', AnDyno=0, wSize=1, hSize=1, numFkJnts=4, jawJnt='Jaw_Jnt')#
[shArgs : nt=nameTongue, ad=AnDyno, ws=wSize, hs=hSize, nfj=numFkJnts, jj=jawJnt]
Purpose:
:: Sets up a dynamic or static tongue rig in Autodesk Maya, allowing for realistic tongue movements and deformations.
This function allows for the creation of a dynamic tongue using MayaMuscle or a static tongue setup.
It supports customization options like size, number of FK joints, and dynamic properties.
- Parameters:
nameTongue – <str> # Name to be assigned to the tongue setup.
AnDyno – <int> # Indicates whether to create a dynamic (1) or static (0) tongue.
wSize – <float> # Width size of the tongue.
hSize – <float> # Height size of the tongue.
numFkJnts – <int> # Number of FK joints to be created for the tongue.
jawJnt – <str> # Name of the jaw joint to which the tongue setup will be parented.
- Returns:
None # Sets up the tongue rig in the Maya scene.
Code Examples:
>>> as_CreateTongueSetup("Tongue", 1, 1.0, 0.5, 5, "Jaw_Jnt")
# Creates a dynamic tongue setup named 'Tongue' with specific size and joint parameters.
Usage:
1. Import from D:\My_Scripts\$_as_FaceExp\Tongue_Placer
2. Run : eMod.as_CreateTongueSetup ("Tongue", 0, 1, 1)
3. Parent 'Tongue_IK_01_Jnt' to 'Jaw_Jnt'
4. Parent 'TongueFk_Tongue_01_ctrl_grp' and 'TongueIK_tenna_controls_grp' to gCtrl_grp
5. parentConstrain 'TongueFk_Tongue_01_ctrl_grp' from 'Jaw_Jnt'
6. Done
- eMod.as_FixFeatherCtrls(self)#
[shArgs: ]
Purpose:
:: The function as_FixFeatherCtrls is designed to adjust the orientation constraints of selected control nodes in Autodesk Maya, specifically for feather controls. It rotates the control’s orientation by 180 degrees along the Y-axis to correct any misalignment issues.
This function is particularly useful in rigging scenarios where feather controls may have orientation issues.
It iterates through each selected control and checks for any existing orient constraints. If found, the function adjusts the constraint’s offset to correct the control’s orientation.
- Parameters:
None – No parameters are required for this function as it operates on the currently selected nodes in Maya.
- Returns:
None # The function does not return a value but performs orientation adjustments on selected feather controls.
Code Examples:
>>> as_FixFeatherCtrls()
# This example demonstrates the function being called to adjust the orientation of selected feather controls in Maya.
- eMod.as_FixFileErrors(self)#
[shArgs: ]
Purpose:
:: This function, as_FixFileErrors, is designed to identify and remove specific rogue model panel change events that can cause errors in Autodesk Maya. It is particularly effective in addressing the “Cannot find procedure” error related to model panels.
This function specifically targets the error “Error: line 1: Cannot find procedure ‘onModelChange3dc’” and similar errors.
The implementation includes a method to search through model panels and remove event callbacks that are causing the error.
- Parameters:
None – No parameters are required for this function.
- Returns:
None # The function does not return a value but fixes specific errors within the Maya environment.
Code Examples:
>>> as_FixFileErrors()
# This example demonstrates the function being called to fix file errors related to model panels in Maya.
- eMod.as_InvertCBS(self)#
- eMod.as_RebuildLegSetup(self, upStreamJnt='COG_Jnt', bodyList=None, bendySetup=True, createToeSetup=True)#
[shArgs: ]
Purpose:
:: Rebuilds and enhances the leg rig setup for a character in Autodesk Maya. This function allows for the integration of advanced features like bendy setups, toe setups, and updates existing rig elements to improve functionality and flexibility.
The function is tailored to enhance an existing leg rig setup, providing options for bendy setups, toe joint creation, and updating control shapes to match the previous setup.
It is useful in scenarios where an existing leg rig needs upgrading or modification without starting the rigging process from scratch.
- Parameters:
upStreamJnt – <str> # Name of the upstream joint, usually the COG or root joint of the rig.
bodyList – <list, optional> # List of body meshes to which skinning will be transferred.
bendySetup – <bool, default=True> # Indicates whether to include a bendy setup in the rig.
createToeSetup – <bool, default=True> # Determines whether to create a toe setup as part of the rig.
- Returns:
None # This function does not return any value but updates the leg rig setup in the Maya scene.
Code Examples:
>>> as_RebuildLegSetup(upStreamJnt="COG_Jnt", bodyList=["character_mesh"], bendySetup=True, createToeSetup=True)
# This example rebuilds the leg rig setup for a character, adding bendy and toe setups, and transferring skinning to the specified mesh.
>>> as_RebuildLegSetup(upStreamJnt="Root_Jnt", bendySetup=False)
# Here, the leg rig is rebuilt without a bendy setup and without specifying any body meshes for skinning transfer.
- eMod.as_eMod(self)#
To Support main scripts with repetitive tasks via eMod
- eMod.bonyCur(self, nanoname, numBones, rebuild_Curve, addSplineIK)#
[shArgs : nn=nanoname, nb=numBones, rc=rebuild_Curve, asi=addSplineIK]
Purpose:
:: Generates a joint chain along a curve with optional spline IK in Autodesk Maya.
Ideal for rigging purposes where joint chains need to align along specific curves.
Offers control over the number of joints, curve rebuilding, and the addition of spline IK.
Function Operations:
Iterates over selected curves, optionally rebuilding each for smoother joint placement.
Places a specified number of joints along each curve, evenly distributed.
Optionally adds a spline IK handle to the joint chain for dynamic movement.
- Parameters:
nanoname – <str> # Name prefix for the created joints.
numBones – <int> # Number of joints to be created along the curve.
rebuild_Curve – <bool> # Determines whether to rebuild the curve for smoother joint placement.
addSplineIK – <bool> # Specifies if a spline IK handle should be added to the joint chain.
- Returns:
None # This function does not return any value but creates joints along curves with optional spline IK.
Code Examples:
>>> curve_name = 'myCurve'
>>> num_joints = 5
>>> rebuild_curve = True
>>> add_spline_ik = False
>>> bonyCur(curve_name, num_joints, rebuild_curve, add_spline_ik)
# Creates a joint chain of 5 joints along 'myCurve', rebuilding the curve and without adding spline IK.
- eMod.colorLeft(self)#
[shArgs : ]
Purpose:
:: Applies a specific wireframe color to selected objects or curves in Autodesk Maya.
Enhances visibility and organization by color-coding objects, particularly useful in complex scenes.
Streamlines the process of setting up wireframe colors for left-sided objects or curves.
Function Operations:
Iterates through all currently selected objects or curves.
Sets a pre-defined wireframe color for these elements, enhancing their visibility in the viewport.
:param : None # This function operates on currently selected objects or curves in Maya.
- Returns:
None # This function does not return any value but changes the wireframe color of selected items.
Code Examples:
>>> colorLeft()
# Applies the specified wireframe color to all selected objects or curves in Maya.
- eMod.colorMid(self)#
[shArgs : ]
Purpose:
:: Assigns a middle-range wireframe color to the selected objects or curves in Autodesk Maya.
Useful for categorizing and visually distinguishing objects located centrally in the scene or rig.
Facilitates a clear and organized workspace, especially in complex scenes with multiple elements.
Function Operations:
Loops through the selected objects or curves in Maya.
Applies a predefined middle-range color to their wireframes, making them distinct in the viewport.
:param : None # The function targets currently selected objects or curves in Maya.
- Returns:
None # This function does not return any value but changes the wireframe color of selected items.
Code Examples:
>>> colorMid()
# Applies a middle-range wireframe color to all selected objects or curves in Maya.
- eMod.colorRight(self)#
[shArgs : ]
Purpose:
:: Applies a specific wireframe color to the selected objects or curves in Autodesk Maya, typically for objects positioned on the right.
Aids in visually organizing and differentiating objects or elements within the Maya scene.
Particularly useful in complex scenes or rigs where spatial arrangement and quick identification are important.
Function Operations:
Iterates over the selected objects or curves in Maya.
Enables wireframe color override and sets a predefined color, typically associated with the right side of a scene or rig.
:param : None # This function operates on the currently selected objects or curves in Maya.
- Returns:
None # Does not return a value but alters the wireframe color of the selected items.
Code Examples:
>>> colorRight()
# Changes the wireframe color of all selected objects or curves in Maya to a color typically used for right-side elements.
- eMod.createEyePupilRig(self, eyeBall='EyeBall_Inner', pupil='Pupil')#
[shArgs: eb=eyeBall, p=pupil]
Purpose:
:: Creates an eye pupil rig in Autodesk Maya, allowing for realistic eye and pupil movement and interaction.
This function is particularly useful in character rigging to achieve realistic eye movements.
It includes features like shrink wrapping and blend shapes for dynamic pupil adjustment.
- Parameters:
eyeBall – <str> # The inner eye ball node.
pupil – <str> # The pupil node to be rigged.
- Returns:
None # The function sets up the eye pupil rig but does not return a value.
Code Examples:
>>> eyeBall_node = "EyeBall_Inner"
>>> pupil_node = "Pupil"
>>> createEyePupilRig(eyeBall_node, pupil_node)
# Sets up the pupil rig for the specified eye ball and pupil nodes in Maya.

- eMod.createEyeRig_BS(self, eyeBallInner, pupil, reflectLoc, aimLoc)#
[shArgs: ebi=eyeBallInner, p=pupil, rl=reflectLoc, al=aimLoc]
Purpose:
:: Sets up an eye rig in Autodesk Maya using blend shapes and controls for eye aiming and reflection.
This function is used for creating a comprehensive eye rig, incorporating pupil rigging and reflection tracking.
It leverages blend shapes and constraint-based controls to achieve realistic eye movements and reflections.
- Parameters:
eyeBallInner – <str> # The inner eye ball node for the rig setup.
pupil – <str> # The pupil node that will be rigged.
reflectLoc – <str> # Locator for managing eye reflections.
aimLoc – <str> # Locator for controlling the direction of the eye gaze.
- Returns:
None # The function constructs the eye rig but does not return a value.
Code Examples:
>>> eyeBallInner_node = "EyeBall_Inner"
>>> pupil_node = "Pupil"
>>> reflectLoc_node = "ReflectLoc"
>>> aimLoc_node = "AimLoc"
>>> createEyeRig_BS(eyeBallInner_node, pupil_node, reflectLoc_node, aimLoc_node)
# Creates an eye rig with pupil rigging and reflection tracking.
- Flow Chart Description:
This flowchart illustrates the createEyeRig_BS function, which sets up an eye rig in Autodesk Maya using blend shapes and controls for eye aiming and reflection:
Starts the process by defining the function arguments: eyeBallInner, pupil, reflectLoc, and aimLoc.
Checks if the arguments are provided using shArgs. If provided, it updates the variables accordingly.
Calls the createEyePupilRig function from the eMod module to create the eye pupil rig.
Calls the createNode_CPOM function from the eSpec module to create the nodes for controlling eye aiming and reflection.
Calls the as_CreateHierarchy function from eMod to create the hierarchy.
Converts reflectLoc to a Maya node using asNode.
Parents the eyeBallInner, pupil, aimLoc, and reflectLoc under the ‘gCtrls_Grp’ node.
graph TB Start[("fa:fa-play Start")] --> DefineArgs["Define Function Arguments"] DefineArgs --> CheckShArgs["Check for 'shArgs' Dictionary"] CheckShArgs --> UpdateVars["Update Variables if Provided in 'shArgs'"] UpdateVars --> CallCreateEyePupilRig["Call 'createEyePupilRig' Function"] CallCreateEyePupilRig --> CallCreateNodeCPOM["Call 'createNode_CPOM' Function"] CallCreateNodeCPOM --> CallAsCreateHierarchy["Call 'as_CreateHierarchy' Function"] CallAsCreateHierarchy --> ConvertReflectLoc["Convert 'reflectLoc' to Maya Node"] ConvertReflectLoc --> ParentNodes["Parent Nodes under 'gCtrls_Grp'"] style Start fill:#00cc00,stroke:#000,stroke-width:3px style DefineArgs fill:#ffcc00,stroke:#000,stroke-width:2px style CheckShArgs fill:#ff9999,stroke:#000,stroke-width:2px style UpdateVars fill:#99ccff,stroke:#000,stroke-width:2px style CallCreateEyePupilRig fill:#99ccff,stroke:#000,stroke-width:2px style CallCreateNodeCPOM fill:#99ccff,stroke:#000,stroke-width:2px style CallAsCreateHierarchy fill:#99ccff,stroke:#000,stroke-width:2px style ConvertReflectLoc fill:#99ccff,stroke:#000,stroke-width:2px style ParentNodes fill:#99ccff,stroke:#000,stroke-width:2px
- eMod.create_setPose(self)#
[shArgs : spn=spineName]
Purpose:
:: Creates a control to set the pose of a character in Autodesk Maya.
Facilitates the easy setting and adjustment of character poses during animation.
Integrates with spine controls for precise manipulation of character posture.
- Parameters:
spineName – <list> #List containing the names of spine joints or controls.
- Returns:
tuple #Returns a tuple containing the created set pose control and its group.
Code Examples:
>>> spine_joints = ["spine1", "spine2", "spine3"]
>>> set_pose_control, set_pose_group = create_setPose(spine_joints)
# Creates a set pose control for the given spine joints and parents it to the root control.
- eMod.ctrlCurves(self, nam)#
[shArgs : n=name]
Purpose:
:: Creates control curves based on the bounding box of selected objects in Autodesk Maya.
Generates custom control curves that match the size and position of the selected objects.
Useful for creating intuitive and appropriately sized controls in rigging and animation setups.
- Parameters:
name – <str> # Name for the newly created control curves.
- Returns:
None # This function does not return a value but creates control curves in the scene.
Code Examples:
>>> object_name = "ControlCurve1"
>>> ctrlCurves(object_name)
# Creates a control curve named "ControlCurve1" based on the bounding box of the selected object.
- eMod.getAimTo(self, selList=None)#
[shArgs : sl=selList]
Purpose:
:: Aligns a selected control handle to a specified target vertex or edge in Autodesk Maya.
Facilitates precise alignment of control handles to specific parts of a mesh, enhancing rigging accuracy.
Automates the orientation and positioning process for rigging, especially in facial rigging scenarios.
- Parameters:
selList – <list> # List of selected objects, typically including a control handle and a target vertex or edge.
- Returns:
None # This function does not return a value but modifies the position and rotation of the control handle.
Code Examples:
>>> getAimTo()
# Aligns the selected control handle to the target vertex or edge.
- eMod.getFrameCtrl_FaceRig(self, expName1='Wide', expName2='Close', trgtNode=None, attrList=None)#
[shArgs : en1=expName1, en2=expName2, tn=trgtNode, al=attrList]
Purpose:
:: Creates a facial rig control with an adjustable frame for facial expressions in Autodesk Maya.
Enables animators to manipulate facial expressions using a custom control interface.
Integrates with existing facial rig systems, providing a user-friendly and versatile tool for facial animation.
- Parameters:
expName1 – <str> # The first expression name to be associated with the control.
expName2 – <str> # The second expression name to be associated with the control.
trgtNode – <str/None> # The target node to which the control will be connected.
attrList – <list/None> # A list of attributes on the target node to be controlled by the frame control.
- attrList =[‘R_eyeUpLid_expressions.R_MainUpperEye_Wide_bld’, ‘L_eyeUpLid_expressions.L_MainUpperEye_Wide_bld’,
‘R_eyeUpLid_expressions.R_MainUpperEye_Squint_bld’, ‘L_eyeUpLid_expressions.L_MainUpperEye_Squint_bld’]
- Returns:
None # This function does not return a value but creates a control interface for facial rigging.
Code Examples:
>>> getFrameCtrl_FaceRig(expName1='Wide', expName2='Close', trgtNode='Head_Ctrl', attrList=['eye_blink_attr', 'mouth_open_attr'])
# Creates a facial rig control for 'Wide' and 'Close' expressions, targeting the 'Head_Ctrl' node with specified attributes.
- eMod.getPosLocators(self, makeChild=1, snapRot=0, hideLoc=1, oppAxis=None)#
[shArgs : mc=makeChild, sr=snapRot, hl=hideLoc, oa=oppAxis]
Purpose:
:: Generates locators at the positions of selected objects in Autodesk Maya, with optional settings for parenting, rotation, and visibility.
Useful for creating reference points or pivot locators based on the position of existing objects.
Provides options for parenting locators to the objects, matching rotation, and hiding locators for cleaner scene management.
- Parameters:
makeChild – <int> # If set to 1, the locator becomes a child of the object.
snapRot – <int> # If set to 1, the locator snaps to the object’s rotation.
hideLoc – <int> # If set to 1, the locator is hidden in the scene.
oppAxis – <str/None> # Optional axis for mirroring the position of locators. If None, no mirroring is applied.
- Returns:
<list> # A list of created locators.
Code Examples:
>>> getPosLocators(makeChild=1, snapRot=0, hideLoc=1, oppAxis='x')
# Creates locators at the positions of selected objects, makes them children of the objects, without snapping rotation, hides locators, and mirrors positions along the x-axis.
- eMod.getSliderCtrl_FaceRig(self, expName='Laugh')#
[shArgs : en=expName]
Purpose:
:: Creates a slider control for facial expressions in Autodesk Maya, enhancing facial rig interactivity.
Provides a user-friendly interface for animators to adjust facial expressions using a simple slider control.
Customizable to fit various facial rig setups, enabling a wide range of expression adjustments.
- Parameters:
expName – <str> # Name of the expression associated with the slider control.
- Returns:
<PyNode> # Returns the created slider control PyNode object.
Code Examples:
>>> slider_ctrl = getSliderCtrl_FaceRig(expName='Smile')
# Creates a slider control for the 'Smile' expression and returns the control object.
- eMod.resetGlobalCtrlGrp(self)#
[shArgs : None]
Purpose:
:: Resets the global control group in an Autodesk Maya scene, ensuring its transform values are zeroed out and disconnected from any influences.
This function is useful for cleaning up the rigging setup and ensuring the global control group is in its default state.
It also sets display types and applies specific control colors for better visual clarity in the scene.
- Returns:
A message indicating the successful reset of the “Global_Ctrl_Grp”.
Code Examples:
>>> resetGlobalCtrlGrp()
# This will reset the global control group in the Maya scene, ensuring its scale is disconnected and identity transformations are applied.
- Flow Chart Description:
This flowchart illustrates the resetGlobalCtrlGrp function:
Starts the process by defining the global control and placement control nodes.
Checks for the existence of the ‘Global_Ctrl’ or ‘Global_Control’ node.
If found, assigns the global control node to the ‘worldCtrl’ variable.
Assigns the ‘Placement_Ctrl’ node to the ‘placementCtrl’ variable.
Sets the ‘worldCtrlGrp’ variable to ‘Global_Control_Grp’.
Checks if there is a connection to the scale attribute of ‘worldCtrlGrp’.
If there is a connection, disconnects it.
Selects the ‘worldCtrlGrp’.
Applies the identity transformations (scale, rotation, translation) to zero out its transform values.
Sets the display type of ‘worldCtrl’ and ‘placementCtrl’ to 0 (normal).
Applies control colors to ‘worldCtrl’ and ‘placementCtrl’ for visual clarity.
Displays a success message indicating the reset of “Global_Ctrl_Grp”.
graph TB Start[("fa:fa-play Start")] --> DefineNodes["Define 'worldCtrl' and 'placementCtrl'"] DefineNodes --> CheckGlobalCtrl["Check for 'Global_Ctrl' or 'Global_Control'"] CheckGlobalCtrl --> AssignWorldCtrl["Assign 'Global_Ctrl' or 'Global_Control' to 'worldCtrl'"] AssignWorldCtrl --> AssignPlacementCtrl["Assign 'Placement_Ctrl' to 'placementCtrl'"] AssignPlacementCtrl --> AssignWorldCtrlGrp["Set 'worldCtrlGrp' to 'Global_Control_Grp'"] AssignWorldCtrlGrp --> CheckScaleConnection["Check for Scale Attribute Connection"] CheckScaleConnection --> DisconnectScale["Disconnect Scale Attribute"] DisconnectScale --> SelectWorldCtrlGrp["Select 'Global_Control_Grp'"] SelectWorldCtrlGrp --> ApplyIdentity["Apply Identity Transformations"] ApplyIdentity --> SetDisplayType["Set Display Type to 0 (Normal)"] SetDisplayType --> ApplyCtrlColors["Apply Control Colors"] ApplyCtrlColors --> DisplaySuccess["Display Success Message"] style Start fill:#00cc00,stroke:#000,stroke-width:3px style DefineNodes fill:#ffcc00,stroke:#000,stroke-width:2px style CheckGlobalCtrl fill:#ff9999,stroke:#000,stroke-width:2px style AssignWorldCtrl fill:#99ccff,stroke:#000,stroke-width:2px style AssignPlacementCtrl fill:#cc99ff,stroke:#000,stroke-width:2px style AssignWorldCtrlGrp fill:#99ccff,stroke:#000,stroke-width:2px style CheckScaleConnection fill:#ff9999,stroke:#000,stroke-width:2px style DisconnectScale fill:#ff6666,stroke:#000,stroke-width:2px style SelectWorldCtrlGrp fill:#99ccff,stroke:#000,stroke-width:2px style ApplyIdentity fill:#99ccff,stroke:#000,stroke-width:2px style SetDisplayType fill:#99ccff,stroke:#000,stroke-width:2px style ApplyCtrlColors fill:#99ccff,stroke:#000,stroke-width:2px style DisplaySuccess fill:#00cc00,stroke:#000,stroke-width:3px
- eMod.snapFromRefVtx(self, refVtx, excludeList, snappedList, finalList, allVtxList, targetMesh)#
- eMod.snapIt(self, src, trgt)#
[shArgs : s=src, t=trgt]
Purpose:
:: Aligns the position of one object (source) to another object (target) in Autodesk Maya.
Useful for precisely aligning objects in 3D space, ensuring exact spatial correspondence.
Typically employed in rigging and animation tasks where accurate object positioning is crucial.
Function Operations:
Calculates the world space position of the target object.
Adjusts the source object’s position to match the target’s, considering their respective pivot points.
- Parameters:
src – <str> # Name of the source object to be aligned.
trgt – <str> # Name of the target object to align to.
- Returns:
None # The function performs an action and does not return a value.
Code Examples:
>>> source_object = "pCube1"
>>> target_object = "pSphere1"
>>> snapIt(source_object, target_object)
# Snaps the position of 'pCube1' to align with the position of 'pSphere1'.
- eMod.snapNearest_Vtx2Vtx(self)#
- eMod.snapTo_VtxIDs(self)#
- eMod.snapVtx2Vtx_InvertCBS(self)#
- eMod.splineCtrl(self, ctrlName, ctrlType, sizeCtrl=1, ctrlShape='Circle')#
[shArgs : cn=ctrlName, ct=ctrlType, sz=sizeCtrl, cs=ctrlShape]
Purpose:
:: Creates a control object in Autodesk Maya with various shape and size options.
Enables custom control creation for rigging and animation tasks.
Provides flexibility in control shapes and scaling for diverse rigging needs.
Function Operations:
Supports multiple control shapes like Circle, Snake, Gold Ring, Star, One Pin, Arrow Head.
Allows scaling and grouping of the control for different rigging requirements.
- Parameters:
ctrlName – <str> # Name of the control to be created.
ctrlType – <str> # Type of control, e.g., ‘Grouped’ for grouping the control.
sizeCtrl – <float> # Scale factor for the control’s size.
ctrlShape – <str> # Shape of the control, e.g., ‘Circle’, ‘Snake’, etc.
- Returns:
<str> # Returns the name of the created control or its group.
Code Examples:
>>> control_name = "myControl"
>>> control_type = "Grouped"
>>> control_size = 2.0
>>> control_shape = "Circle"
>>> created_control = splineCtrl(control_name, control_type, control_size, control_shape)
# Creates a grouped circle control with the specified name and scale.
- eMod.tree_AttachBranches(self, mainBranch=None, subBranches=None, locList=None)#
[shArgs : mb=mainBranch, sb=subBranches, ll=locList]
Purpose:
:: Attaches sub-branches to a main branch at specified locations in Autodesk Maya.
Enables dynamic creation of complex tree structures by attaching smaller branches to a main branch.
Utilizes locators to define the attachment points for sub-branches, providing precision and control.
- Parameters:
mainBranch – <str/None, optional> # The main branch to which sub-branches are attached. If None, it’s derived from the selected objects.
subBranches – <list/None, optional> # List of sub-branches to attach. If None, selected mesh objects are used.
locList – <list/None, optional> # List of locators defining attachment points. If None, selected locators are used.
- Returns:
None # This function does not return a value but modifies the scene by attaching branches.
Code Examples:
>>> main_branch = "MainBranch"
>>> sub_branches = ["Branch1", "Branch2", "Branch3"]
>>> locators = ["Loc1", "Loc2", "Loc3"]
>>> tree_AttachBranches(mainBranch=main_branch, subBranches=sub_branches, locList=locators)
# Attaches "Branch1", "Branch2", and "Branch3" to "MainBranch" at the positions of "Loc1", "Loc2", and "Loc3".
- eMod.tree_CreateRig(jnt=None, numCtrls=5, srcMesh=None, trgtPrefix='Ex_', joinUpstream=True)#
[shArgs : j=jnt, nC=numCtrls, sM=srcMesh, tP=trgtPrefix, jU=joinUpstream]
Purpose:
:: Automates the rigging process for tree branches or similar structures in Autodesk Maya.
Facilitates easy animation of trees or branches with customizable rigging options.
Supports integration with existing tree models and meshes for enhanced realism.
- Parameters:
jnt – <str/None, optional> # Root joint of the branch to be rigged. If None, rigs selected joints.
numCtrls – <int> # Number of controls to create along the branch.
srcMesh – <str/None, optional> # Mesh used for skinning the branch. If None, uses the default mesh.
trgtPrefix – <str> # Prefix for naming the generated joints and related nodes.
joinUpstream – <bool> # If True, connects the rigged branch to its parent joint.
- Returns:
None # This function does not return a value but creates a rig for branches.
Code Examples:
>>> tree_CreateRig(jnt='MainBranch', numCtrls=5, srcMesh='TreeBody', trgtPrefix='Branch_', joinUpstream=True)
# This code rigs the 'MainBranch' with 5 controls, skins it to 'TreeBody', and connects it to its parent joint.
- eMod.tree_CreateRig_UI(self)#
- [shArgsstw=as_SpeedTreeWin, hrt=hyperRig_easyTabs, mF=mainFrame2, ikR=ikHandRbg, stR=stretchRbg, om=optionMenu, omI=optAxisDir, ikF=as_InIK,
gC=as_InGlobal, elP=as_ElbowPin_CB, ikPC=as_InIKPoleCtrl, ikC=as_InIKCtrl, swA=as_SwitchAttr_CB, csTF=as_CtrlSwitch_TF]
Purpose:
:: Provides a user interface for creating rig setups in Autodesk Maya, specifically for SpeedTree models.
Offers an intuitive interface for rigging trees and similar structures.
Includes options for stretch and squash, volume preservation, and various control setup tools.
Function Operations:
Creates and manages UI elements like windows, tabs, and controls for rigging.
Supports operations like stretch and squash setup and control switch configuration.
- Returns:
None # This function does not return any value.
Code Examples:
# No specific usage examples as this function primarily handles UI creation.
- eMod.tree_CreateTreeGrowth(self, growthCtrl=None)#
[shArgs : gc=growthCtrl, s1=space01, s2=space02, s3=space03, lg=leafGrps, sg=stemGeo, lgN=leafGrp, lf=leafs, bS=bShape, bsA=bsAttr]
Purpose:
:: Automates the process of creating growth animations for tree models in Autodesk Maya.
Allows for realistic and customizable tree growth animations.
Utilizes mesh space checking to determine growth levels for branches and leaves.
Function Operations:
Checks for the presence of a growth control node and sets default if absent.
Iterates through leaf groups to apply growth settings based on their spatial relationship to defined spaces.
- Parameters:
growthCtrl – <str, optional> # The control node driving the tree’s growth animation. Defaults to ‘Global_Control’ if not provided.
- Returns:
None # This function does not return any value but updates the tree model with growth animation.
Code Examples:
# Example to automate tree growth animation
tree_CreateTreeGrowth(growthCtrl='Global_Growth_Control')
# This applies growth settings to a tree model using 'Global_Growth_Control'.