
EasyBird#
- EasyBird.__aboutEasyBird(self)#
- EasyBird.__confirmAction(self, action)#
- EasyBird.__init__(self)#
as_EasyBirdMain_v2.5
About :#
Author: (Subbaiah) Subbu Addanki Character Supervisor (Rigging) & Programmer
Visit :#
Contact :#
Mail Id: subbu.add@gmail.com Mobile No: +91-9741454400 / +91-9949005359
Copyright (c) as_EasyBirdMain :#
** (Subbaiah) Subbu Addanki. All Rights Reserved. **
- EasyBird._check4Author(self)#
- EasyBird._compileEasyBird(self, userFolder='$_Free_asEB')#
- EasyBird._mayaVer(self)#
- EasyBird.addSelection_nextVar(self, textFld='as_FeatherNextVar_TF', multiSelect=False)#
[shArgs : tf=textFld, ms=multiSelect]
Purpose:
:: Adds the name of the selected object(s) to a specified text field in Autodesk Maya, supporting single and multi-object selection.
Facilitates the process of inputting object names into UI fields, especially useful in character rigging and animation setups.
Automatically updates the text field with the next logical name variant of the selected object.
The function can handle both single and multiple object selections, updating the text field accordingly.
- Parameters:
textFld – <str> # The name of the text field to which the object name will be added.
multiSelect – <bool> # Flag to determine if multiple objects are selected; True for multi-selection, False for single selection.
- Returns:
None # This function does not return a value but updates a UI text field.
Code Examples:
>>> # Example for single object selection:
>>> addSelection_nextVar(textFld='objectNameField', multiSelect=False)
# Updates 'objectNameField' with the name of the selected object.

>>> # Example for multiple objects selection:
>>> addSelection_nextVar(textFld='objectNameField', multiSelect=True)
# Updates 'objectNameField' with the names of all selected objects.
Usage:
obj10           # Adds 'obj10' While pressing Enter.. <== button
box25           # Adds 'box25' While pressing Enter.. <== button
graph TB Start[("fa:fa-play Start")] --> CheckSelection{"/fas:fa-mouse-pointer Check Object Selection"} CheckSelection --"If Objects are Selected"--> UpdateTextField["/fas:fa-pen Update Text Field"] CheckSelection --"If No Objects are Selected"--> ClearTextField["/fas:fa-eraser Clear Text Field"] UpdateTextField --> End["/fas:fa-stop End"] ClearTextField --> End style Start fill:#00cc00,stroke:#000,stroke-width:3px style CheckSelection fill:#ffcc99,stroke:#000,stroke-width:2px style UpdateTextField fill:#99ccff,stroke:#000,stroke-width:2px style ClearTextField fill:#ff9999,stroke:#000,stroke-width:2px style End fill:#ff6666,stroke:#000,stroke-width:3px- Flow Chart Description:
This flowchart illustrates the addSelection_nextVar function:
The process begins by checking if any objects are selected in Autodesk Maya.
If objects are selected, the function updates the specified text field with the next logical name variant of the selected object(s).
If no objects are selected, the function clears the text field.
The function ends after updating or clearing the text field.
- EasyBird.add_ComponentNum(self, intFld)#
[shArgs : ifg=intFld]
Purpose:
:: Extracts the component number from a selected Maya component (like a vertex or edge) and inputs it into a specified UI integer field or text field.
Useful for rigging and modeling operations where specific component numbers need to be referenced or manipulated.
Automatically extracts the number from the selected component’s name and updates the specified UI field.
Supports both integer field groups and text fields for input.
- Parameters:
intFld – <str> # The name of the integer field group or text field where the component number will be inputted.
- Returns:
<int> # Returns the extracted component number from the selected Maya component.
Code Examples:
>>> # Example with a selected vertex:
>>> add_ComponentNum(intFld='vertexNumberField')
# Extracts the vertex number from the selected vertex and updates 'vertexNumberField'.

>>> # Example with a selected edge:
>>> add_ComponentNum(intFld='edgeNumberField')
# Extracts the edge number from the selected edge and updates 'edgeNumberField'.
Usage:
obj.vtx[105]  # Adds 105 While pressing Enter.. <== button
obj.e[206]      # Adds 206 While pressing Enter.. <== button
graph TB Start[("fa:fa-play Start")] --> CheckSelection{"/fas:fa-mouse-pointer Check Component Selection"} CheckSelection --"If Component is Selected"--> ExtractNumber["/fas:fa-pen Extract Component Number"] CheckSelection --"If No Component is Selected"--> ClearField["/fas:fa-eraser Clear Field"] ExtractNumber --> UpdateField["/fas:fa-pencil-alt Update Field"] ClearField --> End["/fas:fa-stop End"] UpdateField --> End style Start fill:#00cc00,stroke:#000,stroke-width:3px style CheckSelection fill:#ffcc99,stroke:#000,stroke-width:2px style ExtractNumber fill:#99ccff,stroke:#000,stroke-width:2px style ClearField fill:#ff9999,stroke:#000,stroke-width:2px style UpdateField fill:#ccffcc,stroke:#000,stroke-width:2px style End fill:#ff6666,stroke:#000,stroke-width:3px- Flow Chart Description:
This flowchart illustrates the add_ComponentNum function:
The process begins by checking if a Maya component (like a vertex or edge) is selected.
If a component is selected, the function extracts the component number from its name.
The extracted number is then used to update the specified integer field or text field.
If no component is selected, the function clears the specified field.
The function ends after updating or clearing the field.
- EasyBird.add_FeatherGrps(self, grpLevel=None)#
[shArgs : gl=grpLevel, fhs=featherHasSiblings]
Purpose:
:: Adds a specified number of group levels to selected feather objects in Maya.
Designed to organize feather objects by grouping them, enhancing scene management.
Can handle both single and multiple feather objects, adapting to the presence of sibling feather parts.
- Parameters:
grpLevel – <int> # Number of group levels to add to each feather object.
featherHasSiblings – <bool> # Indicates if the feather object has sibling parts.
- Returns:
None # This function does not return a value but restructures the hierarchy of the selected feather objects in Maya.
Code Examples:
# To add two group levels to the selected feathers where the feathers have sibling parts:
>>> add_FeatherGrps(grpLevel=2)
graph TB Start[("fa:fa-play Start")] --> CheckGrpLevel CheckGrpLevel{{"/fas:fa-question-circle Check Group Level"}} --> GetGrpLevelFromUI GetGrpLevelFromUI["/fas:fa-wrench Get Group Level from UI"] --> CheckFeatherSiblings CheckFeatherSiblings{{"/fas:fa-check-square Check if Feather Has Siblings"}} --> InitializeFeatherList InitializeFeatherList["/fas:fa-list-ol Initialize Feather List"] --> ShowProgressStart ShowProgressStart["/fas:fa-spinner Show Progress Start"] --> ForEachFeather ForEachFeather["/fas:fa-repeat For Each Feather"] --> AddGroupLevels AddGroupLevels["/fas:fa-object-group Add Group Levels"] --> CheckSiblingFeathers CheckSiblingFeathers{{"/fas:fa-question-circle Check Sibling Feathers"}} --> ReparentSiblings ReparentSiblings["/fas:fa-sitemap Reparent Sibling Feathers"] --> ContinueForEachFeather CheckSiblingFeathers --"If No Sibling Feathers"--> ContinueForEachFeather ContinueForEachFeather["/fas:fa-arrow-right Continue For Each Feather"] --> ForEachFeather ForEachFeather --"End of Feather List"--> ShowProgressEnd ShowProgressEnd["/fas:fa-check-circle Show Progress End"] --> SelectFeathers SelectFeathers["/fas:fa-mouse-pointer Select Feathers"] --> End[("fas:fa-stop End")] style Start fill:#00cc00,stroke:#000,stroke-width:3px style CheckGrpLevel fill:#ffcc00,stroke:#000,stroke-width:2px style GetGrpLevelFromUI fill:#99ccff,stroke:#000,stroke-width:2px style CheckFeatherSiblings fill:#ffcc99,stroke:#000,stroke-width:2px style InitializeFeatherList fill:#cc99ff,stroke:#000,stroke-width:2px style ShowProgressStart fill:#99ff99,stroke:#000,stroke-width:2px style ForEachFeather fill:#ffcc00,stroke:#000,stroke-width:2px style AddGroupLevels fill:#ff9999,stroke:#000,stroke-width:2px style CheckSiblingFeathers fill:#ff6666,stroke:#000,stroke-width:2px style ReparentSiblings fill:#99ccff,stroke:#000,stroke-width:2px style ContinueForEachFeather fill:#cc99ff,stroke:#000,stroke-width:2px style ShowProgressEnd fill:#99ff99,stroke:#000,stroke-width:2px style SelectFeathers fill:#cc99ff,stroke:#000,stroke-width:2px style End fill:#ff6666,stroke:#000,stroke-width:3px :Flow Chart Description: This flowchart illustrates the **add_FeatherGrps** function: #. The function begins by checking if the group level is provided. If not, it retrieves the group level from the user interface. #. It then checks if the feathers have siblings, which affects how they are grouped. #. The feather list is initialized based on the selected objects and sibling information. #. A progress indicator is shown, and for each feather in the list: - Group levels are added to organize the feathers. - If feathers have siblings, their siblings are appropriately reparented. #. After processing all feathers, the progress indicator is closed. #. Finally, all processed feathers are selected, and the function concludes.
- EasyBird.add_FeatherGrps02(self)#
- EasyBird.add_Prefix(self, txtFldName)#
[shArgs : tfn=txtFldName]
Purpose:
:: Extracts the prefix from the name of a selected Maya object and inputs it into a specified UI text field.
Ideal for automating repetitive tasks in Maya that involve working with object names and their prefixes.
Simplifies the process of retrieving and using prefixes from object names for various rigging or modeling operations.
Supports updating a specified UI text field with the extracted prefix.
- Parameters:
txtFldName – <str> # The name of the text field where the object’s prefix will be inputted.
- Returns:
None # This function does not return any value but updates the UI text field with the extracted prefix.
Code Examples:
>>> add_Prefix(txtFldName='objectPrefixField')
# Extracts the prefix from the selected object's name and updates 'objectPrefixField'.
Usage:
Left_Hand               # Adds 'Left_' While pressing Enter.. <== button
Hand                    # Adds '' While pressing Enter.. <== button
graph TB Start[("fa:fa-play Start")] --> CheckSelection{"/fas:fa-mouse-pointer Check Object Selection"} CheckSelection --"If Object is Selected"--> ExtractPrefix["/fas:fa-pen Extract Prefix"] CheckSelection --"If No Object is Selected"--> ClearField["/fas:fa-eraser Clear Field"] ExtractPrefix --> UpdateField["/fas:fa-pencil-alt Update Field"] ClearField --> End["/fas:fa-stop End"] UpdateField --> End style Start fill:#00cc00,stroke:#000,stroke-width:3px style CheckSelection fill:#ffcc99,stroke:#000,stroke-width:2px style ExtractPrefix fill:#99ccff,stroke:#000,stroke-width:2px style ClearField fill:#ff9999,stroke:#000,stroke-width:2px style UpdateField fill:#ccffcc,stroke:#000,stroke-width:2px style End fill:#ff6666,stroke:#000,stroke-width:3px- Flow Chart Description:
This flowchart illustrates the add_Prefix function:
The process begins by checking if a Maya object is selected.
If an object is selected, the function extracts the prefix from its name.
The extracted prefix is then used to update the specified text field.
If no object is selected, the function clears the specified text field.
The function ends after updating or clearing the text field.
- EasyBird.add_Selection(self, textFld, multiSelect=False)#
[shArgs : tf=textFld, ms=multiSelect]
Purpose:
:: Adds the name of the selected Maya object(s) to a specified UI text field.
Useful for quickly transferring selected object names into user interfaces or scripts within Maya.
Can handle multiple selections, appending each selected object’s name to the text field.
Streamlines workflows involving the selection and naming of objects in Maya.
- Parameters:
textFld – <str> # The name of the text field where the object’s name will be inputted.
multiSelect – <bool> # Indicates whether multiple object names should be concatenated and added to the text field.
- Returns:
None # This function does not return any value but updates the UI text field with the selected object name(s).
Code Examples:
>>> add_Selection(textFld='objectNameField', multiSelect=True)
# Adds names of all selected objects to 'objectNameField'.

>>> add_Selection(textFld='singleObjectNameField', multiSelect=False)
# Adds the name of the first selected object to 'singleObjectNameField'.
Usage:
obj10           # Adds 'obj10' While pressing Enter.. <== button
box25           # Adds 'box25' While pressing Enter.. <== button
graph TB Start[("fa:fa-play Start")] --> CheckSelection{"/fas:fa-mouse-pointer Check Object Selection"} CheckSelection --"If Objects are Selected"--> DetermineSelectionType{"/fas:fa-list-ul Determine Selection Type"} CheckSelection --"If No Objects are Selected"--> ClearField["/fas:fa-eraser Clear Field"] DetermineSelectionType --"If Multi-Select is True"--> ConcatenateNames["/fas:fa-stream Concatenate Object Names"] DetermineSelectionType --"If Multi-Select is False"--> AddSingleName["/fas:fa-plus-circle Add Single Object Name"] ConcatenateNames --> UpdateField["/fas:fa-pencil-alt Update Field"] AddSingleName --> UpdateField ClearField --> End["/fas:fa-stop End"] UpdateField --> End style Start fill:#00cc00,stroke:#000,stroke-width:3px style CheckSelection fill:#ffcc99,stroke:#000,stroke-width:2px style DetermineSelectionType fill:#99ccff,stroke:#000,stroke-width:2px style ConcatenateNames fill:#ccffcc,stroke:#000,stroke-width:2px style AddSingleName fill:#cc99ff,stroke:#000,stroke-width:2px style UpdateField fill:#ff9999,stroke:#000,stroke-width:2px style ClearField fill:#99ff99,stroke:#000,stroke-width:2px style End fill:#ff6666,stroke:#000,stroke-width:3px- Flow Chart Description:
This flowchart illustrates the add_Selection function:
The process starts by checking if objects are selected in Maya.
If objects are selected, it determines if multiple selections are allowed.
If multiple selections are allowed, it concatenates the names of all selected objects.
If only a single selection is allowed, it adds the name of the first selected object.
The selected object names are then added to the specified text field.
If no objects are selected, the function clears the specified text field.
The process ends after updating or clearing the text field.
- EasyBird.add_Selection_FeathersSetup(self, textFld, multiSelect=False)#
[shArgs : tf=textFld, ms=multiSelect]
Purpose:
- :: Adds the names of selected objects or their associated position locators to a text field in Maya.
This function is tailored for feather rigging setups, allowing quick input of feather or locator names into GUI fields.
Facilitates the process of selecting feathers or their position locators and transferring their names directly into user interfaces.
Supports both individual and multiple selections, enhancing its utility in rigging and setup tasks for feathers.
- Parameters:
textFld – <str> # The name of the text field where the object or locator name(s) will be added.
multiSelect – <bool> # If True, allows multiple selections to be concatenated into the text field.
- Returns:
None # This function does not return a value but updates the specified text field with selected object or locator names.
Code Examples:
# To add a single selected feather or locator name to a text field:
>>> add_Selection_FeathersSetup(textFld='myTextField')

# To add multiple selected feather or locator names to a text field:
>>> add_Selection_FeathersSetup(textFld='myTextField', multiSelect=True)
graph TB Start[("fa:fa-play Start")] --> CheckShArgs{"/fas:fa-question-circle Check shArgs"} CheckShArgs --"If shArgs Exist"--> ParseShArgs["/fas:fa-cogs Parse shArgs"] CheckShArgs --"If shArgs Does Not Exist"--> InitializeParameters["/fas:fa-wrench Initialize Parameters"] InitializeParameters --> GetSelectedObjects{"/fas:fa-check-square Get Selected Objects"} GetSelectedObjects --"For Each Selected Object"--> CheckObjectType{"/fas:fa-question-circle Check Object Type"} CheckObjectType --"If Object is Mesh"--> CheckMeshLocator{"/fas:fa-question-circle Check Mesh Locator"} CheckObjectType --"If Object is Not Mesh"--> UpdateTextField["/fas:fa-arrow-right Update Text Field"] CheckMeshLocator --"If Mesh Locator Exists"--> UpdateTextField CheckMeshLocator --"If Mesh Locator Does Not Exist"--> UpdateTextField UpdateTextField --> End["/fas:fa-stop End"] style Start fill:#00cc00,stroke:#000,stroke-width:3px style CheckShArgs fill:#ffcc00,stroke:#000,stroke-width:2px style ParseShArgs fill:#ff9999,stroke:#000,stroke-width:2px style InitializeParameters fill:#99ccff,stroke:#000,stroke-width:2px style GetSelectedObjects fill:#cc99ff,stroke:#000,stroke-width:2px style CheckObjectType fill:#99ff99,stroke:#000,stroke-width:2px style CheckMeshLocator fill:#ffcc99,stroke:#000,stroke-width:2px style UpdateTextField fill:#99ff99,stroke:#000,stroke-width:2px style End fill:#ff6666,stroke:#000,stroke-width:3px- Flow Chart Description:
This flowchart illustrates the add_Selection_FeathersSetup function:
Checks if shArgs exist, and if so, parses the textFld and multiSelect parameters from it.
If shArgs do not exist, initializes parameters with default values.
Retrieves a list of selected objects.
- For each selected object:
Checks the type of the object.
- If the object is a mesh:
Checks if its associated position locator exists.
Updates the text field with the locator name if found, otherwise updates with the object name.
If the object is not a mesh, updates the text field with the object name.
Ends the process.
- EasyBird.add_Selection_VtxList(self, textFld, multiSelect=False)#
[shArgs : tf=textFld, ms=multiSelect]
Purpose:
:: Adds a list of selected vertices to a text field in Maya, supporting both single and multiple selections.
Useful for inputting vertex selections directly into GUI fields, streamlining workflows in modeling and rigging.
Can handle both individual and multiple vertex selections, providing flexibility in various use cases.
- Parameters:
textFld – <str> # The name of the text field where the vertex list will be added.
multiSelect – <bool> # Indicates whether multiple vertex selections should be concatenated into the text field.
- Returns:
None # This function does not return a value but updates the specified text field with the selected vertex list.
Code Examples:
# To add a single selected vertex to a text field:
>>> add_Selection_VtxList(textFld='myTextField')

# To add multiple selected vertices to a text field:
>>> add_Selection_VtxList(textFld='myTextField', multiSelect=True)
graph TB Start[("fa:fa-play Start")] --> CheckSelection{"/fas:fa-mouse-pointer Check Vertex Selection"} CheckSelection --"If Vertex is Selected"--> DetermineSelectionType{"/fas:fa-list-ul Determine Selection Type"} CheckSelection --"If No Vertex is Selected"--> ClearField["/fas:fa-eraser Clear Field"] DetermineSelectionType --"If Multi-Select is True"--> ConcatenateVertices["/fas:fa-stream Concatenate Vertex List"] DetermineSelectionType --"If Multi-Select is False"--> AddSingleVertex["/fas:fa-plus-circle Add Single Vertex"] ConcatenateVertices --> UpdateField["/fas:fa-pencil-alt Update Field"] AddSingleVertex --> UpdateField ClearField --> End["/fas:fa-stop End"] UpdateField --> End style Start fill:#00cc00,stroke:#000,stroke-width:3px style CheckSelection fill:#ffcc99,stroke:#000,stroke-width:2px style DetermineSelectionType fill:#99ccff,stroke:#000,stroke-width:2px style ConcatenateVertices fill:#ccffcc,stroke:#000,stroke-width:2px style AddSingleVertex fill:#cc99ff,stroke:#000,stroke-width:2px style UpdateField fill:#ff9999,stroke:#000,stroke-width:2px style ClearField fill:#99ff99,stroke:#000,stroke-width:2px style End fill:#ff6666,stroke:#000,stroke-width:3px :Flow Chart Description: This flowchart illustrates the **add_Selection_VtxList** function: #. The process starts by checking if vertices are selected in Maya. #. If vertices are selected, it determines if multiple selections are allowed. #. If multiple selections are allowed, it concatenates the names of all selected vertices. #. If only a single selection is allowed, it adds the name of the first selected vertex. #. The selected vertex names are then added to the specified text field. #. If no vertices are selected, the function clears the specified text field. #. The process ends after updating or clearing the text field.
- EasyBird.adjustCloseToObj(self, srcObj=None, srcDistObj=None, trgtObjOrPos=None, stepVal=0.001, action='scale', rotateDir='ry')#
[shArgs : so=srcObj, sdo=srcDistObj, top=trgtObjOrPos, sv=stepVal, act=action, rd=rotateDir]
Purpose:
:: Adjusts the scale or rotation of a source object to bring it closer to a target object or position.
Useful in rigging and animation, where precise control over the distance between objects is required.
Allows for dynamic adjustments based on initial and ongoing distance measurements.
- Parameters:
srcObj – <PyNode> # The source object to be scaled or rotated.
srcDistObj – <PyNode> # The object used to measure distance from the source to the target.
trgtObjOrPos – <PyNode/sequence> # The target object or position to which the source object is being adjusted.
stepVal – <float> # The incremental value for scaling or rotating the source object.
action – <str> # The action to perform (‘scale’ or ‘rotate’).
rotateDir – <str> # The rotation direction (e.g., ‘ry’) for the rotate action.
- Returns:
None # This function does not return a value but modifies the source object’s scale or rotation.
Code Examples:
# To scale an object closer to a target position:
>>> adjustCloseToObj(srcObj='myObject', trgtObjOrPos=[1,2,3], stepVal=0.001, action='scale')

# To rotate an object closer to another object:
>>> adjustCloseToObj(srcObj='myObject', srcDistObj='myDistanceObj', trgtObjOrPos='targetObject', stepVal=5, action='rotate', rotateDir='ry')
graph TB Start[("fa:fa-play Start")] --> CheckShArgs{"/fas:fa-question-circle Check shArgs"} CheckShArgs --"If shArgs Exist"--> ParseShArgs["/fas:fa-cogs Parse shArgs"] CheckShArgs --"If shArgs Does Not Exist"--> InitializeParameters["/fas:fa-wrench Initialize Parameters"] InitializeParameters --> GetSelectedObjects{"/fas:fa-check-square Get Selected Objects"} GetSelectedObjects --"For Each Selected Object"--> CheckObjectTypes{"/fas:fa-question-circle Check Object Types"} CheckObjectTypes --"If Source Object Exists"--> CheckDistanceObject{"/fas:fa-question-circle Check Distance Object"} CheckObjectTypes --"If Source Object Does Not Exist"--> ErrorNoSourceObject["/fas:fa-exclamation-triangle Error: No Source Object Found"] CheckDistanceObject --"If Distance Object Exists"--> AdjustScaleOrRotate{"/fas:fa-cogs Adjust Scale or Rotate"} CheckDistanceObject --"If Distance Object Does Not Exist"--> ErrorNoDistanceObject["/fas:fa-exclamation-triangle Error: No Distance Object Found"] AdjustScaleOrRotate --> End["/fas:fa-stop End"] ErrorNoSourceObject --> End ErrorNoDistanceObject --> End style Start fill:#00cc00,stroke:#000,stroke-width:3px style CheckShArgs fill:#ffcc00,stroke:#000,stroke-width:2px style ParseShArgs fill:#ff9999,stroke:#000,stroke-width:2px style InitializeParameters fill:#99ccff,stroke:#000,stroke-width:2px style GetSelectedObjects fill:#cc99ff,stroke:#000,stroke-width:2px style CheckObjectTypes fill:#99ff99,stroke:#000,stroke-width:2px style CheckDistanceObject fill:#99ff99,stroke:#000,stroke-width:2px style AdjustScaleOrRotate fill:#cc99ff,stroke:#000,stroke-width:2px style ErrorNoSourceObject fill:#ff9999,stroke:#000,stroke-width:2px style ErrorNoDistanceObject fill:#ff9999,stroke:#000,stroke-width:2px style End fill:#ff6666,stroke:#000,stroke-width:3px- Flow Chart Description:
This flowchart illustrates the adjustCloseToObj function:
Checks if shArgs exist, and if so, parses the parameters from it.
If shArgs do not exist, initializes parameters with default values.
Retrieves the selected objects and checks their types.
- If the source object exists:
Checks if the distance object exists.
If the distance object exists, adjusts the scale or rotation of the source object to bring it closer to the target object or position.
If the distance object does not exist, an error is raised.
If the source object does not exist, an error is raised.
Ends the process.
- EasyBird.applyCharPrefix(self)#
[**shArgs : l=label, rm=rigMain]
Purpose:
:: Adds a prefix to all nodes in the hierarchy of a specified rig main node in Maya.
Primarily used in character rigging to organize and differentiate various components of a rig.
Iterates through all child nodes of the given rig main node and renames them with the specified prefix.
- Parameters:
label – <str> # Prefix to be added to the nodes.
rigMain – <asNode> # The main node of the rig whose children will be renamed.
- Returns:
None # This function does not return a value but renames nodes in the hierarchy.
Code Examples:
>>> applyCharPrefix()
# This will add the specified prefix to all nodes in the hierarchy of the rig main node.
graph TB Start[("fa:fa-play Start")] --> GetLabelAndRigMain["/fas:fa-tag Get Label and Rig Main"] GetLabelAndRigMain --> SelectRigMainHierarchy["/fas:fa-sitemap Select Rig Main Hierarchy"] SelectRigMainHierarchy --> IterateNodes{{"/fas:fa-sync-alt Iterate Through Nodes"}} IterateNodes --"For Each Node" --> RenameNode["/fas:fa-i-cursor Rename Node with Prefix"] RenameNode --> CheckNextNode{"/fas:fa-arrow-right Check Next Node"} CheckNextNode --"If More Nodes" --> IterateNodes CheckNextNode --"No More Nodes" --> End[("fas:fa-stop End")] style Start fill:#00cc00,stroke:#000,stroke-width:3px style GetLabelAndRigMain fill:#ffcc00,stroke:#000,stroke-width:2px style SelectRigMainHierarchy fill:#99ccff,stroke:#000,stroke-width:2px style IterateNodes fill:#cc99ff,stroke:#000,stroke-width:2px style RenameNode fill:#99ff99,stroke:#000,stroke-width:2px style CheckNextNode fill:#ffcc00,stroke:#000,stroke-width:2px style End fill:#ff6666,stroke:#000,stroke-width:3px- Flow Chart Description:
This flowchart illustrates the applyCharPrefix function:
The process begins by retrieving the specified label and the rig main node.
It then selects the entire hierarchy of the rig main node.
The function iterates through each node in the hierarchy.
Each node is renamed with the specified prefix added to its name.
The process continues until all nodes in the hierarchy are renamed.
The function ends after all nodes have been processed.
- EasyBird.as_AboutEasyBird(self)#
[shArgs : ]
Purpose:
:: Displays the credits and information about the EasyBird tool, including details about the author and contact information.
Provides a GUI window with information about EasyBird, its author, and related links for further information.
The window is dynamically adjusted based on the Maya version.
Includes functionality to visit the PythonScripting website and close the window.
- Returns:
None # This function does not return a value but displays a window with information about EasyBird.
Code Examples:
>>> as_AboutEasyBird()
# Opens a window displaying credits and information about EasyBird.
- EasyBird.as_ActivateSetPose(self)#
[shArgs : l=label]
Purpose:
:: Activates and sets a pose for selected control objects in Autodesk Maya using an expression command.
Useful for creating reset or default poses for rig controls, allowing animators to quickly return to a base state.
Dynamically generates an expression to reset control attributes to their default values.
- Parameters:
label – <str> # Label used as a prefix to create unique identifiers for the expression command and script nodes.
- Returns:
None # This function does not return any value but creates an expression to set control poses.
Code Examples:
>>> as_ActivateSetPose(label="myCharacter")
# Activates and sets a pose for the selected controls of 'myCharacter' in Maya.
graph TB Start[("fa:fa-play Start")] --> CheckSelection{"/fas:fa-check-circle Check Selection"} CheckSelection --"If Selection Exists"--> InitializeVariables["/fas:fa-sliders-h Initialize Variables"] CheckSelection --"If No Selection"--> DisplayWarning["/fas:fa-exclamation-triangle Display Warning"] InitializeVariables --> CreateExpressionCommand["/fas:fa-code Create Expression Command"] CreateExpressionCommand --> GenerateResetAllProc["/fas:fa-recycle Generate ResetAll Procedure"] GenerateResetAllProc --"For Each Selected Node"--> IterateNodes["/fas:fa-repeat Iterate Through Nodes"] IterateNodes --> SetDefaultAttributes["/fas:fa-sliders-h Set Default Attributes"] SetDefaultAttributes --> AppendToExpression["/fas:fa-pencil-alt Append to Expression"] AppendToExpression --> IterateNodes IterateNodes --"After Last Node"--> CreateScriptNode["/fas:fa-sticky-note Create Script Node"] CreateScriptNode --> OpenExpressionEditor["/fas:fa-edit Open Expression Editor"] DisplayWarning --> End["/fas:fa-stop End"] OpenExpressionEditor --> End style Start fill:#00cc00,stroke:#000,stroke-width:3px style CheckSelection fill:#ffcc99,stroke:#000,stroke-width:2px style InitializeVariables fill:#99ccff,stroke:#000,stroke-width:2px style CreateExpressionCommand fill:#cc99ff,stroke:#000,stroke-width:2px style GenerateResetAllProc fill:#99ff99,stroke:#000,stroke-width:2px style IterateNodes fill:#ffcc99,stroke:#000,stroke-width:2px style SetDefaultAttributes fill:#ccffcc,stroke:#000,stroke-width:2px style AppendToExpression fill:#99ccff,stroke:#000,stroke-width:2px style CreateScriptNode fill:#cc99ff,stroke:#000,stroke-width:2px style OpenExpressionEditor fill:#ffcc99,stroke:#000,stroke-width:2px style DisplayWarning fill:#ff6666,stroke:#000,stroke-width:3px style End fill:#ff6666,stroke:#000,stroke-width:3px- Flow Chart Description:
This flowchart illustrates the as_ActivateSetPose function:
The process starts by checking if any objects are selected.
If no objects are selected, a warning is displayed.
If objects are selected, variables are initialized, including the label.
Creates the expression command based on the label and selected objects.
Generates a “ResetAll” procedure in the expression to reset attributes to default values.
Iterates through each selected node to set its default attributes in the expression.
Appends the attribute reset commands to the expression for each node.
After iterating through all nodes, creates a script node with the generated expression.
Opens the Expression Editor for further adjustments or review.
The process ends after setting up the expression and opening the Expression Editor.
- EasyBird.as_AttachFeather(self)#
[shArgs : el=edgeLoc, zv=zoomView]
Purpose:
:: Attaches a feather to the specified location on an edge of a mesh.
- Parameters:
edgeLoc – (<float>) # The location along the edge where the feather should be attached.
zoomView – (<bool>) # Indicates whether to zoom in the view after attaching the feather.
- Returns:
None
Code Examples:
>>> EasyBird.as_AttachFeather()
graph TD Start[("fa:fa-play Start")] --> CheckShArgs{"/fas:fa-question-circle Check shArgs"} CheckShArgs --"If shArgs Exist"--> ParseShArgs["/fas:fa-cogs Parse shArgs"] CheckShArgs --"If shArgs Does Not Exist"--> GetEdgeLocZoomView["/fas:fa-mouse-pointer Get Edge Location, Zoom View"] GetEdgeLocZoomView --> AttachFeather["/fas:fa-magic Attach Feather"] ParseShArgs --> AttachFeather AttachFeather --> End["/fas:fa-stop End"] End --> RefreshView["/fas:fa-eye Refresh View"] style Start fill:#00cc00,stroke:#000,stroke-width:3px style CheckShArgs fill:#ffcc00,stroke:#000,stroke-width:2px style ParseShArgs fill:#ffcc00,stroke:#000,stroke-width:2px style GetEdgeLocZoomView fill:#ffcc00,stroke:#000,stroke-width:2px style AttachFeather fill:#ffcc00,stroke:#000,stroke-width:2px style End fill:#ff6666,stroke:#000,stroke-width:3px style RefreshView fill:#00cc00,stroke:#000,stroke-width:3px- Flow Chart Description:
This flowchart illustrates the as_AttachFeather function:
Checks if shArgs exist, and if so, parses the parameters from it.
If shArgs do not exist, gets the edge location and zoom view settings.
Attaches the feather to the specified edge location on the mesh.
Refreshes the view if required.
- EasyBird.as_AttachFeathers(self)#
[shArgs : sl=srcList, t=trgt, pp=pointOnPoly, dh=deleteHistory, cp=centerPiv, sm=skinMesh, ub=updateBtns, nv=nearestVtx, oc=orientCon, es=extraSup, sp=showProgress]
Purpose:
:: Attaches objects (buttons) to a target mesh, creating a rigging setup that is useful for attaching detailed elements.
Commonly used in character rigging for attaching buttons, badges, or similar objects to clothing or other surfaces.
This function does: attach the selected objects to the last selected meshes, this is the main script
- Parameters:
srcList – List of object to attach as buttons to shirt. if trgt is None, trgt = srcList[-1] And src objects will be attached to nearest vertex on trgt.
trgt – To attach all src list of objects to trgt
pointOnPoly – Attaching method. if false, follicles will be used for the rivets.
deleteHistory – History will be deleted on srcList.
centerPiv – CenterPivot will be applied on srcList.
skinMesh – if True, src list of objects will be skinned to joints under rivets.
updateBtns – if True, when UVs are changed, will update follicle positions as per new UVs and old vertices (In this case srcList will be follicles or same objects)
nearestVtx – <bool> #Flag to attach objects to the nearest vertex.
orientCon – <bool> #Flag to apply orient constraints.
extraSup – <bool> #Flag to add extra support for attachment.
showProgress – <bool> #Flag to show progress during the operation.
- Returns:
None #No return value, but objects are attached to the target mesh.
Code Examples:
>>> attachButtons(srcList=['button1', 'button2'], trgt='shirt', pointOnPoly=True, deleteHistory=False, centerPiv=True, skinMesh=False, updateBtns=False)
graph TB Start[("fa:fa-play Start")] --> InitializeParameters InitializeParameters["/fas:fa-cogs Initialize Parameters"] --> CheckTrgt CheckTrgt{{"/fas:fa-question-circle Check if trgt is provided"}} --> CheckSrcList CheckSrcList{{"/fas:fa-question-circle Check if srcList is provided"}} --> InitializeSrcList InitializeSrcList["/fas:fa-list Initialize srcList"] --> SetSrcListType SetSrcListType["/fas:fa-exchange-alt Set srcList Type"] --> ShowProgressStart ShowProgressStart["/fas:fa-spinner Show Progress Start"] --> ForEachObjInSrcList ForEachObjInSrcList["/fas:fa-repeat For each obj in srcList"] --> CheckUpdateBtns CheckUpdateBtns{{"/fas:fa-question-circle Check if updateBtns is True"}} --> UpdateButtons UpdateButtons["/fas:fa-sync-alt Update Buttons"] --> ContinueForEachObj CheckUpdateBtns --"If updateBtns is False"--> CheckDeleteHistory CheckDeleteHistory{{"/fas:fa-question-circle Check if deleteHistory is True"}} --> DeleteHistory DeleteHistory["/fas:fa-eraser Delete History"] --> CheckCenterPiv CheckCenterPiv{{"/fas:fa-question-circle Check if centerPiv is True"}} --> CenterPivot CenterPivot["/fas:fa-dot-circle Center Pivot"] --> CheckPointOnPoly CheckPointOnPoly{{"/fas:fa-question-circle Check if pointOnPoly is True"}} --> AttachPointOnPoly AttachPointOnPoly["/fas:fa-thumbtack Attach Point on Poly"] --> CheckOrientCon CheckOrientCon{{"/fas:fa-question-circle Check if orientCon is True"}} --> OrientConstrain OrientConstrain["/fas:fa-link Orient Constrain"] --> ContinueForEachObj CheckPointOnPoly --"If pointOnPoly is False"--> AttachFollicle AttachFollicle["/fas:fa-paperclip Attach Follicle"] --> CheckSkinMesh CheckSkinMesh{{"/fas:fa-question-circle Check if skinMesh is True"}} --> SkinCluster SkinCluster["/fas:fa-network-wired Skin Cluster"] --> ParentJoint CheckSkinMesh --"If skinMesh is False"--> CheckOrientConFollicle CheckOrientConFollicle{{"/fas:fa-question-circle Check if orientCon is True"}} --> ParentConstraint ParentConstraint["/fas:fa-link Parent Constraint"] --> ParentJoint CheckOrientConFollicle --"If orientCon is False"--> PointConstraint PointConstraint["/fas:fa-thumbtack Point Constraint"] --> ParentJoint ParentJoint["/fas:fa-sitemap Parent Joint"] --> ContinueForEachObj ContinueForEachObj["/fas:fa-arrow-right Continue For Each Obj"] --> ForEachObjInSrcList ForEachObjInSrcList --"End of srcList"--> ShowProgressEnd ShowProgressEnd["/fas:fa-check-circle Show Progress End"] --> SelectSrcList SelectSrcList["/fas:fa-mouse-pointer Select srcList"] --> End[("fas:fa-stop End")] style Start fill:#00cc00,stroke:#000,stroke-width:3px style InitializeParameters fill:#ff9999,stroke:#000,stroke-width:2px style CheckTrgt fill:#ffcc00,stroke:#000,stroke-width:2px style CheckSrcList fill:#ffcc00,stroke:#000,stroke-width:2px style InitializeSrcList fill:#99ccff,stroke:#000,stroke-width:2px style SetSrcListType fill:#cc99ff,stroke:#000,stroke-width:2px style ShowProgressStart fill:#99ff99,stroke:#000,stroke-width:2px style ForEachObjInSrcList fill:#ffcc00,stroke:#000,stroke-width:2px style CheckUpdateBtns fill:#ff6666,stroke:#000,stroke-width:2px style UpdateButtons fill:#99ff99,stroke:#000,stroke-width:2px style ContinueForEachObj fill:#cc99ff,stroke:#000,stroke-width:2px style CheckDeleteHistory fill:#ff6666,stroke:#000,stroke-width:2px style DeleteHistory fill:#ff9999,stroke:#000,stroke-width:2px style CheckCenterPiv fill:#ff6666,stroke:#000,stroke-width:2px style CenterPivot fill:#99ccff,stroke:#000,stroke-width:2px style CheckPointOnPoly fill:#ff6666,stroke:#000,stroke-width:2px style AttachPointOnPoly fill:#cc99ff,stroke:#000,stroke-width:2px style CheckOrientCon fill:#ff6666,stroke:#000,stroke-width:2px style OrientConstrain fill:#99ff99,stroke:#000,stroke-width:2px style AttachFollicle fill:#cc99ff,stroke:#000,stroke-width:2px style CheckSkinMesh fill:#ff6666,stroke:#000,stroke-width:2px style SkinCluster fill:#99ccff,stroke:#000,stroke-width:2px style ParentJoint fill:#cc99ff,stroke:#000,stroke-width:2px style CheckOrientConFollicle fill:#ff6666,stroke:#000,stroke-width:2px style ParentConstraint fill:#99ff99,stroke:#000,stroke-width:2px style PointConstraint fill:#99ccff,stroke:#000,stroke-width:2px style ShowProgressEnd fill:#99ff99,stroke:#000,stroke-width:2px style SelectSrcList fill:#cc99ff,stroke:#000,stroke-width:2px style End fill:#ff6666,stroke:#000,stroke-width:3px- Flow Chart Description:
This flowchart illustrates the attachButtons function:
The function starts by initializing parameters and checking if trgt and srcList are provided.
If trgt is not provided and srcList exists, the last object in srcList becomes trgt.
srcList is set to the selected objects if not provided.
For each object in srcList, the function checks if updateBtns is True, and if so, updates the buttons.
If deleteHistory is True, history is deleted for each object.
If centerPiv is True, the pivot is centered for each object.
Based on the value of pointOnPoly, the function either attaches using point on poly or follicles.
If skinMesh is True, a skin cluster is created, otherwise point or orient constraints are applied
- EasyBird.as_BasicSetup(self)#
[**shArgs : er=eRig, ec=EasyRig, mc=mc, w=wingSetup, ow=onlyWings, rc=refCount, nc=neckCurve, jc=jawCurve]
Purpose:
:: Creates a basic reference setup for a character or creature in Autodesk Maya.
This function is ideal for initial stages of rigging, providing a simple and adjustable skeletal structure.
It generates a global control curve and other necessary curves based on the parameters provided.
The function offers flexibility for different types of setups, such as winged creatures or bipedal characters.
- Parameters:
eRig – <module> # The module containing rigging utilities and functions.
EasyRig – <module> # The module for handling EasyRig specific functionalities.
mc – <module> # Maya commands module for executing Maya specific commands.
wingSetup – <bool> # Determines if the setup includes wings.
onlyWings – <bool> # Specifies if the setup is only for wings.
refCount – <int> # Reference count for refresh view updates.
neckCurve – <asNode> # The curve node used for neck setup.
jawCurve – <asNode> # The curve node used for jaw setup.
- Returns:
None # This function does not return a value but creates a basic rig setup in the Maya scene.
Code Examples:
>>> as_BasicSetup()
# This will create a basic reference setup in the Maya scene based on the provided parameters.
- EasyBird.as_BasicSetup_1(self)#
- EasyBird.as_BendFeathers(self, ctrlName=None, tailSetupRH=False)#
[shArgs : ]
Purpose:
:: Applies bend deformations to selected feather geometry.
- Returns:
None
Code Examples:
>>> bend_feathers = BendFeathers()
>>> bend_feathers.as_BendFeathers()
graph TB Start[("fa:fa-play Start")] --> GetSelectedFeathers{"/fas:fa-feather-alt Get Selected Feathers"} GetSelectedFeathers --"Retrieve selected feathers" --> CheckCtrlName{"/fas:fa-check-circle Check Control Name"} CheckCtrlName --"If control name provided" --> ValidateCtrlName["/fas:fa-check-double Validate Control Name"] ValidateCtrlName --"Ensure control name exists and is correct" --> ApplyUpDownBend["/fas:fa-arrows-alt-v Apply Up-Down Bend"] CheckCtrlName --"If control name not provided" --> GetCtrlNameFromField["/fas:fa-text-height Get Control Name from Text Field"] GetCtrlNameFromField --"Retrieve control name from UI" --> ApplyUpDownBend ApplyUpDownBend --"Apply up-down bend to feathers" --> ApplyLeftRightBend["/fas:fa-arrows-alt-h Apply Left-Right Bend"] ApplyLeftRightBend --"Apply left-right bend to feathers" --> CreateBendHandsSet["/fas:fa-layer-group Create Bend Hands Set"] CreateBendHandsSet --"Create set for bend handlers" --> End[("fas:fa-stop End")] style Start fill:#00cc00,stroke:#000,stroke-width:3px style GetSelectedFeathers fill:#ffcc00,stroke:#000,stroke-width:2px style CheckCtrlName fill:#99ccff,stroke:#000,stroke-width:2px style ValidateCtrlName fill:#99ff99,stroke:#000,stroke-width:2px style GetCtrlNameFromField fill:#ff9999,stroke:#000,stroke-width:2px style ApplyUpDownBend fill:#ffcc00,stroke:#000,stroke-width:2px style ApplyLeftRightBend fill:#99ccff,stroke:#000,stroke-width:2px style CreateBendHandsSet fill:#cc99ff,stroke:#000,stroke-width:2px style End fill:#ff6666,stroke:#000,stroke-width:3px- Flow Chart Description:
This flowchart illustrates the as_BendFeathers function:
Starts by selecting feathers for the bend deformation process.
Checks if a control name is provided. If not, retrieves it from the text field.
Validates the provided or retrieved control name to ensure correctness.
Applies up-down bend deformation to the selected feathers.
Then applies left-right bend deformation to the same feathers.
Creates a set for the bend handlers for organization.
The function concludes after setting up the bend deformations.
- EasyBird.as_BendTwistFeathers(self)#
[shArgs : ]
Purpose:
:: Applies both bend and twist deformations to selected feather geometry.
- Returns:
None
Code Examples:
>>> EasyBird.as_BendTwistFeathers()
graph TB Start[("fa:fa-play Start")] --> GetSelectedFeathers{"/fas:fa-feather-alt Get Selected Feathers"} GetSelectedFeathers --"Retrieve selected feathers" --> ApplyBendDeformation["/fas:fa-long-arrow-alt-right Apply Bend Deformation"] ApplyBendDeformation --"Apply bend deformation to feathers" --> ApplyTwistDeformation["/fas:fa-sync-alt Apply Twist Deformation"] ApplyTwistDeformation --"Apply twist deformation to feathers" --> CheckFeatherSide{"/fas:fa-question-circle Check Feather Side"} CheckFeatherSide --"If feathers start with 'L_'" --> GetGlobalCtrl["/fas:fa-globe Get Global Control"] GetGlobalCtrl --"Retrieve global control" --> UpdateGlobalCtrlForRight["/fas:fa-arrow-right Update Global Control for Right Side"] UpdateGlobalCtrlForRight --"Update global control for right side feathers" --> SelectRightFeathers{"/fas:fa-feather-alt Select Right Feathers"} SelectRightFeathers --"Select right side feathers" --> ConfirmBendTwistRH["/fas:fa-check-circle Confirm Bend & Twist Setup -RH Side"] ConfirmBendTwistRH --"If confirmed" --> ApplyBendTwistRight["/fas:fa-redo Apply Bend & Twist to Right Side"] ApplyBendTwistRight --"Apply bend and twist to right side feathers" --> End[("fas:fa-stop End")] CheckFeatherSide --"If feathers do not start with 'L_'" --> End style Start fill:#00cc00,stroke:#000,stroke-width:3px style GetSelectedFeathers fill:#ffcc00,stroke:#000,stroke-width:2px style ApplyBendDeformation fill:#ff9999,stroke:#000,stroke-width:2px style ApplyTwistDeformation fill:#99ccff,stroke:#000,stroke-width:2px style CheckFeatherSide fill:#99ff99,stroke:#000,stroke-width:2px style GetGlobalCtrl fill:#cc99ff,stroke:#000,stroke-width:2px style UpdateGlobalCtrlForRight fill:#ff9999,stroke:#000,stroke-width:2px style SelectRightFeathers fill:#ffcc00,stroke:#000,stroke-width:2px style ConfirmBendTwistRH fill:#99ccff,stroke:#000,stroke-width:2px style ApplyBendTwistRight fill:#99ff99,stroke:#000,stroke-width:2px style End fill:#ff6666,stroke:#000,stroke-width:3px- Flow Chart Description:
This flowchart illustrates the as_BendTwistFeathers function:
The process begins by selecting feathers for deformation.
Applies bend deformation to the selected feathers.
Then applies twist deformation to the same feathers.
Checks if the selected feathers start with ‘L_’ to determine if they are on the left side.
If they are left side feathers, retrieves the global control.
Updates the global control to correspond to the right side feathers.
Selects the corresponding right side feathers based on the name.
Asks for confirmation to apply bend and twist setup to the right-hand side feathers.
If confirmed, applies bend and twist deformations to the right side feathers.
If the feathers do not start with ‘L_’, the process ends.
- EasyBird.as_BendySetup(self, baseJnt, bendyCount=4, elbowBendy=False, deleteUnwanted='hands', globalCtrl='Global_Control', bendySwitch=None)#
[shArgs : bj=baseJnt, bc=bendyCount, eb=elbowBendy, du=deleteUnwanted, gc=globalCtrl, bs=bendySwitch]
Purpose:
:: Sets up a bendy rig for specific joints in a character, providing enhanced deformation and control.
Creates a series of joints and controls for bendy deformation, applicable for body parts like arms and legs.
Supports customization for different joint counts and specific joint setups like elbows and knees.
Integrates with existing rigs and global controls, allowing seamless incorporation into complex character rigs.
- Parameters:
baseJnt – <str> # The base joint from which the bendy setup will begin.
bendyCount – <int, optional> # Number of joints to include in the bendy setup. Default is 4.
elbowBendy – <bool, optional> # Flag to indicate if the setup is for an elbow bendy. Default is False.
deleteUnwanted – <str, optional> # Specify ‘hands’ or ‘legs’ to remove unwanted joints and constraints. Default is ‘hands’.
globalCtrl – <str, optional> # The name of the global control to which the system will be connected. Default is ‘Global_Control’.
bendySwitch – <str, optional> # The switch control for the bendy setup visibility. Default is None.
- Returns:
None # The function doesn’t return a value but configures a bendy rig on the specified joints.
Code Examples:
>>> as_BendySetup('L_Shoulder_Jnt', bendyCount=4, elbowBendy=True)
# Configures a bendy rig starting from the left shoulder joint with 4 bendy joints and specified for elbow.
- EasyBird.as_BendySetup_Hands(self)#
[shArgs : nj=numJnts]
Purpose:
:: Sets up a bendy rig for the hands of a character, enhancing the flexibility and control for animation.
Facilitates the creation of a bendy rig specifically for the hands, allowing for more nuanced movements and deformations.
Organizes and parents the necessary groups and controllers for the bendy setup, ensuring a structured and manageable rig.
- Parameters:
numJnts – <int> # Number of joints to be used in the bendy setup for each hand segment.
- Returns:
None # This function does not return a value but sets up the bendy rig for the hands.
Code Examples:
>>> as_BendySetup_Hands()
# This will execute the bendy setup for the hands with the number of joints specified in the 'as_NumBendyJnts_TF' text field.
- EasyBird.as_BendySetup_Legs(self)#
[shArgs : nj=numJnts]
Purpose:
:: Configures a bendy rig for the legs of a character, enhancing the control and flexibility in animation.
Enables the creation of a bendy rig tailored for the leg segments, allowing for intricate and smooth movements.
Manages and arranges essential groups and controllers for the bendy setup, ensuring an efficient and organized rig structure.
- Parameters:
numJnts – <int> # The number of joints used in the bendy setup for each segment of the leg.
- Returns:
None # The function doesn’t return a value but effectively sets up the bendy rig for the legs.
Code Examples:
>>> as_BendySetup_Legs()
# Executes the bendy setup for the legs using the specified number of joints from the 'as_NumBendyJnts_TF' text field.
- EasyBird.as_CleanLoc(self)#
[shArgs : ]
Purpose:
:: Deletes specific locators (‘dir_Loc’ and ‘vtx_Loc’) in Autodesk Maya, cleaning up the scene.
Used to remove unnecessary locators after they have served their purpose in rigging or animation tasks.
Helps maintain a tidy and efficient working environment within Maya.
- Returns:
None # This function does not return any value but removes specified locators from the scene.
Code Examples:
>>> as_CleanLoc()
# Deletes 'dir_Loc' and 'vtx_Loc' locators from the Maya scene.
graph TB Start[("fa:fa-play Start")] --> ConfirmDeletion{"/fas:fa-question-circle Confirm Deletion"} ConfirmDeletion --"If Confirmed"--> DeleteDirLoc["/fas:fa-trash-alt Delete 'dir_Loc'"] ConfirmDeletion --"If Not Confirmed"--> End["/fas:fa-stop End"] DeleteDirLoc --"Attempt Deletion"--> CheckVtxLoc{"/fas:fa-question-circle Check 'vtx_Loc' Existence"} CheckVtxLoc --"If 'vtx_Loc' Exists"--> DeleteVtxLoc["/fas:fa-trash-alt Delete 'vtx_Loc'"] CheckVtxLoc --"If 'vtx_Loc' Does Not Exist"--> End DeleteVtxLoc --> End style Start fill:#00cc00,stroke:#000,stroke-width:3px style ConfirmDeletion fill:#ffcc99,stroke:#000,stroke-width:2px style DeleteDirLoc fill:#99ccff,stroke:#000,stroke-width:2px style CheckVtxLoc fill:#cc99ff,stroke:#000,stroke-width:2px style DeleteVtxLoc fill:#99ff99,stroke:#000,stroke-width:2px style End fill:#ff6666,stroke:#000,stroke-width:3px- Flow Chart Description:
This flowchart illustrates the as_CleanLoc function:
The process starts by confirming with the user if they want to delete the locators.
If confirmed, the function attempts to delete the ‘dir_Loc’ locator.
After attempting to delete ‘dir_Loc’, it checks for the existence of ‘vtx_Loc’.
If ‘vtx_Loc’ exists, it proceeds to delete ‘vtx_Loc’.
The function ends after deleting the locators or if the user decides not to delete them.
- EasyBird.as_ControlColors(self, colorType=None)#
[**shArgs : ct=colorType]
Purpose:
:: Customizes the colors of control objects in a rigging setup in Autodesk Maya.
This function streamlines the process of color-coding control objects for easier rigging and animation.
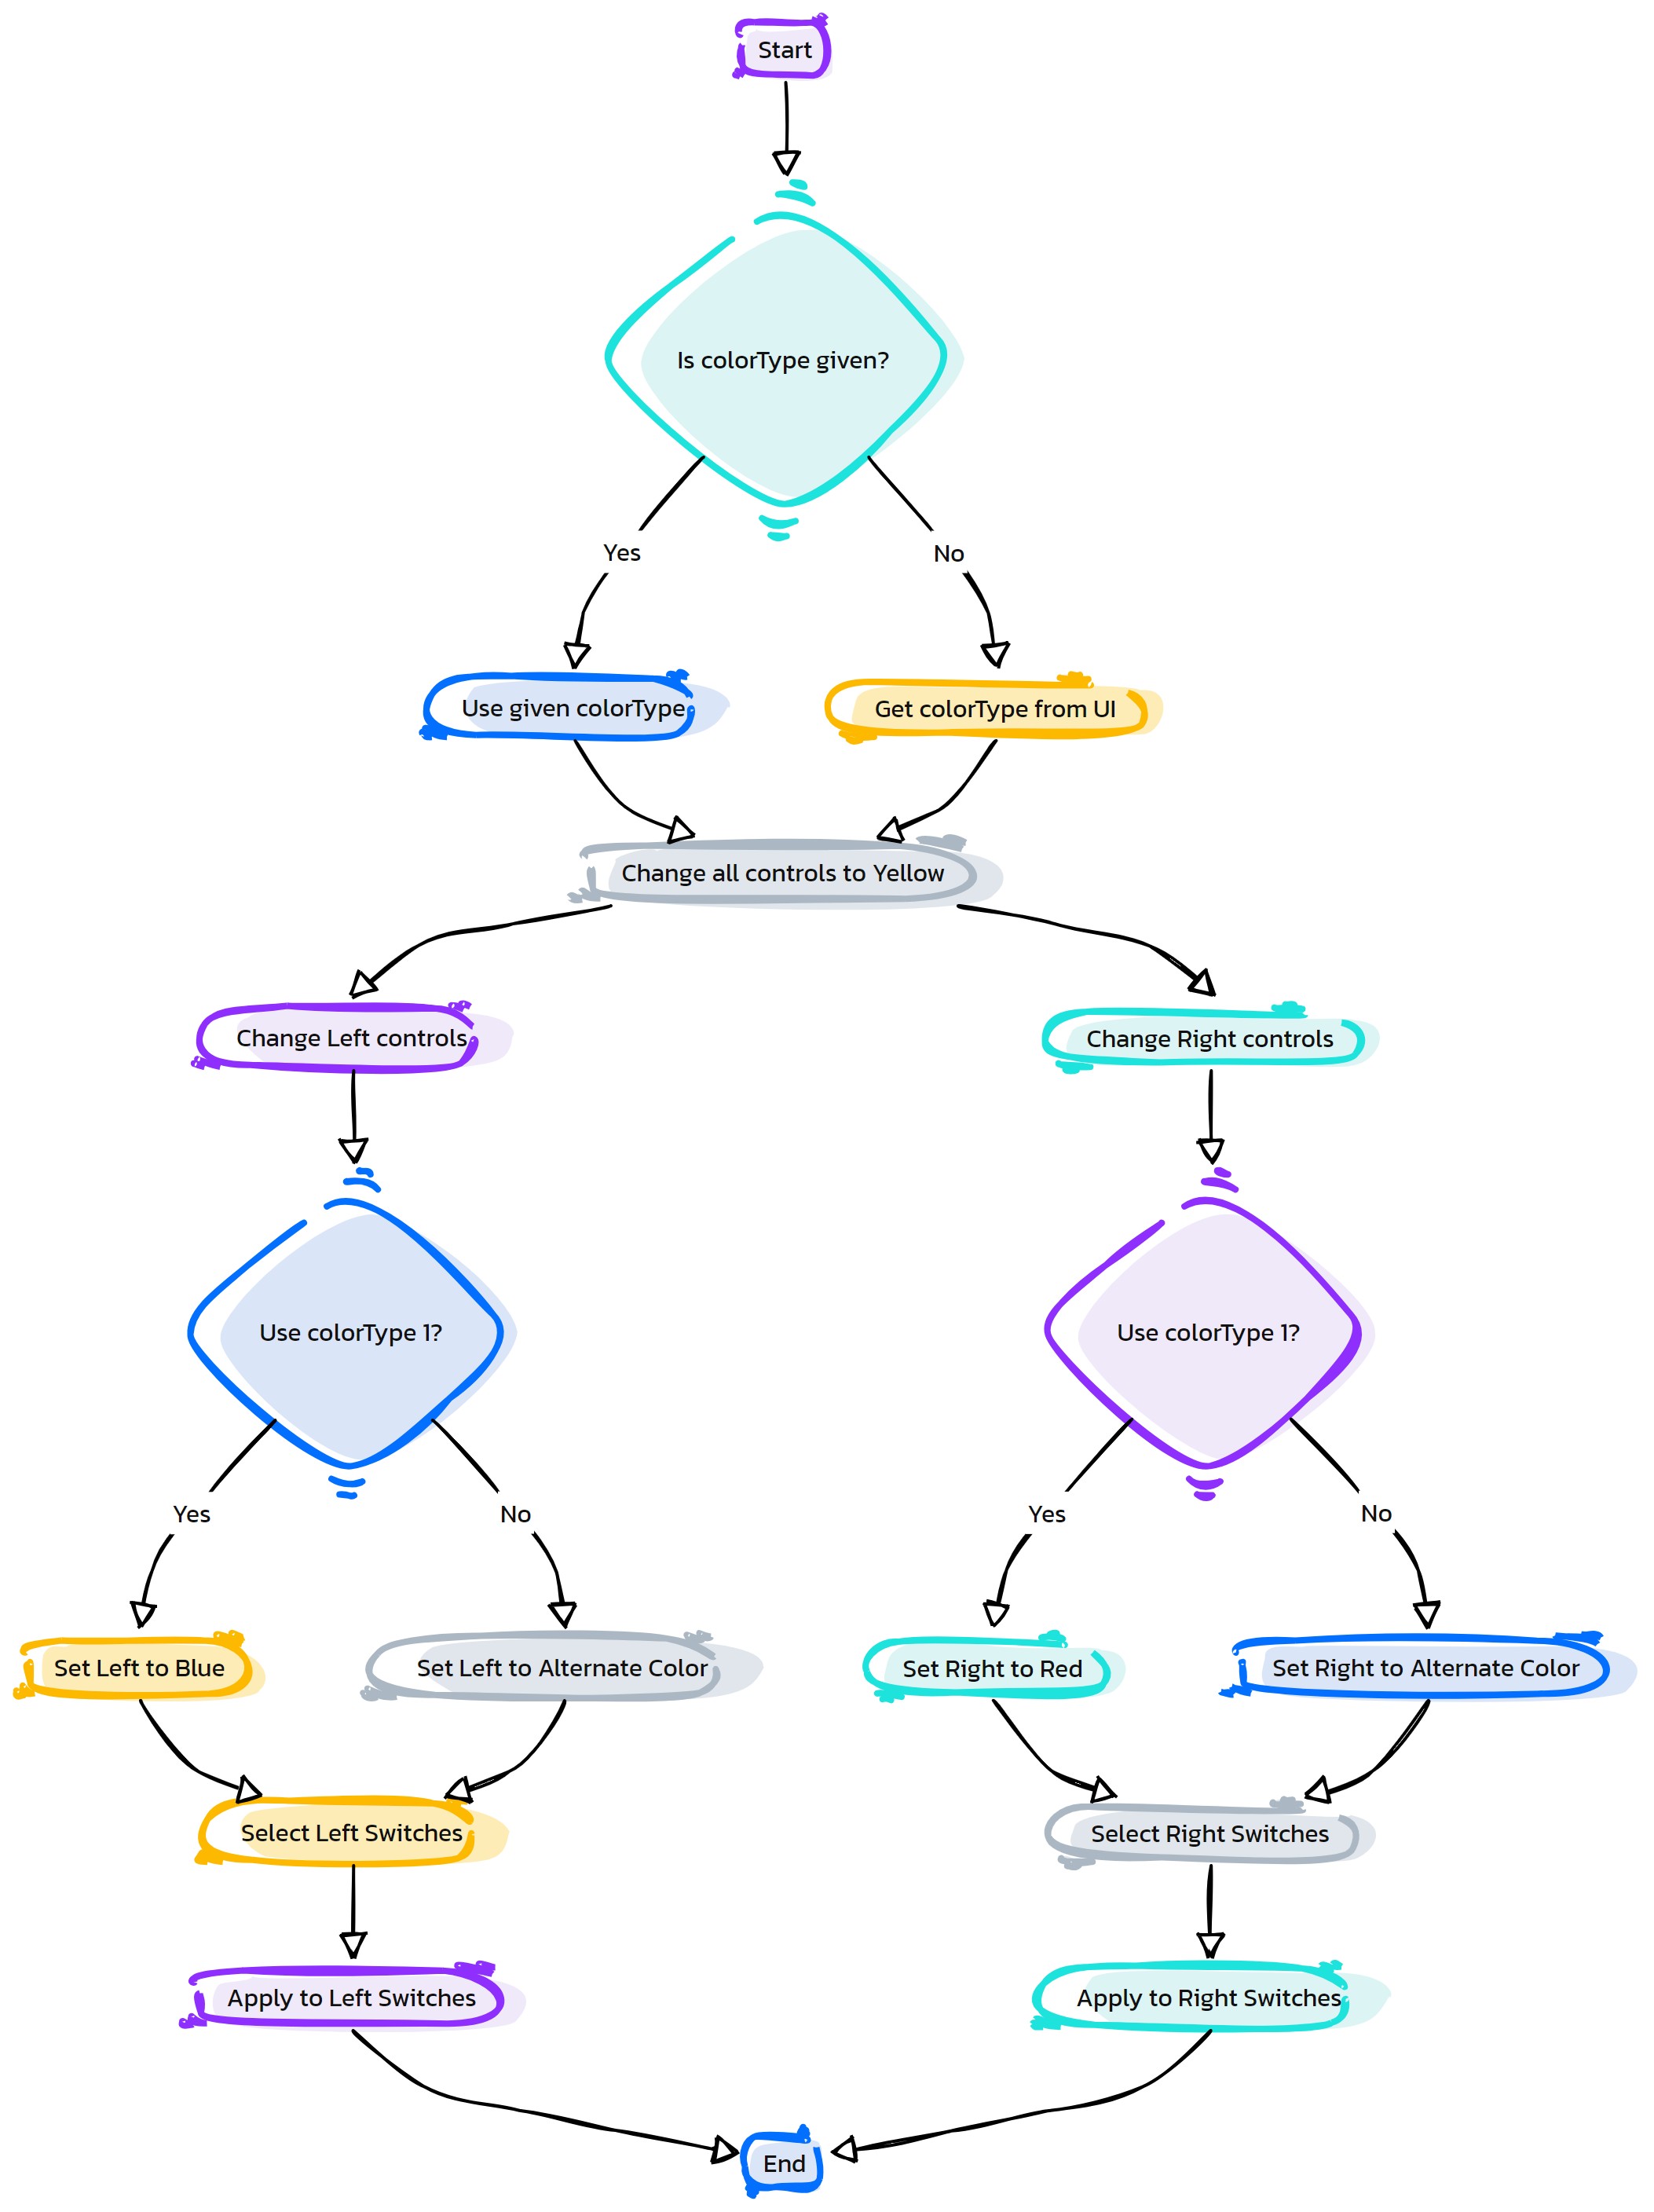
It changes all control colors to yellow, then adjusts left and right controls to blue and red (or alternate colors) respectively.
The function operates based on a color type option selected by the user, ensuring flexibility and customization.
It’s particularly useful in rigging workflows for visually organizing different control objects in a complex rig.
- Parameters:
colorType – <int> # The color type selected by the user, determining the color scheme for the control objects.
- Returns:
None # This function does not return a value but alters the color attributes of control objects in the Maya scene.
Code Examples:
>>> as_ControlColors()
# This will change the control colors based on the selected color type option in the Maya UI.
- Flow Chart Description:
This flowchart illustrates the as_ControlColors function:
The process starts by checking if a color type is provided. If not, it retrieves the color type from the Maya UI.
All control objects are initially set to a yellow color.
Left-side controls are then selected and set to blue or an alternate color based on the color type.
Right-side controls are selected next and set to red or pink, also depending on the color type.
The function ends after applying the specified colors to the controls.
- EasyBird.as_CreateEyeSetup(self)#
[**shArgs : ge=gCtrlGrp, nn=neckName, ik=ikGrp, hj=headJnt, le=LEye, re=REye]
Purpose:
:: Creates a comprehensive eye rigging setup for characters with left and right eyes.
The function includes the creation of skin joints for each eye, main eye control, and individual eye controls.
It also handles the aim constraints and positioning of eye controls relative to the head and neck joints.
This setup enables animators to control eye movements precisely and intuitively.
- Parameters:
gCtrlGrp – <asNode> # The main group node for global controls.
neckName – <list of asNode> # List of neck joint nodes.
ikGrp – <asNode> # The IK group node.
headJnt – <asNode> # The head joint node.
LEye – <asNode> # The left eye geometry node.
REye – <asNode> # The right eye geometry node.
- Returns:
None # This function does not return a value but applies the eye rigging setup to the character.
Code Examples:
>>> as_CreateEyeSetup()
# This example sets up the eye rigging for a character with predefined global control group, neck joints, IK group, head joint, and eye geometries.
graph TB Start[("fa:fa-play Start")] --> InitializeEyeSetup[("/fas:fa-tools Initialize Eye Setup")] InitializeEyeSetup --> CreateSkinJoints[("/fas:fa-bone Create Skin Joints for Eyes")] CreateSkinJoints --> CreateMainEyeControl[("/fas:fa-eye Create Main Eye Control")] CreateMainEyeControl --> CreateIndividualEyeControls{"/fas:fa-eye-dropper Create Individual Eye Controls"} CreateIndividualEyeControls --"For Left Eye"--> CreateLEyeControl[("/fas:fa-eye Create Left Eye Control")] CreateIndividualEyeControls --"For Right Eye"--> CreateREyeControl[("/fas:fa-eye Create Right Eye Control")] CreateLEyeControl --> SetupAimConstraintLEye[("/fas:fa-bullseye Setup Aim Constraint for Left Eye")] CreateREyeControl --> SetupAimConstraintREye[("/fas:fa-bullseye Setup Aim Constraint for Right Eye")] SetupAimConstraintLEye --> ParentLEyeControl[("/fas:fa-link Parent Left Eye Control")] SetupAimConstraintREye --> ParentREyeControl[("/fas:fa-link Parent Right Eye Control")] ParentLEyeControl --> FinalizeSetup[("/fas:fa-check-circle Finalize Eye Setup")] ParentREyeControl --> FinalizeSetup FinalizeSetup --> End[("fas:fa-stop End")] style Start fill:#00cc00,stroke:#000,stroke-width:3px style InitializeEyeSetup fill:#ffcc00,stroke:#000,stroke-width:2px style CreateSkinJoints fill:#ff9999,stroke:#000,stroke-width:2px style CreateMainEyeControl fill:#99ccff,stroke:#000,stroke-width:2px style CreateIndividualEyeControls fill:#cc99ff,stroke:#000,stroke-width:2px style CreateLEyeControl fill:#99ff99,stroke:#000,stroke-width:2px style CreateREyeControl fill:#ffcc99,stroke:#000,stroke-width:2px style SetupAimConstraintLEye fill:#ccffcc,stroke:#000,stroke-width:2px style SetupAimConstraintREye fill:#99ff99,stroke:#000,stroke-width:2px style ParentLEyeControl fill:#ffcc99,stroke:#000,stroke-width:2px style ParentREyeControl fill:#ccffcc,stroke:#000,stroke-width:2px style FinalizeSetup fill:#ff9999,stroke:#000,stroke-width:2px style End fill:#ff6666,stroke:#000,stroke-width:3px- Flow Chart Description:
This flowchart illustrates the as_CreateEyeSetup function:
Starts by initializing the eye setup for the character.
Creates skin joints for the left and right eyes, positioning them correctly.
Creates the main eye control, allowing for overall eye movement control.
Proceeds to create individual eye controls for both left and right eyes.
For each eye (left and right), sets up the respective eye control.
Establishes aim constraints for both eyes to direct their gaze.
Parents each eye control to the main eye control and the neck joint.
Finalizes the setup, integrating the eye controls with the character rig.
Completes the eye rigging process, enhancing the character’s expressiveness.
- EasyBird.as_CreateFeatherCtrls(self)#
[shArgs : jn=jntList, fc=featherCtrl, fcg=featherCtrlGrp, rs=RScaleJnt]
Purpose:
:: Creates feather controls for both left and right sides, providing comprehensive control over feather rigging.
This function is integral for establishing detailed control over feather rigging, especially in avian models.
It involves creating control nodes for feathers, adjusting their position and rotation, and setting up orientation constraints for smooth deformation.
- Parameters:
jntList – <list of asNode> # List of joint nodes where feather controls will be created.
featherCtrl – <asNode> # The control node created for a feather.
featherCtrlGrp – <asNode> # The group node for feather control.
RScaleJnt – <asNode> # The joint used for scaling right side feather controls.
- Returns:
None # This function does not return a value but sets up feather controls on the model.
Code Examples:
>>> as_CreateFeatherCtrls()
# This example sets up feather controls for the selected joints.
graph TB Start[("fa:fa-play Start")] --> CheckStandPose{{"/fas:fa-question-circle Check Stand Pose"}} CheckStandPose --"Stand Pose" --> SetRotListStand[("/fas:fa-list-ol Set Rotation List for Stand Pose")] CheckStandPose --"Not Stand Pose" --> SetRotListNotStand[("/fas:fa-list-ol Set Rotation List for Not Stand Pose")] SetRotListStand --> CreateLFeatherCtrls[("/fas:fa-feather-alt Create Left Feather Controls")] SetRotListNotStand --> CreateLFeatherCtrls CreateLFeatherCtrls --> CreateRFeatherCtrls[("/fas:fa-feather-alt Create Right Feather Controls")] CreateRFeatherCtrls --> End[("fas:fa-stop End")] style Start fill:#00cc00,stroke:#000,stroke-width:3px style CheckStandPose fill:#ffcc00,stroke:#000,stroke-width:2px style SetRotListStand fill:#99ccff,stroke:#000,stroke-width:2px style SetRotListNotStand fill:#99ccff,stroke:#000,stroke-width:2px style CreateLFeatherCtrls fill:#cc99ff,stroke:#000,stroke-width:2px style CreateRFeatherCtrls fill:#cc99ff,stroke:#000,stroke-width:2px style End fill:#ff6666,stroke:#000,stroke-width:3px- Flow Chart Description:
This flowchart illustrates the as_CreateFeatherCtrls function:
The process begins by checking if the model is in a stand pose.
Sets the rotation list based on whether it’s a stand pose or not.
Creates control nodes for the feathers on the left side, adjusting their position, rotation, and setting up orientation constraints.
Replicates the process for the right side feathers, ensuring symmetrical control.
The function concludes after setting up feather controls for both sides.
- EasyBird.as_CreateFeatherJntsAndBind(self)#
[shArgs : ms=multiStepGeo, fs=featherHasSiblings, ct=chainType, gc=globalCtrl]
Purpose:
:: Creates and binds joints for feather geometry, with options for multi-step geometries and sibling feather parts.
This function is tailored for rigging feather geometries, allowing for complex setups with multiple steps in geometry and handling sibling feather parts.
It offers a robust solution for creating joints and binding them to the respective feather geometries, facilitating detailed animation controls.
- Parameters:
multiStepGeo – <bool> # Determines if the geometry has multiple steps, affecting joint creation.
featherHasSiblings – <bool> # Indicates if the feather has sibling parts that need to be considered in the setup.
chainType – <str> # Defines the type of joint chain to create, either ‘Driver’ or another specified type.
globalCtrl – <asNode> # The global control node for the setup.
- Returns:
None # This function does not return a value but modifies the feather rigging setup.
Code Examples:
>>> as_CreateFeatherJntsAndBind()
# This example creates and binds joints to selected feather geometries.
graph TB Start[("fa:fa-play Start")] --> CheckArgs{"/fas:fa-question-circle Check Arguments"} CheckArgs --"If shArgs provided" --> ProcessArgs[("/fas:fa-cogs Process Args")] CheckArgs --"If shArgs not provided" --> CheckFeatherSelection{{"/fas:fa-check-circle Check Feather Selection"}} ProcessArgs --> CheckFeatherSelection CheckFeatherSelection --"Feathers selected" --> DetermineSplitCount{{"/fas:fa-sort-numeric-up Determine Split Count"}} DetermineSplitCount --"Multi-step or single-step geo" --> CheckVtxNum{{"/fas:fa-sort-numeric-up-alt Check Vertex Number"}} CheckVtxNum --"Check if vertex number provided" --> SetupFeatherGroups[("/fas:fa-object-group Setup Feather Groups")] SetupFeatherGroups --> StartFeatherRigging[("/fas:fa-feather-alt Start Feather Rigging")] StartFeatherRigging --> IterateFeathers{"/fas:fa-repeat Iterate Feathers"} IterateFeathers --> CreateJoints[("/fas:fa-bone Create Joints")] CreateJoints --> OrientJoints[("/fas:fa-redo-alt Orient Joints")] OrientJoints --> SplitJoints[("/fas:fa-cut Split Joints")] SplitJoints --> ReparentFeathers[("/fas:fa-object-ungroup Reparent Feathers")] ReparentFeathers --> BindSkinning[("/fas:fa-link Bind Skinning")] BindSkinning --> CreateFKCtrls[("/fas:fa-circle Create FK Controls")] CreateFKCtrls --> SetupFeatherCtrlConnections[("/fas:fa-sitemap Setup Control Connections")] SetupFeatherCtrlConnections --> ReorderDeformers[("/fas:fa-sort Reorder Deformers")] ReorderDeformers --> End[("fas:fa-stop End")] style Start fill:#00cc00,stroke:#000,stroke-width:3px style CheckArgs fill:#ffcc00,stroke:#000,stroke-width:2px style ProcessArgs fill:#99ccff,stroke:#000,stroke-width:2px style CheckFeatherSelection fill:#ffcc00,stroke:#000,stroke-width:2px style DetermineSplitCount fill:#ffcc00,stroke:#000,stroke-width:2px style CheckVtxNum fill:#ffcc00,stroke:#000,stroke-width:2px style SetupFeatherGroups fill:#cc99ff,stroke:#000,stroke-width:2px style StartFeatherRigging fill:#cc99ff,stroke:#000,stroke-width:2px style IterateFeathers fill:#ffcc00,stroke:#000,stroke-width:2px style CreateJoints fill:#99ccff,stroke:#000,stroke-width:2px style OrientJoints fill:#ff9999,stroke:#000,stroke-width:2px style SplitJoints fill:#99ccff,stroke:#000,stroke-width:2px style ReparentFeathers fill:#cc99ff,stroke:#000,stroke-width:2px style BindSkinning fill:#99ff99,stroke:#000,stroke-width:2px style CreateFKCtrls fill:#99ccff,stroke:#000,stroke-width:2px style SetupFeatherCtrlConnections fill:#cc99ff,stroke:#000,stroke-width:2px style ReorderDeformers fill:#99ff99,stroke:#000,stroke-width:2px style End fill:#ff6666,stroke:#000,stroke-width:3px- Flow Chart Description:
This flowchart illustrates the as_CreateFeatherJntsAndBind function:
Begins by checking if specific arguments (shArgs) are provided.
If not provided, it checks the selected feather objects.
Determines the split count for the joints based on multi-step or single-step geometry.
Checks if a specific vertex number is provided for joint placement.
Sets up feather groups for rigging and control.
Starts the feather rigging process.
Iterates through each selected feather.
Creates joints for each feather geometry.
Orients the joints correctly.
Splits the joints if needed, based on the split count.
Reparents feathers for proper hierarchy.
Binds skinning to the created joints.
Creates FK controls for the feathers.
Sets up connections between the feather controls and the rig.
Reorders deformers for optimal performance.
Completes the feather rigging process.
- EasyBird.as_CreateFeathersRig(self, continueCheck=True)#
[shArgs : cc=continueCheck]
Purpose:
:: Creates rigging for feathers based on specified controls.
- Parameters:
continueCheck – (<bool>) # Indicates whether to continue with the rigging process.
- Returns:
None
Code Examples:
>>> EasyBird.as_CreateFeathersRig()
graph TD Start[("fa:fa-play Start")] --> CheckShArgs{"/fas:fa-question-circle Check shArgs"} CheckShArgs --"If shArgs Exist"--> ParseShArgs["/fas:fa-cogs Parse shArgs"] CheckShArgs --"If shArgs Does Not Exist"--> GetControlsOffsetSuperFast{"/fas:fa-mouse-pointer Get Controls, Offset, Super Fast"} ParseShArgs --> GetFeatherList{"/fas:fa-list-ul Get Feather List"} GetControlsOffsetSuperFast --> GetFeatherList GetFeatherList --> ConfirmAction["/fas:fa-question-circle Confirm Action"] ConfirmAction --"If Yes"--> CreateRig["/fas:fa-magic Create Rig"] ConfirmAction --"If No"--> WarnCancelledAction["/fas:fa-exclamation-triangle Warn Cancelled Action"] WarnCancelledAction --> End["/fas:fa-stop End"] CreateRig --> ShowResult["/fas:fa-eye Show Result"] style Start fill:#00cc00,stroke:#000,stroke-width:3px style CheckShArgs fill:#ffcc00,stroke:#000,stroke-width:2px style ParseShArgs fill:#ffcc00,stroke:#000,stroke-width:2px style GetControlsOffsetSuperFast fill:#ffcc00,stroke:#000,stroke-width:2px style GetFeatherList fill:#ffcc00,stroke:#000,stroke-width:2px style ConfirmAction fill:#ffcc00,stroke:#000,stroke-width:2px style WarnCancelledAction fill:#ff6666,stroke:#000,stroke-width:3px style CreateRig fill:#ffcc00,stroke:#000,stroke-width:2px style End fill:#ff6666,stroke:#000,stroke-width:3px style ShowResult fill:#00cc00,stroke:#000,stroke-width:3px- Flow Chart Description:
This flowchart illustrates the as_CreateFeathersRig function:
Checks if shArgs exist, and if so, parses the parameters from it.
If shArgs do not exist, gets the controls, offset, and super-fast settings.
Gets the list of feathers to create rigging for.
Confirms the action to continue with rigging.
Creates rigging for each feather based on the specified controls.
Shows the result of the operation.
Warns if the action is cancelled and ends the process.
- EasyBird.as_CreateFeathersRig_New(self)#
[shArgs : co1=ctrl01, co2=ctrl02, of=offSet, sffr=superFastFeatherRig]
Purpose:
:: Creates rigging for feathers based on specified controls.
- Parameters:
ctrl01 – (<str>) # The name of the first control.
ctrl02 – (<str>) # The name of the second control.
offSet – (<int>) # The offset value.
superFastFeatherRig – (<bool>) # Indicates whether to use a super-fast feather rigging approach.
- Returns:
None
Code Examples:
>>> EasyBird.as_CreateFeathersRig_New()
graph TD Start[("fa:fa-play Start")] --> CheckShArgs{"/fas:fa-question-circle Check shArgs"} CheckShArgs --"If shArgs Exist"--> ParseShArgs["/fas:fa-cogs Parse shArgs"] CheckShArgs --"If shArgs Does Not Exist"--> GetControlsOffsetSuperFast{"/fas:fa-mouse-pointer Get Controls, Offset, Super Fast"} ParseShArgs --> GetFeatherList{"/fas:fa-list-ul Get Feather List"} GetControlsOffsetSuperFast --> GetFeatherList GetFeatherList --> CreateRig["/fas:fa-magic Create Rig"] CreateRig --> End["/fas:fa-stop End"] End --> ShowResult["/fas:fa-eye Show Result"] style Start fill:#00cc00,stroke:#000,stroke-width:3px style CheckShArgs fill:#ffcc00,stroke:#000,stroke-width:2px style ParseShArgs fill:#ffcc00,stroke:#000,stroke-width:2px style GetControlsOffsetSuperFast fill:#ffcc00,stroke:#000,stroke-width:2px style GetFeatherList fill:#ffcc00,stroke:#000,stroke-width:2px style CreateRig fill:#ffcc00,stroke:#000,stroke-width:2px style End fill:#ff6666,stroke:#000,stroke-width:3px style ShowResult fill:#00cc00,stroke:#000,stroke-width:3px- Flow Chart Description:
This flowchart illustrates the as_CreateFeathersRig_New function:
Checks if shArgs exist, and if so, parses the parameters from it.
If shArgs do not exist, gets the controls, offset, and super-fast settings.
Gets the list of feathers to create rigging for.
Creates rigging for each feather based on the specified controls.
Shows the result of the operation.
- EasyBird.as_CreateGradualBend(self, ctrlGrps=None, animCtrl=None, animAttr='bendBase', bendAttr='rz', animRange=20, **shArgs)#
[**shArgs : cg=ctrlGrps, ac=animCtrl, aa=animAttr, ba=bendAttr, ar=animRange]
Purpose:
:: Creates a gradual bend effect on specified control groups, using an animation control and specified attributes.
This function is essential for creating smooth and controlled bending animations, especially for feathers or similar elements.
It allows animators to define bending attributes and ranges, offering precise control over the bending effect.
The function dynamically generates required nodes and connections to implement the gradual bend.
It supports both left and right sides, enabling symmetrical bending effects on characters or objects.
- Parameters:
ctrlGrps – <list> # List of control groups to apply the gradual bend effect.
animCtrl – <str> # The animation control used to manipulate the bend attribute.
animAttr – <str> # The attribute on the animation control that drives the bending (e.g., ‘bendBase’).
bendAttr – <str> # The attribute of the feather or control that will be bent (e.g., ‘rz’).
animRange – <int> # The range of animation values for bending.
- Returns:
None # This function does not return a value but applies the gradual bend setup to the specified controls.
Code Examples:
>>> as_CreateGradualBend(["FeatherGrp1", "FeatherGrp2"], "Wing_Ctrl", "bendMid", "rz", 20)
# This example applies a gradual bend to the 'FeatherGrp1' and 'FeatherGrp2' controlled by the 'bendMid' attribute on 'Wing_Ctrl'.
graph TB Start[("fa:fa-play Start")] --> InitializeBendSetup[("/fas:fa-tools Initialize Bend Setup")] InitializeBendSetup --> ValidateAnimCtrl{"/fas:fa-check-circle Validate Animation Control"} ValidateAnimCtrl --"If Anim Control Exists"--> AddBendAttributes[("/fas:fa-plus Add Bend Attributes")] ValidateAnimCtrl --"If Anim Control Does Not Exist"--> ErrorNoAnimCtrl["/fas:fa-exclamation-triangle Error: No Animation Control Found"] AddBendAttributes --> ProcessControlGroups{"/fas:fa-sitemap Process Control Groups"} ProcessControlGroups --"For Each Control Group"--> SetupBendEffect[("/fas:fa-sliders-h Setup Bend Effect")] SetupBendEffect --> CheckSide{"/fas:fa-arrows-alt-h Check Control Side"} CheckSide --"If Left Side"--> PrepareRightSide[("/fas:fa-arrow-right Prepare Right Side")] CheckSide --"If Right Side or None"--> CompleteSetup[("/fas:fa-check Complete Setup")] PrepareRightSide --"Confirm to Continue"--> CreateRightSideBend[("/fas:fa-repeat Create Right Side Bend")] CreateRightSideBend --> CompleteSetup ErrorNoAnimCtrl --> End[("fas:fa-stop End")] CompleteSetup --> End style Start fill:#00cc00,stroke:#000,stroke-width:3px style InitializeBendSetup fill:#ffcc00,stroke:#000,stroke-width:2px style ValidateAnimCtrl fill:#ff9999,stroke:#000,stroke-width:2px style AddBendAttributes fill:#99ccff,stroke:#000,stroke-width:2px style ErrorNoAnimCtrl fill:#cc99ff,stroke:#000,stroke-width:2px style ProcessControlGroups fill:#99ff99,stroke:#000,stroke-width:2px style SetupBendEffect fill:#ff9999,stroke:#000,stroke-width:2px style CheckSide fill:#99ccff,stroke:#000,stroke-width:2px style PrepareRightSide fill:#cc99ff,stroke:#000,stroke-width:2px style CreateRightSideBend fill:#99ff99,stroke:#000,stroke-width:2px style CompleteSetup fill:#99ccff,stroke:#000,stroke-width:2px style End fill:#ff6666,stroke:#000,stroke-width:3px- Flow Chart Description:
This flowchart illustrates the as_CreateGradualBend function:
Starts by initializing the gradual bend setup.
Validates if the specified animation control exists.
If the animation control exists, adds bend attributes to the control.
If the animation control does not exist, an error is displayed.
Processes each control group for gradual bending.
Sets up the bend effect by connecting nodes and attributes for each control group.
Checks the side of the control (left or right) to determine if the right side bend needs to be created.
If the control is on the left side, prepares to create the bend effect on the right side.
If confirmed, creates the gradual bend on the right side controls.
Completes the setup and finalizes the gradual bend effect.
Ends the function if an error occurs or after completing the setup.
- EasyBird.as_CreateHandSetup(self)#
[shArgs : sp=standPose, ow=onlyWings, ig=ikGrp, gg=gCtrlGrp, jg=jntGrp, gc=globalCtrl]
Purpose:
:: Sets up the hand rigging including IK/FK switch, controls for fingers, and clavicle control.
This function is dedicated to creating a comprehensive hand setup in a rig, including IK/FK switching, control creation for finger movements, and clavicle control setup.
It supports customization for various rig types and offers options for standalone wing setup.
- Parameters:
standPose – <bool> # Indicates if the setup should be in a standing pose.
onlyWings – <bool> # Determines if only wing setup is required, without the full body rig.
ikGrp – <str> # The name of the IK group node.
gCtrlGrp – <str> # The name of the global control group node.
jntGrp – <str> # The name of the joint group node.
globalCtrl – <str> # The name of the global control node.
- Returns:
<list> # Returns a list of skin joints as nodes.
Code Examples:
>>> as_CreateHandSetup()
# This example sets up the hand rigging for a character.
graph TB Start[("fa:fa-play Start")] --> CheckArgs{"/fas:fa-question-circle Check Arguments"} CheckArgs --"If shArgs provided" --> ProcessArgs[("/fas:fa-cogs Process Args")] CheckArgs --"If shArgs not provided" --> CheckOnlyWings{{"/fas:fa-question-circle Check Only Wings"}} ProcessArgs --> CheckOnlyWings CheckOnlyWings --"If only wings" --> SetupWingRig[("/fas:fa-feather Setup Wing Rig")] CheckOnlyWings --"Full body rig" --> SetupFullBodyRig[("/fas:fa-user Setup Full Body Rig")] SetupWingRig --> CreateHandJoints[("/fas:fa-bone Create Hand Joints")] SetupFullBodyRig --> CreateHandJoints CreateHandJoints --> OrientJoints[("/fas:fa-redo-alt Orient Joints")] OrientJoints --> DuplicateFKJoints[("/fas:fa-clone Duplicate FK Joints")] DuplicateFKJoints --> DuplicateIKJoints[("/fas:fa-clone Duplicate IK Joints")] DuplicateIKJoints --> MirrorJoints[("/fas:fa-exchange-alt Mirror Joints")] MirrorJoints --> CreateIKFKMixJoints[("/fas:fa-link Create IK/FK Mix Joints")] CreateIKFKMixJoints --> CreateClavicleCtrl[("/fas:fa-hand-paper Create Clavicle Control")] CreateClavicleCtrl --> CreateIKFKSwitch[("/fas:fa-toggle-on Create IK/FK Switch")] CreateIKFKSwitch --> CreateFKCtrls[("/fas:fa-circle Create FK Controls")] CreateFKCtrls --> CreateIKCtrls[("/fas:fa-hand-rock Create IK Controls")] CreateIKCtrls --> CreatePoleCtrls[("/fas:fa-map-pin Create Pole Controls")] CreatePoleCtrls --> ConnectIKFKSwitch[("/fas:fa-link Connect IK/FK Switch")] ConnectIKFKSwitch --> CreateBendyConnections[("/fas:fa-sitemap Create Bendy Connections")] CreateBendyConnections --> End[("fas:fa-stop End")] style Start fill:#00cc00,stroke:#000,stroke-width:3px style CheckArgs fill:#ffcc00,stroke:#000,stroke-width:2px style ProcessArgs fill:#99ccff,stroke:#000,stroke-width:2px style CheckOnlyWings fill:#ffcc00,stroke:#000,stroke-width:2px style SetupWingRig fill:#cc99ff,stroke:#000,stroke-width:2px style SetupFullBodyRig fill:#ff9999,stroke:#000,stroke-width:2px style CreateHandJoints fill:#99ccff,stroke:#000,stroke-width:2px style OrientJoints fill:#ff9999,stroke:#000,stroke-width:2px style DuplicateFKJoints fill:#99ccff,stroke:#000,stroke-width:2px style DuplicateIKJoints fill:#99ccff,stroke:#000,stroke-width:2px style MirrorJoints fill:#cc99ff,stroke:#000,stroke-width:2px style CreateIKFKMixJoints fill:#99ff99,stroke:#000,stroke-width:2px style CreateClavicleCtrl fill:#cc99ff,stroke:#000,stroke-width:2px style CreateIKFKSwitch fill:#ff9999,stroke:#000,stroke-width:2px style CreateFKCtrls fill:#99ccff,stroke:#000,stroke-width:2px style CreateIKCtrls fill:#99ccff,stroke:#000,stroke-width:2px style CreatePoleCtrls fill:#99ccff,stroke:#000,stroke-width:2px style ConnectIKFKSwitch fill:#cc99ff,stroke:#000,stroke-width:2px style CreateBendyConnections fill:#99ff99,stroke:#000,stroke-width:2px style End fill:#ff6666,stroke:#000,stroke-width:3px- Flow Chart Description:
This flowchart illustrates the as_CreateHandSetup function:
Starts by checking if specific arguments (shArgs) are provided.
If provided, processes these arguments.
Checks if only a wing rig is required or a full body rig.
Sets up hand joints and orients them correctly.
Duplicates joints for FK and IK setups.
Mirrors joints for symmetry.
Creates IK/FK mix joints for bendy setup.
Creates clavicle control for shoulder movements.
Implements IK/FK switch for hand controls.
Creates FK controls for finger movements.
Establishes IK controls and pole vector controls for IK setup.
Connects the IK/FK switch to control the rig.
Creates bendy connections for enhanced flexibility.
Completes the hand setup for the character rig.
- EasyBird.as_CreateHeadSetup(self)#
[**shArgs : nc=neckCurve, jc=jawCurve, juc=jawUpCurve]
Purpose:
:: Constructs the head setup for a character rig, including neck and jaw joints, head control, and related attributes.
Essential for animating head, neck, and jaw movements, this function sets up the necessary joint chains and control objects.
It provides detailed control over the neck’s bending and twisting, as well as jaw opening, closing, and rotations.
Head control is equipped with attributes for easy manipulation of jaw and upper jaw movements.
The setup integrates with spine joints and allows for space switching, crucial for realistic head and neck animations.
- Parameters:
neckCurve – <str> # The curve used to generate neck joints and control objects.
jawCurve – <str> # The curve for creating jaw joints, defining the jawline and motion path.
jawUpCurve – <str> # The curve for creating upper jaw joints, further enhancing facial rigging capabilities.
- Returns:
None # The function sets up head, neck, and jaw rigging components in the Maya scene without returning any value.
Code Examples:
>>> as_CreateHeadSetup("Neck_Path_Curve", "Jaw_Path_Curve", "Upper_Jaw_Path_Curve")
# This example creates head setup using specified curves for the neck, jaw, and upper jaw.
graph TB Start[("fa:fa-play Start")] --> InitializeGroups[("/fas:fa-object-group Initialize Groups")] InitializeGroups --> DefineNeckCurve[("/fas:fa-bezier-curve Define Neck Curve")] DefineNeckCurve --> CreateNeckJoints[("/fas:fa-bone Create Neck Joints")] CreateNeckJoints --> CreateChestHeadJoints[("/fas:fa-plus-circle Create Chest & Head Joints")] CreateChestHeadJoints --> OrientNeckJoints[("/fas:fa-redo-alt Orient Neck Joints")] OrientNeckJoints --> GenerateNeckCurve[("/fas:fa-vector-square Generate Neck Curve")] GenerateNeckCurve --> CreateNeckIKHandle[("/fas:fa-link Create Neck IK Handle")] CreateNeckIKHandle --> CreateNeckClusters[("/fas:fa-object-ungroup Create Neck Clusters")] CreateNeckClusters --> SetupNeckControls[("/fas:fa-cogs Setup Neck Controls")] SetupNeckControls --> CreateJawJoints[("/fas:fa-bone Create Jaw Joints")] CreateJawJoints --> CreateUpperJawJoints[("/fas:fa-bone Create Upper Jaw Joints")] CreateUpperJawJoints --> CreateHeadControl[("/fas:fa-head-side-virus Create Head Control")] CreateHeadControl --> ParentClustersToControls[("/fas:fa-level-down-alt Parent Clusters to Controls")] ParentClustersToControls --> SetupJawControl[("/fas:fa-cogs Setup Jaw Control")] SetupJawControl --> SetupUpperJawControl[("/fas:fa-cogs Setup Upper Jaw Control")] SetupUpperJawControl --> CreateSetPoseGroup[("/fas:fa-user-circle Create Set Pose Group")] CreateSetPoseGroup --> SpaceSwitching[("/fas:fa-exchange-alt Space Switching")] SpaceSwitching --> FinalizeSetup[("/fas:fa-check-circle Finalize Setup")] FinalizeSetup --> End[("fas:fa-stop End")] style Start fill:#00cc00,stroke:#000,stroke-width:3px style InitializeGroups fill:#ffcc00,stroke:#000,stroke-width:2px style DefineNeckCurve fill:#ff9999,stroke:#000,stroke-width:2px style CreateNeckJoints fill:#99ccff,stroke:#000,stroke-width:2px style CreateChestHeadJoints fill:#cc99ff,stroke:#000,stroke-width:2px style OrientNeckJoints fill:#99ff99,stroke:#000,stroke-width:2px style GenerateNeckCurve fill:#ff9999,stroke:#000,stroke-width:2px style CreateNeckIKHandle fill:#99ccff,stroke:#000,stroke-width:2px style CreateNeckClusters fill:#cc99ff,stroke:#000,stroke-width:2px style SetupNeckControls fill:#99ff99,stroke:#000,stroke-width:2px style CreateJawJoints fill:#ff9999,stroke:#000,stroke-width:2px style CreateUpperJawJoints fill:#99ccff,stroke:#000,stroke-width:2px style CreateHeadControl fill:#cc99ff,stroke:#000,stroke-width:2px style ParentClustersToControls fill:#99ff99,stroke:#000,stroke-width:2px style SetupJawControl fill:#ff9999,stroke:#000,stroke-width:2px style SetupUpperJawControl fill:#99ccff,stroke:#000,stroke-width:2px style CreateSetPoseGroup fill:#cc99ff,stroke:#000,stroke-width:2px style SpaceSwitching fill:#99ff99,stroke:#000,stroke-width:2px style FinalizeSetup fill:#ff9999,stroke:#000,stroke-width:2px style End fill:#ff6666,stroke:#000,stroke-width:3px- Flow Chart Description:
This flowchart illustrates the as_CreateHeadSetup function:
Starts with initializing necessary groups for the head setup, such as IK and control groups.
Defines the neck curve which guides the creation of neck joints.
Creates neck joints along the defined neck curve.
Additional chest and head joints are created and properly oriented.
Neck joints are oriented to ensure correct bending and twisting motions.
Generates a curve along the neck joints for the IK handle setup.
Creates an IK handle for the neck, enabling flexible neck movement.
Clusters are created for each segment of the neck curve for finer control.
Sets up neck controls for animating the neck movements.
Creates jaw joints to define the jawline and motion path.
Upper jaw joints are created to enhance facial rigging capabilities.
Head control is created with attributes for manipulating jaw and upper jaw movements.
Clusters are parented to the respective controls for manipulation.
Sets up jaw and upper jaw controls on the head control.
Creates a set pose group for animation preparation.
Implements space switching for the head control, crucial for realistic head and neck animations.
Finalizes the setup by organizing and parenting all components into the rig hierarchy.
- EasyBird.as_CreateLegSetup(self)#
[shArgs : rf=refCount, fv=fontList[rand.randint(0, 5)]]
Purpose:
:: Creates a complete leg rig setup for a character, including reverse foot controls, IK/FK switching, and space switching.
This function constructs a comprehensive rigging system for leg and foot animations.
It includes reverse foot controls, IK/FK blending, pole vector controls, and space switching for dynamic animations.
- Parameters:
refCount – <int> # Reference count used for refreshing the viewport during the setup process.
fontList – <list> # A list of font names used to randomly select a font for the IK/FK switch control label.
- Returns:
None # This function does not return a value but constructs a full leg rig setup in the Maya scene.
Code Examples:
>>> as_CreateLegSetup()
# This will create a complete leg rig setup for both left and right legs, with all necessary controls and constraints.
graph TB Start[("fa:fa-play Start")] --> CreateJnts[("/fas:fa-sitemap Create Joints")] CreateJnts --> CreateIKFK[("/fas:fa-exchange-alt Create IK/FK System")] CreateIKFK --> CreateRF[("/fas:fa-cogs Create Reverse Foot")] CreateRF --> CreateCtrls[("/fas:fa-wrench Create Controls")] CreateCtrls --> CreateSpaceSwitch[("/fas:fa-globe-americas Create Space Switch")] CreateSpaceSwitch --> End[("fas:fa-stop End")] style Start fill:#00cc00,stroke:#000,stroke-width:3px style CreateJnts fill:#ff9999,stroke:#000,stroke-width:2px style CreateIKFK fill:#99ccff,stroke:#000,stroke-width:2px style CreateRF fill:#ffcc00,stroke:#000,stroke-width:2px style CreateCtrls fill:#99ff99,stroke:#000,stroke-width:2px style CreateSpaceSwitch fill:#cc99ff,stroke:#000,stroke-width:2px style End fill:#ff6666,stroke:#000,stroke-width:3px- Flow Chart Description:
This flowchart illustrates the as_CreateLegSetup function:
The process starts by creating leg joints for both left and right legs.
An IK/FK system is set up, including reverse foot controls, IK/FK switching, and pole vector controls.
Reverse foot controls are created for detailed foot animation.
Controls for the leg, including IK, FK, and foot controls, are created and set up.
Finally, a space switching system is implemented for dynamic control of the leg rig.
- EasyBird.as_CreateSpineSetup(self)#
[**shArgs : sc=spineCurve]
Purpose:
:: Creates a spine setup for character rigging in Autodesk Maya, including spine joints, IK handles, and control clusters.
This function is integral for rigging the spine of a character, providing flexibility and control for animation.
It automates the creation of spine joints based on vertex positions, sets up an IK spline handle for spine movement, and associates control clusters for easy manipulation.
The spine setup is crucial for achieving natural and realistic bending and twisting motions in character animation.
It also includes additional features like chest joint creation and control object generation for root and COG (Center of Gravity).
- Parameters:
spineCurve – <str> # The name of the curve used to define the spine’s path. This curve dictates the placement and orientation of the spine joints.
- Returns:
None # This function does not return a value but constructs a spine rigging setup in the Maya scene.
Code Examples:
>>> as_CreateSpineSetup("Spine_Path_Curve")
# This will create a spine setup using the specified spine path curve.
graph TB Start[("fa:fa-play Start")] --> InitializeGroups[("/fas:fa-object-group Initialize Groups")] InitializeGroups --> DefineSpineCurve[("/fas:fa-spline Define Spine Curve")] DefineSpineCurve --> CreateSpineJoints[("/fas:fa-bone Create Spine Joints")] CreateSpineJoints --> CreateChestJoint[("/fas:fa-plus-circle Create Chest Joint")] CreateChestJoint --> OrientSpineJoints[("/fas:fa-redo-alt Orient Spine Joints")] OrientSpineJoints --> GenerateSpineCurve[("/fas:fa-vector-square Generate Spine Curve")] GenerateSpineCurve --> CreateIKHandle[("/fas:fa-link Create IK Handle")] CreateIKHandle --> CreateClusters[("/fas:fa-object-ungroup Create Clusters")] CreateClusters --> SetupSpineControls[("/fas:fa-cogs Setup Spine Controls")] SetupSpineControls --> ParentClustersToControls[("/fas:fa-level-down-alt Parent Clusters to Controls")] ParentClustersToControls --> FinalizeSetup[("/fas:fa-check-circle Finalize Setup")] FinalizeSetup --> End[("fas:fa-stop End")] style Start fill:#00cc00,stroke:#000,stroke-width:3px style InitializeGroups fill:#ffcc00,stroke:#000,stroke-width:2px style DefineSpineCurve fill:#ff9999,stroke:#000,stroke-width:2px style CreateSpineJoints fill:#99ccff,stroke:#000,stroke-width:2px style CreateChestJoint fill:#cc99ff,stroke:#000,stroke-width:2px style OrientSpineJoints fill:#99ff99,stroke:#000,stroke-width:2px style GenerateSpineCurve fill:#ff9999,stroke:#000,stroke-width:2px style CreateIKHandle fill:#99ccff,stroke:#000,stroke-width:2px style CreateClusters fill:#cc99ff,stroke:#000,stroke-width:2px style SetupSpineControls fill:#99ff99,stroke:#000,stroke-width:2px style ParentClustersToControls fill:#ff9999,stroke:#000,stroke-width:2px style FinalizeSetup fill:#99ccff,stroke:#000,stroke-width:2px style End fill:#ff6666,stroke:#000,stroke-width:3px- Flow Chart Description:
This flowchart illustrates the as_CreateSpineSetup function:
The process begins by initializing necessary groups for the spine setup, like IK and joint groups.
Defines the spine curve based on the given input, which will guide the placement of spine joints.
Creates a series of spine joints aligned along the spine curve.
A chest joint is then created and properly parented within the joint hierarchy.
Orientations of spine joints are set up to ensure correct bending and twisting.
Generates a new curve along the spine joints for IK spline handle setup.
Creates an IK handle for the spine, enabling flexible movement.
Clusters are created for each segment of the spine curve for finer control.
Sets up spine controls, such as control objects for root and COG.
Parents the clusters to the respective spine controls for manipulation.
Finalizes the setup by organizing and parenting all components into the rig hierarchy.
- EasyBird.as_CreateSplineIK_Feathers(self, feathersList=None, wingJnts=None, mirrorSetup=True, LPrefix='L_', RPrefix='R_', **shArgs)#
[shArgs : fl=feathersList, wj=wingJnts, ms=mirrorSetup, lp=LPrefix, rp=RPrefix]
Purpose:
:: Creates a Spline IK setup for feathers, typically used in wing rigging.
This function automates the creation of a Spline IK system for feathers, facilitating the rigging of bird wings or similar structures.
It provides an option to mirror the setup, making the process efficient for symmetrical wing structures.
- Parameters:
feathersList – <list, optional> # List of feather objects. If not provided, it’s derived from the selected objects.
wingJnts – <list, optional> # List of joint objects for the wing. If not provided, the function attempts to determine them from the feathers list.
mirrorSetup – <bool> # Indicates whether to mirror the setup for the other side. Default is True.
LPrefix – <str> # Prefix for left side objects. Default is ‘L_’.
RPrefix – <str> # Prefix for right side objects. Default is ‘R_’.
- Returns:
<list> # Returns a list containing the IK handle and the list of created joints.
Code Examples:
>>> feathers = ["feather1", "feather2", "feather3"]
>>> wing_joints = ["joint1", "joint2", "joint3"]
>>> as_CreateSplineIK_Feathers(feathers, wing_joints)
# Creates a Spline IK system for the specified feathers and joints.
graph TB Start[("fa:fa-play Start")] --> CheckFeathersList{"/fas:fa-question-circle Check Feathers List"} CheckFeathersList --"If feathers list provided" --> MapFeathers[("/fas:fa-map-marked-alt Map Feathers")] CheckFeathersList --"If feathers list not provided" --> SelectFeathers[("/fas:fa-mouse-pointer Select Feathers")] MapFeathers --> CheckWingJoints{"/fas:fa-question-circle Check Wing Joints"} SelectFeathers --> CheckWingJoints CheckWingJoints --"If wing joints provided" --> MapWingJoints[("/fas:fa-map-marked-alt Map Wing Joints")] CheckWingJoints --"If wing joints not provided" --> DetermineWingJoints[("/fas:fa-search-plus Determine Wing Joints")] MapWingJoints --> GenerateCurve[("/fas:fa-drafting-compass Generate Curve")] DetermineWingJoints --> GenerateCurve GenerateCurve --> CreateJoints[("/fas:fa-bone Create Joints")] CreateJoints --> OrientJoints[("/fas:fa-redo-alt Orient Joints")] OrientJoints --> CreateIKHandle[("/fas:fa-link Create IK Handle")] CreateIKHandle --> CheckBindSkinning{{"/fas:fa-question-circle Check Bind Skinning"}} CheckBindSkinning --"If skinning required" --> BindSkin[("/fas:fa-user-md Bind Skin")] CheckBindSkinning --"No skinning" --> End[("fas:fa-stop End")] BindSkin --> End style Start fill:#00cc00,stroke:#000,stroke-width:3px style CheckFeathersList fill:#ffcc00,stroke:#000,stroke-width:2px style MapFeathers fill:#99ccff,stroke:#000,stroke-width:2px style SelectFeathers fill:#ffcc99,stroke:#000,stroke-width:2px style CheckWingJoints fill:#ffcc00,stroke:#000,stroke-width:2px style MapWingJoints fill:#99ccff,stroke:#000,stroke-width:2px style DetermineWingJoints fill:#ffcc99,stroke:#000,stroke-width:2px style GenerateCurve fill:#cc99ff,stroke:#000,stroke-width:2px style CreateJoints fill:#99ff99,stroke:#000,stroke-width:2px style OrientJoints fill:#ff9999,stroke:#000,stroke-width:2px style CreateIKHandle fill:#cc99ff,stroke:#000,stroke-width:2px style CheckBindSkinning fill:#ffcc00,stroke:#000,stroke-width:2px style BindSkin fill:#99ff99,stroke:#000,stroke-width:2px style End fill:#ff6666,stroke:#000,stroke-width:3px- Flow Chart Description:
This flowchart illustrates the as_CreateSplineIK_Feathers function:
Starts by checking if a feathers list is provided.
If not provided, selects feathers manually.
Checks for wing joints; if not provided, determines them from feathers list.
Generates a curve based on feathers or specified path.
Creates joints along the curve and orients them appropriately.
Creates an IK handle for the spline setup.
Checks if skinning is required for the wing joints.
Binds the skin to the curve if necessary.
Completes the Spline IK setup for feathers.
- EasyBird.as_CreateTailSetup(self)#
Purpose:
:: Establishes a tail rigging setup for characters, including joint creation, IK handles, and control curves.
This function creates joints for the tail, sets up IK handles, and generates control curves for animating the tail.
It ensures seamless integration with existing spine and global control structures.
The setup offers robust control for animating complex tail movements.
- Parameters:
topGrp – <asNode> # Top group node for the rig.
transGrp – <asNode> # Transform group node.
jntGrp – <asNode> # Joint group node.
geoGrp – <asNode> # Geometry group node.
ikGrp – <asNode> # IK group node.
gCtrlGrp – <asNode> # Global control group node.
rootCtrlGrp – <asNode> # Root control group node.
tailName – <list of asNode> # List of tail joint nodes.
jawName – <list of asNode> # List of jaw joint nodes.
spineName – <list of asNode> # List of spine joint nodes.
setPose – <asNode> # Set pose node.
setPoseGrp – <asNode> # Set pose group node.
spineCurve – <asNode> # Spine curve node.
tailCurve – <asNode> # Tail curve node.
- Returns:
None # This function does not return a value but sets up the tail rigging for the character.
Code Examples:
>>> as_CreateTailSetup()
# This example configures the tail rigging for a character with predefined spine, tail, and global control structures.
graph TB Start[("fa:fa-play Start")] --> InitializeTailSetup[("/fas:fa-tools Initialize Tail Setup")] InitializeTailSetup --> CreateTailJoints[("/fas:fa-bone Create Tail Joints")] CreateTailJoints --> CreateIKHandle[("/fas:fa-link Create IK Handle")] CreateIKHandle --> CreateControlClusters[("/fas:fa-sitemap Create Control Clusters")] CreateControlClusters --> CreateTailControls[("/fas:fa-paw Create Tail Controls")] CreateTailControls --> ParentClustersToControls[("/fas:fa-link Parent Clusters to Controls")] ParentClustersToControls --> CreateExtraControls[("/fas:fa-plus-circle Create Extra Controls")] CreateExtraControls --> LockAttributes[("/fas:fa-lock Lock Necessary Attributes")] LockAttributes --> FinalizeSetup[("/fas:fa-check-circle Finalize Tail Setup")] FinalizeSetup --> End[("fas:fa-stop End")] style Start fill:#00cc00,stroke:#000,stroke-width:3px style InitializeTailSetup fill:#ffcc00,stroke:#000,stroke-width:2px style CreateTailJoints fill:#ff9999,stroke:#000,stroke-width:2px style CreateIKHandle fill:#99ccff,stroke:#000,stroke-width:2px style CreateControlClusters fill:#cc99ff,stroke:#000,stroke-width:2px style CreateTailControls fill:#99ff99,stroke:#000,stroke-width:2px style ParentClustersToControls fill:#ffcc99,stroke:#000,stroke-width:2px style CreateExtraControls fill:#ccffcc,stroke:#000,stroke-width:2px style LockAttributes fill:#99ff99,stroke:#000,stroke-width:2px style FinalizeSetup fill:#ff9999,stroke:#000,stroke-width:2px style End fill:#ff6666,stroke:#000,stroke-width:3px- Flow Chart Description:
This flowchart illustrates the as_CreateTailSetup function:
Starts by initializing the setup for the tail rigging.
Creates the tail joints based on the specified vertex positions.
Sets up the IK handle for the tail, enabling dynamic movement.
Generates control clusters along the tail for precise manipulation.
Creates the tail controls for animating the tail movements.
Parents the control clusters to the corresponding tail controls.
Adds extra controls to enhance the rigging flexibility.
Locks necessary attributes to prevent unwanted manipulations.
Finalizes the tail setup, integrating it with the character rig.
Completes the tail rigging process, enhancing the character’s expressiveness.
- EasyBird.as_CreateToeSetup(self)#
[shArgs : rf=refCount]
Purpose:
:: Constructs toe rigging for a character, including IK/FK setups, controls, and constraints for toe animations.
This function builds detailed toe rigging, providing animators with precise control over toe movements.
It includes the creation of joints, controls, IK handles, and FK setups for each toe, along with necessary constraints for seamless IK/FK switching.
- Parameters:
refCount – <int> # Reference count for viewport refresh during rigging setup.
- Returns:
None # This function doesn’t return a value but sets up the toe rigging in the Maya scene.
Code Examples:
>>> as_CreateToeSetup()
# This example command sets up the toe rigging for both left and right feet, providing IK/FK controls and other functionalities.
graph TB Start[("fa:fa-play Start")] --> CreateJnts[("/fas:fa-sitemap Create Toe Joints")] CreateJnts --> CreateCtrls[("/fas:fa-wrench Create Controls")] CreateCtrls --> CreateIK[("/fas:fa-arrows-alt-v Create IK Handles")] CreateIK --> SetupConstraints[("/fas:fa-link Setup Constraints")] SetupConstraints --> End[("fas:fa-stop End")] style Start fill:#00cc00,stroke:#000,stroke-width:3px style CreateJnts fill:#ff9999,stroke:#000,stroke-width:2px style CreateCtrls fill:#99ccff,stroke:#000,stroke-width:2px style CreateIK fill:#ffcc00,stroke:#000,stroke-width:2px style SetupConstraints fill:#99ff99,stroke:#000,stroke-width:2px style End fill:#ff6666,stroke:#000,stroke-width:3px- Flow Chart Description:
This flowchart illustrates the as_CreateToeSetup function:
The process begins with the creation of toe joints for both left and right feet.
Toe controls are then created for animating each toe independently.
IK handles are set up for the toes to facilitate IK-based animations.
Finally, constraints are established to allow seamless IK/FK switching for the toe rigging.
- EasyBird.as_CreateTongue_Setup(self)#
[**shArgs : tn=tongueName, dn=dynEnabled, st=setupType, pt=parentTo]
Purpose:
:: Sets up the tongue rig for a character, providing dynamic and FK control options.
This function is crucial for adding realistic tongue movements in character animations.
It allows for dynamic simulation of the tongue, adding naturalistic motion and secondary animation.
The function provides the option to choose between dynamic and FK controls based on the setup type.
It also ensures that the tongue setup is correctly parented to relevant jaw controls for coherent movement.
- Parameters:
tongueName – <str> # Name identifier for the tongue setup components.
dynEnabled – <bool> # Flag to enable or disable dynamics for the tongue. True for dynamics, False for FK.
setupType – <int> # The type of setup to use. 0 for dynamics, 1 for FK, or other specific setup types.
parentTo – <bool> # Determines whether to parent the tongue setup to the jaw joint. True for parenting, False otherwise.
- Returns:
None # The function configures the tongue rigging components without returning any specific value.
Code Examples:
>>> as_CreateTongue_Setup("Character_Tongue", True, 1, True)
# This example creates a dynamic tongue setup named "Character_Tongue" and parents it to the jaw control.
graph TB Start[("fa:fa-play Start")] --> InitializeTongueSetup[("/fas:fa-paint-roller Initialize Tongue Setup")] InitializeTongueSetup --> DetermineSetupType{"/fas:fa-cogs Determine Setup Type"} DetermineSetupType --"Dynamic Enabled"--> CreateDynamicTongue[("/fas:fa-wave-square Create Dynamic Tongue")] DetermineSetupType --"FK Enabled"--> CreateFKTongue[("/fas:fa-arrows-alt Create FK Tongue")] CreateDynamicTongue --> ParentDynamicTongue[("/fas:fa-link Parent Dynamic Tongue")] CreateFKTongue --> ParentFKTongue[("/fas:fa-link Parent FK Tongue")] ParentDynamicTongue --> FinalizeDynamicSetup[("/fas:fa-check-circle Finalize Dynamic Setup")] ParentFKTongue --> FinalizeFKSetup[("/fas:fa-check-circle Finalize FK Setup")] FinalizeDynamicSetup --> End[("fas:fa-stop End")] FinalizeFKSetup --> End style Start fill:#00cc00,stroke:#000,stroke-width:3px style InitializeTongueSetup fill:#ffcc00,stroke:#000,stroke-width:2px style DetermineSetupType fill:#ff9999,stroke:#000,stroke-width:2px style CreateDynamicTongue fill:#99ccff,stroke:#000,stroke-width:2px style CreateFKTongue fill:#cc99ff,stroke:#000,stroke-width:2px style ParentDynamicTongue fill:#99ff99,stroke:#000,stroke-width:2px style ParentFKTongue fill:#ff9999,stroke:#000,stroke-width:2px style FinalizeDynamicSetup fill:#99ccff,stroke:#000,stroke-width:2px style FinalizeFKSetup fill:#cc99ff,stroke:#000,stroke-width:2px style End fill:#ff6666,stroke:#000,stroke-width:3px- Flow Chart Description:
This flowchart illustrates the as_CreateTongue_Setup function:
The function begins with initializing the tongue setup.
Determines the setup type based on dynEnabled and setupType parameters.
If dynamic setup is enabled, it creates a dynamic tongue setup with physics-based simulation.
If FK setup is enabled, it creates FK controls for manual tongue manipulation.
Parents the dynamic tongue setup to the specified jaw or head control, depending on parentTo.
Parents the FK tongue setup similarly to the specified control.
Finalizes the dynamic setup, ensuring all components are correctly linked and organized.
Finalizes the FK setup with a similar process, completing the tongue rig setup.
- EasyBird.as_DeleteBasicSetup(self)#
[**shArgs : none]
Purpose:
:: Deletes the basic setup components from the Autodesk Maya scene, commonly used in rigging processes.
This function is designed to remove specific objects like ‘Global_Curve’, ‘Global_Ex_Grp’, ‘Mirror_Bone_Grp’, ‘as_BasicSetup_EB’, and ‘Bone_Shader’ from the Maya scene.
A confirmation dialog is presented to the user before proceeding with the deletion to prevent accidental loss of data.
This function aids in scene cleanup by removing initial setup objects that are no longer needed.
Provide Argument | Description in below format [Note: <Sub Title in Bold Lettters> Format below 3 lines including ‘:’s & ‘#’ as per sphinx documentation format needs]
No arguments are required for this function.
- Returns:
None # This function does not return a value but performs a deletion action in the Maya scene.
Code Examples:
>>> as_DeleteBasicSetup()
# This will ask for user confirmation before deleting specific basic setup components from the Maya scene.
graph TD Start[("fa:fa-play Start")] --> ConfirmDeletion{"/fas:fa-question-circle Confirm Deletion"} ConfirmDeletion --"Yes"--> DeleteComponents["/fas:fa-trash-alt Delete Components"] DeleteComponents --> CheckDeletionSuccess{"/fas:fa-check-square Check Deletion Success"} CheckDeletionSuccess --"Success"--> DisplaySuccessMessage["/fas:fa-check Display Success Message"] CheckDeletionSuccess --"Failure"--> DisplayFailureMessage["/fas:fa-times Display Failure Message"] ConfirmDeletion --"No"--> DisplayCancelledMessage["/fas:fa-info-circle Display Cancelled Message"] DisplaySuccessMessage --> End[("fas:fa-stop End")] DisplayFailureMessage --> End DisplayCancelledMessage --> End style Start fill:#00cc00,stroke:#000,stroke-width:3px style ConfirmDeletion fill:#ffcc00,stroke:#000,stroke-width:2px style DeleteComponents fill:#99ccff,stroke:#000,stroke-width:2px style CheckDeletionSuccess fill:#99ff99,stroke:#000,stroke-width:2px style DisplaySuccessMessage fill:#cc99ff,stroke:#000,stroke-width:2px style DisplayFailureMessage fill:#99ccff,stroke:#000,stroke-width:2px style DisplayCancelledMessage fill:#99ff99,stroke:#000,stroke-width:2px style End fill:#ff6666,stroke:#000,stroke-width:3px- Flow Chart Description:
This flowchart illustrates the as_DeleteBasicSetup function:
The process begins with a confirmation dialog asking if the user wants to delete the basic setup.
Upon confirmation with ‘Yes’, the function proceeds to delete specific setup components like ‘Global_Curve’, ‘Global_Ex_Grp’, etc.
After attempting deletion, the function checks whether the deletion was successful.
If successful, a message confirming the successful removal is displayed. If not, a warning message is shown.
If ‘No’ is chosen in the confirmation dialog, a message indicating the cancellation of the delete action is displayed.
The process ends following the display of the appropriate message.
- EasyBird.as_EasyBird(self, gCtrl=None)#
[**shArgs : gc=gCtrl]
Purpose:
:: Launches the EasyBird interface, a tool designed for efficient and user-friendly rigging of bird-like characters in Maya.
This function initializes and displays the EasyBird main window, providing a suite of tools for creating and managing bird rigs.
It dynamically loads UI elements and assigns functionality to various controls within the interface.
- No params needed:
- Returns:
None # This function does not return a value but launches the EasyBird tool interface.
Code Examples:
>>> as_EasyBird()
# This will initialize and display the EasyBird main window for bird rigging.
- EasyBird.as_EasyBird02(self)#
- EasyBird.as_FinalizeBasicSetup(self)#
[**shArgs : gcg=globalControlGrp, ci=connectionInfo, da=disconnectAttr, s=select, mi=makeIdentity, om=om]
Purpose:
:: Finalizes the basic setup by resetting the global control group’s scale in Autodesk Maya.
This function is used at the end of a rigging process to ensure the global control group is set to its default scale.
It disconnects any existing scale connections and resets the scale to (1, 1, 1), standardizing the rig’s scale setup.
- Parameters:
globalControlGrp – <str> #Name of the global control group whose scale is to be reset.
connectionInfo – <function> #Function to get connection information of an attribute in Maya.
disconnectAttr – <function> #Function to disconnect attributes in Maya.
select – <function> #Function to select objects in Maya.
makeIdentity – <function> #Function to apply transformations to objects in Maya.
om – <module> #OpenMaya module for displaying information in Maya.
- Returns:
None #No return value. The function performs an action directly in the Maya scene.
Code Examples:
>>> as_FinalizeBasicSetup()
# This will reset the scale of the global control group to its default value.
graph TB Start[("fa:fa-play Start")] --> CheckGlobalControlGrp{"/fas:fa-search-plus Check Global Control Group"} CheckGlobalControlGrp --"If Global Control Group Exists"--> RetrieveConnectionAttr["/fas:fa-plug Retrieve Connection Attributes"] RetrieveConnectionAttr --> DisconnectScaleAttr["/fas:fa-unlink Disconnect Scale Attributes"] DisconnectScaleAttr --> SelectGlobalCtrlGrp["/fas:fa-mouse-pointer Select Global Control Group"] SelectGlobalCtrlGrp --> ApplyIdentity["/fas:fa-sync-alt Apply Identity Transformation"] ApplyIdentity --> DisplaySuccessMessage["/fas:fa-check-circle Display Success Message"] DisplaySuccessMessage --> End[("fas:fa-stop End")] CheckGlobalControlGrp --"If Global Control Group Does Not Exist"--> End style Start fill:#00cc00,stroke:#000,stroke-width:3px style CheckGlobalControlGrp fill:#ffcc00,stroke:#000,stroke-width:2px style RetrieveConnectionAttr fill:#99ccff,stroke:#000,stroke-width:2px style DisconnectScaleAttr fill:#99ff99,stroke:#000,stroke-width:2px style SelectGlobalCtrlGrp fill:#cc99ff,stroke:#000,stroke-width:2px style ApplyIdentity fill:#99ccff,stroke:#000,stroke-width:2px style DisplaySuccessMessage fill:#00cc00,stroke:#000,stroke-width:3px style End fill:#ff6666,stroke:#000,stroke-width:3px- Flow Chart Description:
This flowchart illustrates the as_FinalizeBasicSetup function:
The process starts by checking for the existence of the Global Control Group.
If it exists, it retrieves the connection attributes for the scale of the Global Control Group.
It then disconnects any existing scale attributes to reset scale values.
The Global Control Group is selected.
Identity transformation is applied to reset scale to (1, 1, 1).
A success message is displayed to indicate completion.
The function ends after resetting the scale of the Global Control Group.
- EasyBird.as_FinalizeSetup(self)#
[**shArgs : cp=charPrfx, ow=onlyWings, tx=textField, mc=mc, cb=checkBox, as=asNode, er=eRig, es=eSpec]
Purpose:
:: Completes the rigging process by setting up various controls and attributes for the character in Autodesk Maya.
This function is an essential step in finalizing the rig setup. It configures various aspects such as space switch for the head control, locks specific attributes, and hides unnecessary nodes.
It also creates annotations and selection sets for easier management of the character rig.
- Parameters:
charPrfx – <str> # Character prefix used to identify controls and other rig elements.
onlyWings – <bool> # Indicates if the setup is only for wings.
textField – <function> # Function to query the value from a text field in the Maya UI.
checkBox – <function> # Function to query the value from a checkbox in the Maya UI.
- Returns:
None #No return value. The function performs an action directly in the Maya scene.
Code Examples:
>>> as_FinalizeSetup()
# This will finalize the setup of a character rig based on the specified parameters and selections.
graph TB Start[("fa:fa-play Start")] --> CheckOnlyWings{"/fas:fa-question-circle Check Only Wings"} CheckOnlyWings --"If not Only Wings"--> SetupSpaceSwitch["/fas:fa-arrows-alt Setup Space Switch for Head Ctrl"] CheckOnlyWings --"If Only Wings"--> LockAttributes SetupSpaceSwitch --> LockAttributes["/fas:fa-lock Lock Attributes"] LockAttributes --> HideNodes["/fas:fa-eye-slash Hide IKs, Curves, Clusters"] HideNodes --> CheckOnlyWingsJoints CheckOnlyWingsJoints{"/fas:fa-question-circle Check Only Wings for Joints"} --"If not Only Wings"--> LockHideJoints["/fas:fa-bone Lock & Hide Joints"] CheckOnlyWingsJoints --"If Only Wings"--> AddAnnotation LockHideJoints --> AddAnnotation["/fas:fa-sticky-note Add Annotation"] AddAnnotation --> CreateSelectionSet["/fas:fa-object-group Create Selection Set"] CreateSelectionSet --> End[("fas:fa-stop End")] style Start fill:#00cc00,stroke:#000,stroke-width:3px style CheckOnlyWings fill:#ffcc00,stroke:#000,stroke-width:2px style SetupSpaceSwitch fill:#99ccff,stroke:#000,stroke-width:2px style LockAttributes fill:#99ff99,stroke:#000,stroke-width:2px style HideNodes fill:#cc99ff,stroke:#000,stroke-width:2px style CheckOnlyWingsJoints fill:#ffcc00,stroke:#000,stroke-width:2px style LockHideJoints fill:#99ccff,stroke:#000,stroke-width:2px style AddAnnotation fill:#99ff99,stroke:#000,stroke-width:2px style CreateSelectionSet fill:#cc99ff,stroke:#000,stroke-width:2px style End fill:#ff6666,stroke:#000,stroke-width:3px- Flow Chart Description:
This flowchart illustrates the as_FinalizeSetup function:
The process starts by checking if the setup is only for wings.
If not only for wings, it sets up a space switch for the head control.
Then, it locks certain attributes for all controls.
Next, it hides IK handles, curves, and cluster nodes.
If the setup is not only for wings, it locks and hides joints.
An annotation is added to the global control.
Finally, a selection set is created for key controls, and the process ends.
- EasyBird.as_FixFeatherCtrls(self)#
[shArgs : fc=ctrl, pg=parentGroups]
Purpose:
:: Adjusts the orientation of feather controls by modifying the offset of orientation constraints.
This function is particularly useful for correcting the orientation of feather controls in avian models.
It iteratively checks each control’s parent groups for orientation constraints and adjusts their offsets.
- Parameters:
ctrl – <asNode> # The feather control whose orientation needs adjustment.
parentGroups – <list of asNode> # List of parent groups of the control to check for orientation constraints.
- Returns:
None # This function does not return a value but adjusts the orientation of feather controls.
Code Examples:
>>> as_FixFeatherCtrls()
# This example adjusts the orientation of selected feather controls.
graph TB Start[("fa:fa-play Start")] --> GetCtrlList[("/fas:fa-list Get Control List")] GetCtrlList --> ForEachCtrl{{"/fas:fa-repeat For Each Control"}} ForEachCtrl --"For each control" --> GetParentGroups[("/fas:fa-sitemap Get Parent Groups")] GetParentGroups --> CheckOriConstraint{{"/fas:fa-search-plus Check Orientation Constraint"}} CheckOriConstraint --"Orientation Constraint Found" --> AdjustOffset[("/fas:fa-tools Adjust Offset")] AdjustOffset --"Adjust offset by 180 degrees" --> End[("fas:fa-stop End")] CheckOriConstraint --"No Orientation Constraint" --> End style Start fill:#00cc00,stroke:#000,stroke-width:3px style GetCtrlList fill:#99ccff,stroke:#000,stroke-width:2px style ForEachCtrl fill:#ffcc00,stroke:#000,stroke-width:2px style GetParentGroups fill:#99ccff,stroke:#000,stroke-width:2px style CheckOriConstraint fill:#ffcc00,stroke:#000,stroke-width:2px style AdjustOffset fill:#cc99ff,stroke:#000,stroke-width:2px style End fill:#ff6666,stroke:#000,stroke-width:3px- Flow Chart Description:
This flowchart illustrates the as_FixFeatherCtrls function:
The process starts by obtaining a list of selected feather controls.
For each control in the list, it retrieves their parent groups.
Checks if any parent group has an orientation constraint.
If an orientation constraint is found, the offset is adjusted by 180 degrees to correct the control’s orientation.
The process is repeated for each control, and the function concludes once all controls are adjusted.
- EasyBird.as_FixPivot(self)#
[shArgs : gl=grpLevel, vn=vtxNo]
Purpose:
:: Corrects pivot positions for selected feather objects in Autodesk Maya.
This function adjusts the pivot of each feather object to a specified vertex.
Ideal for fixing feather pivots in rigging and animation workflows.
- Parameters:
grpLevel – <int> # Group level depth to determine the top group of the selected feathers.
vtxNo – <int> # Vertex number to which the pivot of the feather will be snapped.
- Returns:
None # This function does not return any value but adjusts the pivot of selected feather objects.
Code Examples:
>>> as_FixPivot(grpLevel=2, vtxNo=5)
# Adjusts the pivot of selected feathers to vertex number 5 at a group level depth of 2.
graph TB Start[("fa:fa-play Start")] --> CheckSelection{"/fas:fa-check-circle Check Selection"} CheckSelection --"If Selection Exists"--> InitializeVariables["/fas:fa-sliders-h Initialize Variables"] CheckSelection --"If No Selection"--> DisplayWarning["/fas:fa-exclamation-triangle Display Warning"] InitializeVariables --> GetFeatherList["/fas:fa-list Get Feather List"] GetFeatherList --> IterateFeathers["/fas:fa-repeat Iterate Through Feathers"] IterateFeathers --> CheckGroupLevel{"/fas:fa-sitemap Check Group Level"} CheckGroupLevel --"If Group Level Specified"--> IdentifyTopGroup["/fas:fa-object-group Identify Top Group"] CheckGroupLevel --"If Group Level Not Specified"--> SnapPivotToVertex["/fas:fa-crosshairs Snap Pivot to Vertex"] IdentifyTopGroup --> SnapPivotToVertex SnapPivotToVertex --> CheckSiblingFeathers{"/fas:fa-users Check Sibling Feathers"} CheckSiblingFeathers --"If Sibling Feathers Exist"--> SnapSiblingPivots["/fas:fa-sync-alt Snap Sibling Pivots"] CheckSiblingFeathers --"If No Sibling Feathers"--> AppendToFeatherList["/fas:fa-plus Append to Feather List"] SnapSiblingPivots --> AppendToFeatherList AppendToFeatherList --> IterateFeathers IterateFeathers --"After Last Feather"--> SelectAdjustedFeathers["/fas:fa-mouse-pointer Select Adjusted Feathers"] DisplayWarning --> End["/fas:fa-stop End"] SelectAdjustedFeathers --> End style Start fill:#00cc00,stroke:#000,stroke-width:3px style CheckSelection fill:#ffcc99,stroke:#000,stroke-width:2px style InitializeVariables fill:#99ccff,stroke:#000,stroke-width:2px style GetFeatherList fill:#cc99ff,stroke:#000,stroke-width:2px style IterateFeathers fill:#99ff99,stroke:#000,stroke-width:2px style CheckGroupLevel fill:#ffcc99,stroke:#000,stroke-width:2px style IdentifyTopGroup fill:#ccffcc,stroke:#000,stroke-width:2px style SnapPivotToVertex fill:#99ccff,stroke:#000,stroke-width:2px style CheckSiblingFeathers fill:#cc99ff,stroke:#000,stroke-width:2px style SnapSiblingPivots fill:#ffcc99,stroke:#000,stroke-width:2px style AppendToFeatherList fill:#ccffcc,stroke:#000,stroke-width:2px style SelectAdjustedFeathers fill:#99ff99,stroke:#000,stroke-width:2px style DisplayWarning fill:#ff6666,stroke:#000,stroke-width:3px style End fill:#ff6666,stroke:#000,stroke-width:3px- Flow Chart Description:
This flowchart illustrates the as_FixPivot function:
Starts by checking if any objects are selected.
If no objects are selected, displays a warning.
If objects are selected, initializes variables including group level and vertex number.
Retrieves a list of feather objects to be adjusted.
Iterates through each feather object.
Checks the specified group level to identify the top group of the feather.
Snaps the pivot of each feather to the specified vertex.
Checks for sibling feathers and snaps their pivots if they exist.
Appends each adjusted feather to a list for selection.
After adjusting all feathers, selects the feathers with adjusted pivots.
The process ends after selecting the adjusted feathers.
- EasyBird.as_FixPosition(self)#
[shArgs : gl=grpLevel]
Purpose:
:: Adjusts the position of selected feather objects while maintaining their world space transformations in Autodesk Maya.
This function is designed to unfreeze the transform of feathers without altering their position in world space.
Suitable for rigging and animation workflows where feather position needs to be reset without changing their global location.
- Parameters:
grpLevel – <int> # Group level depth to determine the top group of the selected feathers.
- Returns:
None # This function does not return any value but adjusts the position of selected feather objects.
Code Examples:
>>> as_FixPosition(grpLevel=2)
# Resets the position of selected feathers at a group level depth of 2 while keeping their world space transformations intact.
graph TB Start[("fa:fa-play Start")] --> CheckSelection{"/fas:fa-check-circle Check Selection"} CheckSelection --"If Selection Exists"--> InitializeVariables["/fas:fa-sliders-h Initialize Variables"] CheckSelection --"If No Selection"--> DisplayWarning["/fas:fa-exclamation-triangle Display Warning"] InitializeVariables --> GetFeatherList["/fas:fa-list Get Feather List"] GetFeatherList --> IterateFeathers["/fas:fa-repeat Iterate Through Feathers"] IterateFeathers --> CheckGroupLevel{"/fas:fa-sitemap Check Group Level"} CheckGroupLevel --"If Group Level Specified"--> IdentifyExternalGroup["/fas:fa-object-group Identify External Group"] CheckGroupLevel --"If Group Level Not Specified"--> ResetPosition["/fas:fa-crosshairs Reset Position"] IdentifyExternalGroup --> ResetPosition ResetPosition --> AppendToFeatherList["/fas:fa-plus Append to Feather List"] AppendToFeatherList --> IterateFeathers IterateFeathers --"After Last Feather"--> SelectAdjustedFeathers["/fas:fa-mouse-pointer Select Adjusted Feathers"] DisplayWarning --> End["/fas:fa-stop End"] SelectAdjustedFeathers --> End style Start fill:#00cc00,stroke:#000,stroke-width:3px style CheckSelection fill:#ffcc99,stroke:#000,stroke-width:2px style InitializeVariables fill:#99ccff,stroke:#000,stroke-width:2px style GetFeatherList fill:#cc99ff,stroke:#000,stroke-width:2px style IterateFeathers fill:#99ff99,stroke:#000,stroke-width:2px style CheckGroupLevel fill:#ffcc99,stroke:#000,stroke-width:2px style IdentifyExternalGroup fill:#ccffcc,stroke:#000,stroke-width:2px style ResetPosition fill:#99ccff,stroke:#000,stroke-width:2px style AppendToFeatherList fill:#cc99ff,stroke:#000,stroke-width:2px style SelectAdjustedFeathers fill:#ffcc99,stroke:#000,stroke-width:2px style DisplayWarning fill:#ff6666,stroke:#000,stroke-width:3px style End fill:#ff6666,stroke:#000,stroke-width:3px- Flow Chart Description:
This flowchart illustrates the as_FixPosition function:
Checks if any objects are selected for position adjustment.
If no objects are selected, displays a warning.
If objects are selected, initializes variables including the group level.
Retrieves a list of feather objects to be adjusted.
Iterates through each feather object.
Checks the specified group level to identify the external group of the feather.
Resets the position of each feather to its initial world space position without altering transformations.
Appends each adjusted feather to a list for selection.
After adjusting all feathers, selects the feathers with reset positions.
The process ends after selecting the adjusted feathers.
- EasyBird.as_FixRotation(self, endJnt=False)#
[shArgs : ]
Purpose:
:: Adjusts the rotation of feather objects to align them correctly based on their vertex positions in Autodesk Maya.
Aims to fix the rotation of feathers without affecting their position, ideal for rigging and animation.
Utilizes specified vertices to determine the correct orientation of each feather.
- Parameters:
endJnt – <bool> # Indicates if the operation should consider end joints for rotation alignment.
grpLevel – <int> # Group level depth for finding the top group of the selected feathers.
vtxNo – <int> # Vertex number used as a reference for aligning the rotation.
sideVtxNum – <int> # Additional vertex number used for determining the side orientation.
- Returns:
None # This function does not return any value but adjusts the rotation of selected feather objects.
Code Examples:
>>> as_FixRotation(endJnt=False, grpLevel=2, vtxNo=5, sideVtxNum=10)
# Fixes the rotation of selected feathers using specified vertex numbers for alignment.
graph TB Start[("fa:fa-play Start")] --> CheckSelection{"/fas:fa-check-circle Check Selection"} CheckSelection --"If Selection Exists"--> InitializeVariables["/fas:fa-sliders-h Initialize Variables"] CheckSelection --"If No Selection"--> DisplayWarning["/fas:fa-exclamation-triangle Display Warning"] InitializeVariables --> IterateFeathers["/fas:fa-repeat Iterate Through Feathers"] IterateFeathers --> CheckSide{"/fas:fa-exchange-alt Check Side"} CheckSide --> SetupLocators["/fas:fa-map-marker-alt Setup Locators"] SetupLocators --> ResetGroupRotation["/fas:fa-undo-alt Reset Group Rotation"] ResetGroupRotation --> AimConstraintSetup["/fas:fa-compass Aim Constraint Setup"] AimConstraintSetup --> GetFinalRotation["/fas:fa-sync-alt Get Final Rotation"] GetFinalRotation --> DeleteAimConstraint["/fas:fa-trash-alt Delete Aim Constraint"] DeleteAimConstraint --> AdjustPivot["/fas:fa-crosshairs Adjust Pivot"] AdjustPivot --> SetFinalRotation["/fas:fa-redo-alt Set Final Rotation"] SetFinalRotation --> ReparentGroup["/fas:fa-link Reparent Group"] ReparentGroup --> AppendToFeatherList["/fas:fa-plus Append to Feather List"] AppendToFeatherList --> IterateFeathers IterateFeathers --"After Last Feather"--> CleanupLocators["/fas:fa-broom Cleanup Locators"] CleanupLocators --> SelectAdjustedFeathers["/fas:fa-mouse-pointer Select Adjusted Feathers"] DisplayWarning --> End["/fas:fa-stop End"] SelectAdjustedFeathers --> End style Start fill:#00cc00,stroke:#000,stroke-width:3px style CheckSelection fill:#ffcc99,stroke:#000,stroke-width:2px style InitializeVariables fill:#99ccff,stroke:#000,stroke-width:2px style IterateFeathers fill:#99ff99,stroke:#000,stroke-width:2px style CheckSide fill:#ffcc99,stroke:#000,stroke-width:2px style SetupLocators fill:#ccffcc,stroke:#000,stroke-width:2px style ResetGroupRotation fill:#99ccff,stroke:#000,stroke-width:2px style AimConstraintSetup fill:#cc99ff,stroke:#000,stroke-width:2px style GetFinalRotation fill:#99ff99,stroke:#000,stroke-width:2px style DeleteAimConstraint fill:#ffcc99,stroke:#000,stroke-width:2px style AdjustPivot fill:#ccffcc,stroke:#000,stroke-width:2px style SetFinalRotation fill:#99ccff,stroke:#000,stroke-width:2px style ReparentGroup fill:#cc99ff,stroke:#000,stroke-width:2px style AppendToFeatherList fill:#ffcc99,stroke:#000,stroke-width:2px style CleanupLocators fill:#ccffcc,stroke:#000,stroke-width:2px style SelectAdjustedFeathers fill:#99ccff,stroke:#000,stroke-width:2px style DisplayWarning fill:#ff6666,stroke:#000,stroke-width:3px style End fill:#ff6666,stroke:#000,stroke-width:3px- Flow Chart Description:
This flowchart illustrates the as_FixRotation function:
Checks if any objects are selected for rotation adjustment.
If no objects are selected, displays a warning.
If objects are selected, initializes variables for rotation adjustment.
Iterates through each feather object for rotation correction.
Checks the side (left or right) of each feather for correct orientation.
Sets up locators for aim constraint and directional guidance.
Resets the rotation of the group containing the feather.
Applies aim constraint to align the feather correctly.
Retrieves the final rotation values from the constrained locators.
Deletes the aim constraint after obtaining the necessary rotation values.
Adjusts the pivot of the feather based on the locator positions.
Sets the final rotation values to the feather’s external group.
Reparents the feather to its original group if necessary.
Appends each adjusted feather to a list for selection.
After adjusting all feathers, cleans up any created locators.
Selects the feathers with adjusted rotations.
The process ends after selecting the adjusted feathers.
- EasyBird.as_FixRotationOffsets(self, selList=None)#
[shArgs : sl=selList]
Purpose:
:: Corrects the rotation offsets of selected objects in Autodesk Maya, ensuring their custom attributes align with their current rotation.
Useful for adjusting custom attributes like ‘UpDown’, ‘LeftRight’, and ‘Twist’ to match the actual rotation of the objects.
Ideal for rigging scenarios where control attributes need to be realigned with the object’s current rotation state.
- Parameters:
selList – <list> # List of objects to adjust rotation offsets. If None, uses currently selected objects.
- Returns:
None # This function does not return any value but adjusts the rotation offsets of the specified objects.
Code Examples:
>>> as_FixRotationOffsets(selList=['obj1', 'obj2'])
# Corrects rotation offsets for 'obj1' and 'obj2' based on their current rotation values.
graph TB Start[("fa:fa-play Start")] --> CheckSelection{"/fas:fa-check-circle Check Selection"} CheckSelection --"If Selection Provided"--> UseProvidedSelection["/fas:fa-hand-pointer Use Provided Selection"] CheckSelection --"If No Selection Provided"--> GetCurrentSelection["/fas:fa-mouse-pointer Get Current Selection"] UseProvidedSelection --> ConvertToList["/fas:fa-list-ul Convert to List"] GetCurrentSelection --> ConvertToList ConvertToList --> IterateObjects["/fas:fa-repeat Iterate Through Objects"] IterateObjects --> AdjustRotationOffsets["/fas:fa-sync-alt Adjust Rotation Offsets"] AdjustRotationOffsets --> AppendToList["/fas:fa-plus Append to Adjusted List"] AppendToList --> IterateObjects IterateObjects --"After Last Object"--> SelectAdjustedObjects["/fas:fa-mouse-pointer Select Adjusted Objects"] SelectAdjustedObjects --> End["/fas:fa-stop End"] style Start fill:#00cc00,stroke:#000,stroke-width:3px style CheckSelection fill:#ffcc99,stroke:#000,stroke-width:2px style UseProvidedSelection fill:#99ccff,stroke:#000,stroke-width:2px style GetCurrentSelection fill:#cc99ff,stroke:#000,stroke-width:2px style ConvertToList fill:#99ff99,stroke:#000,stroke-width:2px style IterateObjects fill:#ffcc99,stroke:#000,stroke-width:2px style AdjustRotationOffsets fill:#ccffcc,stroke:#000,stroke-width:2px style AppendToList fill:#99ccff,stroke:#000,stroke-width:2px style SelectAdjustedObjects fill:#cc99ff,stroke:#000,stroke-width:2px style End fill:#ff6666,stroke:#000,stroke-width:3px- Flow Chart Description:
This flowchart illustrates the as_FixRotationOffsets function:
Checks if a selection list is provided. If not, it uses the current selection in Maya.
Converts the selection into a list of objects.
Iterates through each object in the list.
Adjusts the rotation offsets for each object based on their custom attributes (‘UpDown’, ‘LeftRight’, ‘Twist’).
Appends each adjusted object to a list.
After adjusting all objects, selects the objects with corrected rotation offsets.
The process ends after selecting the adjusted objects.
- EasyBird.as_FlipMesh_FromSrc(self)#
[shArgs : lms=LMesh_Src, rmt=RMesh_Trgt, da=dirAxis, l2r=left2right]
Purpose:
:: Flips the mesh geometry from a source mesh (LMesh_Src) to a target mesh (RMesh_Trgt) in Autodesk Maya.
Useful for creating symmetrical mesh shapes or transferring details from one side of a model to the other.
- Argument | Description:
- Parameters:
LMesh_Src – <str> #Source mesh whose shape is used as a reference.
RMesh_Trgt – <str> #Target mesh where the flipped shape will be applied.
dirAxis – <str> #Direction axis for the flip operation.
left2right – <bool> #Determines if the flip is from left to right.
- Returns:
None #The function performs an operation and does not return a value.
Code Examples:
>>> flipMesh_FromSrc(LMesh_Src='L_WingClose', RMesh_Trgt='R_WingClose', dirAxis='x', left2right=False)
Args:
LMesh_Src : LMesh having pose acts as a reference for trgt RMesh
RMesh_Trgt : Final flip shape will come on to this

Usage:
Select vertices on RH Side of RMesh_Trgt. For Ex: Right Wing Vertices of Bird on RMesh_Trgt
graph TB Start[("fa:fa-play Start")] --> CheckSourceMeshExistence["/fas:fa-exclamation-triangle Check Source Mesh Existence"] CheckSourceMeshExistence --"If LMesh_Src exists"--> CheckTargetMeshExistence["/fas:fa-exclamation-triangle Check Target Mesh Existence"] CheckSourceMeshExistence --"If LMesh_Src does not exist"--> ErrorSourceMeshNotFound["/fas:fa-times-circle Error: Source Mesh Not Found"] CheckTargetMeshExistence --"If RMesh_Trgt exists"--> SelectVertices["/fas:fa-mouse-pointer Select Vertices"] CheckTargetMeshExistence --"If RMesh_Trgt does not exist"--> ErrorTargetMeshNotFound["/fas:fa-times-circle Error: Target Mesh Not Found"] SelectVertices --> IdentifyOppositeVertices["/fas:fa-arrows-alt-h Identify Opposite Vertices"] IdentifyOppositeVertices --> StartFlipProcess["/fas:fa-sync-alt Start Flip Process"] StartFlipProcess --> FlipEachVertex["/fas:fa-exchange-alt Flip Each Vertex"] FlipEachVertex --> FinalizeFlip["/fas:fa-check-circle Finalize Flip"] FinalizeFlip --> End[("fas:fa-stop End")] style Start fill:#00cc00,stroke:#000,stroke-width:3px style CheckSourceMeshExistence fill:#ffcc00,stroke:#000,stroke-width:2px style CheckTargetMeshExistence fill:#ff9999,stroke:#000,stroke-width:2px style ErrorSourceMeshNotFound fill:#ff6666,stroke:#000,stroke-width:2px style ErrorTargetMeshNotFound fill:#ff6666,stroke:#000,stroke-width:2px style SelectVertices fill:#99ccff,stroke:#000,stroke-width:2px style IdentifyOppositeVertices fill:#cc99ff,stroke:#000,stroke-width:2px style StartFlipProcess fill:#99ff99,stroke:#000,stroke-width:2px style FlipEachVertex fill:#ffcc99,stroke:#000,stroke-width:2px style FinalizeFlip fill:#ccffcc,stroke:#000,stroke-width:2px style End fill:#ff6666,stroke:#000,stroke-width:3px- Flow Chart Description:
This flowchart illustrates the flipMesh_FromSrc function:
The process starts with verifying the existence of the source mesh (LMesh_Src).
Then, it checks for the target mesh (RMesh_Trgt) existence.
If either mesh does not exist, an error is reported.
Vertices are selected based on the direction axis and left-to-right flag.
Opposite vertices on the target mesh are identified for flipping.
The flip process begins, iterating over each selected vertex.
Each vertex’s position is flipped to mirror the source mesh’s corresponding vertex.
After flipping all vertices, the process finalizes the mesh flip.
The function ends after successfully flipping the target mesh geometry to match the source mesh.
- EasyBird.as_GenerateHyperPoints(self)#
[shArgs : ]
Purpose:
:: Generates hyper points for a bird rig, defining key anatomical locations for rigging and animation.
This function automates the process of placing crucial rigging points on a bird model.
It creates hyper points for body parts like the root, chest, neck, head, jaw, wings, legs, and more, ensuring accurate and efficient rigging.
- Parameters:
__showProgressTime – <bool> # Flag to show progress time.
__displayTotalTime – <bool> # Flag to display total time taken for the operation.
- Returns:
None # This function does not return a value but creates and positions hyper points on the bird model.
Code Examples:
# To generate hyper points on a bird model:
>>> as_GenerateHyperPoints()
# This will create and place hyper points on the selected bird model based on anatomical requirements.
- EasyBird.as_PaintSkin_byWorkBox(self, featherList=None, vtxList=None, workBox='containerObj')#
[shArgs : fl=featherList, vl=vtxList, wb=workBox]
Purpose:
:: Paints skin weights on a set of feathers based on their proximity to a work box object.
Streamlines the process of skinning feathers by using a work box to define the influence area.
Especially useful in complex rigging scenarios involving feathered creatures.
- Parameters:
featherList – <list> # List of feather objects to which the skin weights will be painted.
vtxList – <list> # List of vertex numbers to consider for skin weight painting.
workBox – <str> # The name of the work box object used to define the area of influence.
- Returns:
None # This function does not return a value but alters the skin weights of the specified feathers.
Code Examples:
# To paint skin weights on feathers using a work box:
>>> feather_objects = ['feather1', 'feather2', 'feather3']
>>> vertex_numbers = [1, 2, 3, 4, 5]
>>> work_box = 'myWorkBox'
>>> as_PaintSkin_byWorkBox(featherList=feather_objects, vtxList=vertex_numbers, workBox=work_box)
graph TB Start[("fa:fa-play Start")] --> CheckShArgs{"/fas:fa-question-circle Check shArgs"} CheckShArgs --"If shArgs Exist"--> ParseShArgs["/fas:fa-cogs Parse shArgs"] CheckShArgs --"If shArgs Does Not Exist"--> InitializeParameters["/fas:fa-wrench Initialize Parameters"] InitializeParameters --> GetFeatherAndVertexLists{"/fas:fa-check-square Get Feather and Vertex Lists"} GetFeatherAndVertexLists --"If Feather List Provided"--> CheckVertexList{"/fas:fa-question-circle Check Vertex List"} GetFeatherAndVertexLists --"If Feather List Not Provided"--> GetTextFieldData["/fas:fa-wrench Get Text Field Data"] CheckVertexList --"If Vertex List Provided"--> PaintSkinWeights{"/fas:fa-paint-brush Paint Skin Weights"} CheckVertexList --"If Vertex List Not Provided"--> GetTextFieldData GetTextFieldData --> PaintSkinWeights PaintSkinWeights --> End["/fas:fa-stop End"] style Start fill:#00cc00,stroke:#000,stroke-width:3px style CheckShArgs fill:#ffcc00,stroke:#000,stroke-width:2px style ParseShArgs fill:#ff9999,stroke:#000,stroke-width:2px style InitializeParameters fill:#99ccff,stroke:#000,stroke-width:2px style GetFeatherAndVertexLists fill:#cc99ff,stroke:#000,stroke-width:2px style CheckVertexList fill:#99ff99,stroke:#000,stroke-width:2px style GetTextFieldData fill:#ccffcc,stroke:#000,stroke-width:2px style PaintSkinWeights fill:#99ccff,stroke:#000,stroke-width:2px style End fill:#ff6666,stroke:#000,stroke-width:3px- Flow Chart Description:
This flowchart illustrates the as_PaintSkin_byWorkBox function:
Checks if shArgs exist, and if so, parses the parameters from it.
If shArgs do not exist, initializes parameters with default values.
Retrieves the lists of feathers and vertex numbers.
- If a feather list is provided:
Checks if a vertex list is provided.
If a vertex list is provided, paints skin weights based on the work box.
If a vertex list is not provided, retrieves data from the text fields and paints skin weights.
Ends the process.
- EasyBird.as_QucikSetup(self)#
[**shArgs : ow=onlyWings, ws=wingSetup]
Purpose:
:: Executes a quick setup for rigging, including various components like wings, spine, legs, toes, etc.
Provide Argument | Description:
- Parameters:
onlyWings – (<bool, optional>) # Flag indicating whether to setup only wings.
wingSetup – (<bool, optional>) # Flag indicating whether to setup wings.
- Returns:
(<NoneType>) # No return value.
Code Examples:
>>> as_QucikSetup(onlyWings=True, wingSetup=False)
- EasyBird.as_RebuildHandSetup(self)#
Purpose:
- :: Rebuilds the hand/wing setup for a character, including renaming and restructuring the rig components.
This function also handles the transfer of skin weights and updates constraints for the rebuilt setup.
The function renames hand joints, controls, and other rig elements with a specific prefix for clarity and organization.
It rebuilds the hand/wing setup based on the new naming and structure, ensuring consistency and functionality.
The function optionally transfers skinning from one geometry to another if specified.
It cleans up any previous rig elements, including controls, joints, IKs, and bendy systems.
The function updates constraints to reflect the new rig structure.
- Parameters:
grpLevel – <int> # The group level depth to which controls and joints are processed.
bodyStr – <str> # String containing the names of the body parts to be processed, separated by commas.
skinTransfer – <bool> # Boolean indicating whether skin weights should be transferred during the rebuild.
bodyList – <list of asNode> # List of body part nodes derived from ‘bodyStr’.
bodyInner – <str> # Additional string input for inner body parts to be processed.
skinJntsNew – <list of asNode> # New skin joints created during the hand/wing setup rebuild.
missingJnts_Trgt – <list of asNode> # List of joints missing in the target setup, requiring special handling.
trgtJnts – <list of asNode> # List of target joints for skinning and rigging.
- Returns:
None # This function does not return a value but updates the hand/wing setup of the character.
Code Examples:
>>> as_RebuildHandSetup()
# This example rebuilds the hand/wing setup for a character, including transferring skin weights and updating constraints as needed.
graph TB Start[("fa:fa-play Start")] --> ConfirmRebuild{"/fas:fa-question-circle Confirm Rebuild"} ConfirmRebuild --"If confirmed"--> RenameSetupElements[("/fas:fa-i-cursor Rename Setup Elements")] RenameSetupElements --> RebuildHandWingSetup[("/fas:fa-redo Rebuild Hand/Wing Setup")] RebuildHandWingSetup --> TransferSkinning[("/fas:fa-exchange-alt Transfer Skinning")] TransferSkinning --> CleanUpOldRig[("/fas:fa-broom Clean Up Old Rig")] CleanUpOldRig --> UpdateConstraints[("/fas:fa-link Update Constraints")] UpdateConstraints --> FinalizeRebuild[("/fas:fa-check-circle Finalize Rebuild")] ConfirmRebuild --"If not confirmed"--> End[("fas:fa-stop End")] FinalizeRebuild --> End style Start fill:#00cc00,stroke:#000,stroke-width:3px style ConfirmRebuild fill:#ffcc00,stroke:#000,stroke-width:2px style RenameSetupElements fill:#ff9999,stroke:#000,stroke-width:2px style RebuildHandWingSetup fill:#99ccff,stroke:#000,stroke-width:2px style TransferSkinning fill:#cc99ff,stroke:#000,stroke-width:2px style CleanUpOldRig fill:#99ff99,stroke:#000,stroke-width:2px style UpdateConstraints fill:#ffcc99,stroke:#000,stroke-width:2px style FinalizeRebuild fill:#ccffcc,stroke:#000,stroke-width:2px style End fill:#ff6666,stroke:#000,stroke-width:3px- Flow Chart Description:
This flowchart illustrates the as_RebuildHandSetup function:
Starts by confirming the rebuild action for the hand/wing setup.
Renames existing setup elements like joints and controls with specific prefixes.
Rebuilds the hand/wing setup based on the new naming and structure.
Transfers skinning from the old setup to the new one, if required.
Cleans up old rig elements, including outdated controls, joints, and IKs.
Updates constraints to align with the new hand/wing setup.
Finalizes the rebuild process, ensuring the new setup is fully functional.
- EasyBird.as_RebuildLegSetup(self)#
Purpose:
- :: Handles the rebuilding of leg setup for a character, including renaming, reorganization, and skin weight transfer.
The function updates the structure of leg components in the rig and ensures their proper functionality post-rebuilding.
It starts by renaming leg joints, controls, and other rig elements with a specific prefix.
The function then rebuilds the leg setup, reflecting these changes and ensuring a consistent and functional rig.
If certain conditions are met (like the existence of a bendy setup), additional rig elements are created or modified.
The function handles the transfer of skin weights from old to new rig components, ensuring that the character’s deformations are maintained.
Post-rebuilding, the function cleans up the rig by removing old, prefixed rig elements.
- Parameters:
sidePrfxes – <list> # List of prefixes used for naming rig components (e.g., [’L_’, ‘R_’]).
bodyStr – <str> # String containing the names of body parts, separated by commas.
bodyList – <list of asNode> # List of body part nodes derived from ‘bodyStr’.
cogJnt – <asNode> # The Center of Gravity joint in the rig, used as a reference point.
legJntList – <list of asNode> # List of leg joints after prefixing and reorganization.
LCtrlGrp – <asNode> # Group node containing left side leg controls after prefixing.
RCtrlGrp – <asNode> # Group node containing right side leg controls after prefixing.
ikLegsGrp – <asNode> # Group node containing IK controls for legs after prefixing.
- Returns:
None # This function does not return a value but updates the leg setup of the character.
Code Examples:
>>> as_RebuildLegSetup()
# This example rebuilds the leg setup for a character, including renaming, reorganization, and transferring skin weights as needed.
graph TB Start[("fa:fa-play Start")] --> ConfirmRebuild{"/fas:fa-question-circle Confirm Rebuild"} ConfirmRebuild --"If confirmed"--> RenameSetupElements[("/fas:fa-i-cursor Rename Setup Elements")] RenameSetupElements --> RebuildLegSetup[("/fas:fa-redo Rebuild Leg Setup")] RebuildLegSetup --> TransferSkinning[("/fas:fa-exchange-alt Transfer Skinning")] TransferSkinning --> CleanUpOldRig[("/fas:fa-broom Clean Up Old Rig")] CleanUpOldRig --> UpdateConstraints[("/fas:fa-link Update Constraints")] UpdateConstraints --> FinalizeRebuild[("/fas:fa-check-circle Finalize Rebuild")] ConfirmRebuild --"If not confirmed"--> End[("fas:fa-stop End")] FinalizeRebuild --> End style Start fill:#00cc00,stroke:#000,stroke-width:3px style ConfirmRebuild fill:#ffcc00,stroke:#000,stroke-width:2px style RenameSetupElements fill:#ff9999,stroke:#000,stroke-width:2px style RebuildLegSetup fill:#99ccff,stroke:#000,stroke-width:2px style TransferSkinning fill:#cc99ff,stroke:#000,stroke-width:2px style CleanUpOldRig fill:#99ff99,stroke:#000,stroke-width:2px style UpdateConstraints fill:#ffcc99,stroke:#000,stroke-width:2px style FinalizeRebuild fill:#ccffcc,stroke:#000,stroke-width:2px style End fill:#ff6666,stroke:#000,stroke-width:3px- Flow Chart Description:
This flowchart illustrates the as_RebuildLegSetup function:
Begins with a confirmation step for the rebuilding process.
Renames leg rig components with a specific prefix for organization.
Rebuilds the leg setup according to the new naming convention.
Transfers skin weights from the old rig components to the new ones.
Cleans up the rig by removing old, prefixed elements.
Updates constraints to align with the newly restructured leg setup.
Finalizes the rebuild process, ensuring a fully functional leg rig.
- EasyBird.as_RebuildNeckSetup(self)#
Purpose:
- :: Manages the rebuilding process of the neck setup in a character rig. This function updates and reorganizes the neck components
in the rig, ensuring they function correctly after the rebuilding process.
Begins by renaming the neck joints and controls with a specific prefix for identification.
Rebuilds the neck setup reflecting these changes, ensuring the rig’s consistency and functionality.
Handles the transfer of skin weights from old to new rig components, ensuring that the character’s deformations are maintained.
After rebuilding, the function cleans up the rig by removing old, prefixed elements.
Reapplies constraints and parenting to maintain the rig’s functionality, including eye joints and tongue setup if they exist.
- Parameters:
bodyStr – <str> # String containing the names of body parts, separated by commas.
bodyInner – <str> # Name of the inner body part for skinning transfer.
bodyList – <list of asNode> # List of body part nodes derived from ‘bodyStr’.
neckJnt – <asNode> # Starting joint of the neck, used as a reference for rebuilding.
jntList – <list of asNode> # List of neck joints after prefixing and reorganization.
ctrlGrp – <asNode> # Group node containing neck controls after prefixing.
ikNeckGrp – <asNode> # Group node containing IK controls for the neck after prefixing.
eyeJntsGrp – <asNode, optional> # Group node containing eye joints, if present.
tongueIKJnt – <asNode, optional> # IK joint for the tongue setup, if present.
tongueCtrlGrp – <asNode, optional> # Control group for the tongue setup, if present.
- Returns:
None # This function does not return a value but updates the neck setup of the character.
Code Examples:
>>> as_RebuildNeckSetup()
# This example rebuilds the neck setup for a character, including renaming, reorganization, and transferring skin weights as needed.
graph TB Start[("fa:fa-play Start")] --> ConfirmRebuild{"/fas:fa-question-circle Confirm Rebuild"} ConfirmRebuild --"If confirmed"--> RenameSetupElements[("/fas:fa-i-cursor Rename Setup Elements")] RenameSetupElements --> RebuildNeckSetup[("/fas:fa-redo Rebuild Neck Setup")] RebuildNeckSetup --> TransferSkinning[("/fas:fa-exchange-alt Transfer Skinning")] TransferSkinning --> CleanUpOldRig[("/fas:fa-broom Clean Up Old Rig")] CleanUpOldRig --> UpdateConstraints[("/fas:fa-link Update Constraints")] UpdateConstraints --> ReapplyParenting[("/fas:fa-level-up-alt Reapply Parenting")] ReapplyParenting --> FinalizeRebuild[("/fas:fa-check-circle Finalize Rebuild")] ConfirmRebuild --"If not confirmed"--> End[("fas:fa-stop End")] FinalizeRebuild --> End style Start fill:#00cc00,stroke:#000,stroke-width:3px style ConfirmRebuild fill:#ffcc00,stroke:#000,stroke-width:2px style RenameSetupElements fill:#ff9999,stroke:#000,stroke-width:2px style RebuildNeckSetup fill:#99ccff,stroke:#000,stroke-width:2px style TransferSkinning fill:#cc99ff,stroke:#000,stroke-width:2px style CleanUpOldRig fill:#99ff99,stroke:#000,stroke-width:2px style UpdateConstraints fill:#ffcc99,stroke:#000,stroke-width:2px style ReapplyParenting fill:#ccffcc,stroke:#000,stroke-width:2px style FinalizeRebuild fill:#99ff99,stroke:#000,stroke-width:2px style End fill:#ff6666,stroke:#000,stroke-width:3px- Flow Chart Description:
This flowchart illustrates the as_RebuildNeckSetup function:
Begins with a confirmation step for the neck rebuilding process.
Renames neck rig components with a specific prefix for identification and reorganization.
Rebuilds the neck setup according to the new naming convention.
Transfers skin weights from the old rig components to the new ones.
Cleans up the rig by removing old, prefixed elements.
Reapplies constraints and parenting to maintain the functionality of the rig, including reattaching eye joints and tongue setup if they exist.
Finalizes the rebuild process, ensuring a fully functional neck rig.
- EasyBird.as_RebuildQuickSetup(self)#
[shArgs : ow=onlyWings, ws=wingSetup]
Purpose:
:: Rebuilds the quick setup for a bird rig, allowing for partial or complete rig reconstruction based on options.
This function provides flexibility in rebuilding specific parts of the bird rig, such as spine, legs, toes, wings, neck, and tail.
It’s particularly useful for iterative rigging processes or making modifications to an existing rig.
- Parameters:
onlyWings – <bool> # If True, only the wings are rebuilt. If False, the entire rig setup is reconstructed.
wingSetup – <bool> # Determines whether the wing setup is included in the rebuilding process.
- Returns:
None # This function does not return a value but rebuilds the bird rig components as specified.
Code Examples:
# To rebuild the entire rig setup:
>>> as_RebuildQuickSetup(onlyWings=False, wingSetup=True)
# This will reconstruct the entire bird rig, including wings.

# To rebuild only the wing setup:
>>> as_RebuildQuickSetup(onlyWings=True)
# This will reconstruct only the wings of the bird rig.
- EasyBird.as_RebuildSpineSetup(self)#
Purpose:
- :: Manages the rebuilding process of the spine setup in a character rig. This function updates and reorganizes the spine components
in the rig, ensuring they function correctly after the rebuilding process.
Initiates by detaching the spine and related joints like COG, neck, and tail from their current hierarchy.
Renames the spine joints and controls with a specific prefix for easy identification and management.
Rebuilds the spine setup reflecting these changes, ensuring the rig’s consistency and functionality.
Handles the transfer of skin weights from old to new rig components, ensuring that the character’s deformations are maintained.
After rebuilding, the function cleans up the rig by removing old, prefixed elements.
Reapplies constraints and parenting to maintain the rig’s functionality.
- Parameters:
bodyStr – <str> # String containing the names of body parts, separated by commas.
bodyInner – <str> # Name of the inner body part for skinning transfer.
bodyList – <list of asNode> # List of body part nodes derived from ‘bodyStr’.
rootJnt – <asNode> # Root joint of the spine, used as a reference for rebuilding.
jntList – <list of asNode> # List of spine joints after prefixing and reorganization.
chestJnt – <asNode> # Chest joint, re-parented post-rebuild.
ctrlGrp – <asNode> # Group node containing spine controls after prefixing.
ikSpineGrp – <asNode> # Group node containing IK controls for the spine after prefixing.
- Returns:
None # This function does not return a value but updates the spine setup of the character.
Code Examples:
>>> as_RebuildSpineSetup()
# This example rebuilds the spine setup for a character, including renaming, reorganization, and transferring skin weights as needed.
graph TB Start[("fa:fa-play Start")] --> ConfirmRebuild{"/fas:fa-question-circle Confirm Rebuild"} ConfirmRebuild --"If confirmed"--> DetachJoints[("/fas:fa-unlink Detach Spine Joints")] DetachJoints --> RenameSetupElements[("/fas:fa-i-cursor Rename Setup Elements")] RenameSetupElements --> RebuildSpineSetup[("/fas:fa-redo Rebuild Spine Setup")] RebuildSpineSetup --> TransferSkinning[("/fas:fa-exchange-alt Transfer Skinning")] TransferSkinning --> CleanUpOldRig[("/fas:fa-broom Clean Up Old Rig")] CleanUpOldRig --> ReapplyParenting[("/fas:fa-level-up-alt Reapply Parenting")] ReapplyParenting --> FinalizeRebuild[("/fas:fa-check-circle Finalize Rebuild")] ConfirmRebuild --"If not confirmed"--> End[("fas:fa-stop End")] FinalizeRebuild --> End style Start fill:#00cc00,stroke:#000,stroke-width:3px style ConfirmRebuild fill:#ffcc00,stroke:#000,stroke-width:2px style DetachJoints fill:#ff9999,stroke:#000,stroke-width:2px style RenameSetupElements fill:#99ccff,stroke:#000,stroke-width:2px style RebuildSpineSetup fill:#cc99ff,stroke:#000,stroke-width:2px style TransferSkinning fill:#99ff99,stroke:#000,stroke-width:2px style CleanUpOldRig fill:#ffcc99,stroke:#000,stroke-width:2px style ReapplyParenting fill:#ccffcc,stroke:#000,stroke-width:2px style FinalizeRebuild fill:#99ff99,stroke:#000,stroke-width:2px style End fill:#ff6666,stroke:#000,stroke-width:3px- Flow Chart Description:
This flowchart illustrates the as_RebuildSpineSetup function:
Starts with a confirmation step for the spine rebuilding process.
Detaches the spine and related joints like COG, neck, and tail from their current hierarchy.
Renames spine rig components with a specific prefix for identification and reorganization.
Rebuilds the spine setup according to the new naming convention.
Transfers skin weights from the old rig components to the new ones.
Cleans up the rig by removing old, prefixed elements.
Reapplies constraints and parenting to maintain the functionality of the rig.
Finalizes the rebuild process, ensuring a fully functional spine rig.
- EasyBird.as_RebuildTailSetup(self)#
Purpose:
- :: Manages the rebuilding process of the tail setup in a character rig. This function updates and reorganizes the tail components
in the rig, ensuring they function correctly after the rebuilding process.
Initiates by renaming the tail joints and controls with a specific prefix for identification.
Rebuilds the tail setup reflecting these changes, ensuring the rig’s consistency and functionality.
Handles the transfer of skin weights from old to new rig components, ensuring that the character’s deformations are maintained.
After rebuilding, the function cleans up the rig by removing old, prefixed elements.
Reapplies feather constraints to maintain the rig’s functionality.
- Parameters:
bodyStr – <str> # String containing the names of body parts, separated by commas.
bodyInner – <str> # Name of the inner body part for skinning transfer.
bodyList – <list of asNode> # List of body part nodes derived from ‘bodyStr’.
tailJnt – <asNode> # Starting joint of the tail, used as a reference for rebuilding.
jntList – <list of asNode> # List of tail joints after prefixing and reorganization.
ctrlGrp – <asNode> # Group node containing tail controls after prefixing.
ikTailGrp – <asNode> # Group node containing IK controls for the tail after prefixing.
conTrgets – <dict> # Dictionary mapping controls to their target groups for constraints.
- Returns:
None # This function does not return a value but updates the tail setup of the character.
Code Examples:
>>> as_RebuildTailSetup()
# This example rebuilds the tail setup for a character, including renaming, reorganization, and transferring skin weights as needed.
graph TB Start[("fa:fa-play Start")] --> ConfirmRebuild{"/fas:fa-question-circle Confirm Rebuild"} ConfirmRebuild --"If confirmed"--> RenameSetupElements[("/fas:fa-i-cursor Rename Setup Elements")] RenameSetupElements --> RebuildTailSetup[("/fas:fa-redo Rebuild Tail Setup")] RebuildTailSetup --> TransferSkinning[("/fas:fa-exchange-alt Transfer Skinning")] TransferSkinning --> CleanUpOldRig[("/fas:fa-broom Clean Up Old Rig")] CleanUpOldRig --> UpdateConstraints[("/fas:fa-link Update Constraints")] UpdateConstraints --> ReapplyFeatherConstraints[("/fas:fa-feather Reapply Feather Constraints")] ReapplyFeatherConstraints --> FinalizeRebuild[("/fas:fa-check-circle Finalize Rebuild")] ConfirmRebuild --"If not confirmed"--> End[("fas:fa-stop End")] FinalizeRebuild --> End style Start fill:#00cc00,stroke:#000,stroke-width:3px style ConfirmRebuild fill:#ffcc00,stroke:#000,stroke-width:2px style RenameSetupElements fill:#ff9999,stroke:#000,stroke-width:2px style RebuildTailSetup fill:#99ccff,stroke:#000,stroke-width:2px style TransferSkinning fill:#cc99ff,stroke:#000,stroke-width:2px style CleanUpOldRig fill:#99ff99,stroke:#000,stroke-width:2px style UpdateConstraints fill:#ffcc99,stroke:#000,stroke-width:2px style ReapplyFeatherConstraints fill:#ccffcc,stroke:#000,stroke-width:2px style FinalizeRebuild fill:#99ff99,stroke:#000,stroke-width:2px style End fill:#ff6666,stroke:#000,stroke-width:3px- Flow Chart Description:
This flowchart illustrates the as_RebuildTailSetup function:
Begins with a confirmation step for the tail rebuilding process.
Renames tail rig components with a specific prefix for identification and reorganization.
Rebuilds the tail setup according to the new naming convention.
Transfers skin weights from the old rig components to the new ones.
Cleans up the rig by removing old, prefixed elements.
Reapplies feather constraints to maintain the functionality of the rig.
Finalizes the rebuild process, ensuring a fully functional tail rig.
- EasyBird.as_RebuildToesSetup(self, quickSetup=False)#
Purpose:
:: Handles the process of reconstructing the toes setup in a character rig. This function is designed to update and reorganize the toes components in the rig, ensuring their correct function after the rebuilding process.
Begins by detaching the toes and related joints from their current hierarchy and renaming them with a specific prefix for easy identification.
Rebuilds the toes setup, reflecting these changes to maintain the rig’s consistency and functionality.
Manages the transfer of skin weights from old to new rig components, ensuring that the character’s deformations are preserved.
Post-rebuilding, the function cleans up the rig by removing old, prefixed elements.
Reapplies constraints and parenting to preserve the rig’s functionality.
- Parameters:
bodyStr – <str> # String containing the names of body parts, separated by commas.
bodyList – <list of asNode> # List of body part nodes derived from ‘bodyStr’.
sidePrfxes – <list of str> # List of side prefixes (’L_’ for left, ‘R_’ for right) used to identify corresponding rig components.
_footJnt – <str> # The base joint name for the toes, used as a reference point for rebuilding.
RJntList (LJntList,) – <list of asNode> # Lists of left and right toe joints after prefixing and reorganization.
quickSetup – <bool> # Flag to indicate if a quick setup process is requested, affecting the rebuilding process’s depth.
- Returns:
None # This function does not return a value but updates the toes setup of the character.
Code Examples:
>>> as_RebuildToesSetup()
# This example rebuilds the toes setup for a character, including renaming, reorganization, and transferring skin weights as needed.
graph TB Start[("fa:fa-play Start")] --> ConfirmRebuild{"/fas:fa-question-circle Confirm Rebuild"} ConfirmRebuild --"If confirmed"--> DetachToeJoints[("/fas:fa-unlink Detach Toe Joints")] DetachToeJoints --> RenameSetupElements[("/fas:fa-i-cursor Rename Setup Elements")] RenameSetupElements --> RebuildToeSetup[("/fas:fa-redo Rebuild Toe Setup")] RebuildToeSetup --> TransferSkinning[("/fas:fa-exchange-alt Transfer Skinning")] TransferSkinning --> SnapCVs[("/fas:fa-vector-square Snap CVs to Old Ctrl Shape")] SnapCVs --> CleanUpOldRig[("/fas:fa-broom Clean Up Old Rig")] CleanUpOldRig --> FinalizeRebuild[("/fas:fa-check-circle Finalize Rebuild")] ConfirmRebuild --"If not confirmed"--> End[("fas:fa-stop End")] FinalizeRebuild --> End style Start fill:#00cc00,stroke:#000,stroke-width:3px style ConfirmRebuild fill:#ffcc00,stroke:#000,stroke-width:2px style DetachToeJoints fill:#ff9999,stroke:#000,stroke-width:2px style RenameSetupElements fill:#99ccff,stroke:#000,stroke-width:2px style RebuildToeSetup fill:#cc99ff,stroke:#000,stroke-width:2px style TransferSkinning fill:#99ff99,stroke:#000,stroke-width:2px style SnapCVs fill:#ffcc99,stroke:#000,stroke-width:2px style CleanUpOldRig fill:#ccffcc,stroke:#000,stroke-width:2px style FinalizeRebuild fill:#99ff99,stroke:#000,stroke-width:2px style End fill:#ff6666,stroke:#000,stroke-width:3px- Flow Chart Description:
This flowchart illustrates the as_RebuildToesSetup function:
Begins with a confirmation step for rebuilding the toes setup.
Detaches the toes and related joints from their current hierarchy.
Renames toes rig components for identification and reorganization.
Rebuilds the toes setup based on the new naming convention.
Transfers skin weights from old rig components to the new ones.
Snaps CVs to old control shapes to maintain visual consistency.
Cleans up the rig by removing old, prefixed elements.
Finalizes the rebuild process, ensuring a fully functional toes rig.
- EasyBird.as_ReorderFeathers_BySlNums(self)#
Purpose:
:: Organizes a selected list of feather objects in a character rig based on their serial numbers. This function is particularly useful in rigging and animation where feathers need to be managed and ordered systematically for better control and visual consistency.
Identifies the selected feathers or a single feather’s siblings, including the feather itself, to form a complete list.
Extracts and associates each feather’s serial number to create a dictionary mapping feathers to their respective serial numbers.
Sorts the feathers based on their serial numbers to maintain a logical order.
Adjusts the sibling index of each feather to reflect the new order, ensuring their proper arrangement in the rig hierarchy.
Selects and highlights the reordered feathers in the Maya scene for user verification.
- Parameters:
fList – <list> # List of selected feather objects or siblings of a single selected feather.
fDict – <dict> # Dictionary mapping feather objects to their respective serial numbers.
index – <int> # Index variable used to reorder the feathers according to their serial numbers.
- Returns:
None # This function does not return a value but updates the order of feathers in the scene.
Code Examples:
>>> as_ReorderFeathers_BySlNums()
# This example reorders the selected feathers or a single feather's siblings based on their serial numbers in the rig.
graph TB Start[("fa:fa-play Start")] --> IdentifyFeathers{"/fas:fa-search Identify Feathers"} IdentifyFeathers --"If only one feather selected"--> ExtractSiblings[("/fas:fa-sitemap Extract Siblings")] IdentifyFeathers --"If multiple feathers selected"--> CreateFeatherList[("/fas:fa-list Create Feather List")] ExtractSiblings --> CreateFeatherList CreateFeatherList --> MapSerialNumbers[("/fas:fa-sort-numeric-down Map Serial Numbers")] MapSerialNumbers --> SortFeathers[("/fas:fa-sort-alpha-down Sort Feathers")] SortFeathers --> AdjustSiblingIndex[("/fas:fa-stream Adjust Sibling Index")] AdjustSiblingIndex --> HighlightFeathers[("/fas:fa-lightbulb Highlight Feathers")] HighlightFeathers --> End[("fas:fa-stop End")] style Start fill:#00cc00,stroke:#000,stroke-width:3px style IdentifyFeathers fill:#ffcc00,stroke:#000,stroke-width:2px style ExtractSiblings fill:#ff9999,stroke:#000,stroke-width:2px style CreateFeatherList fill:#99ccff,stroke:#000,stroke-width:2px style MapSerialNumbers fill:#cc99ff,stroke:#000,stroke-width:2px style SortFeathers fill:#99ff99,stroke:#000,stroke-width:2px style AdjustSiblingIndex fill:#ffcc99,stroke:#000,stroke-width:2px style HighlightFeathers fill:#ccffcc,stroke:#000,stroke-width:2px style End fill:#ff6666,stroke:#000,stroke-width:3px- Flow Chart Description:
This flowchart illustrates the as_ReorderFeathers_BySlNums function:
Starts by identifying selected feathers or siblings of a single feather.
Extracts siblings for a single selected feather, if necessary.
Creates a list of feathers to be reordered.
Maps feathers to their serial numbers in a dictionary.
Sorts the feathers according to their serial numbers.
Adjusts the sibling index of each feather to reflect the new order.
Highlights reordered feathers in the scene for user verification.
Completes the feather reordering process in the rig.
- EasyBird.as_ReplaceAimTarget(self)#
Purpose:
:: Updates the aim target of a selected object (usually a feather) in a rigging setup. It is designed to change the orientation target of the aim constraint for a given feather or similar object, allowing for dynamic adjustments in rigging.
The function takes two selected objects: the feather (or similar object) and the new aim target.
It retrieves the parent of the feather and the existing aim constraint.
Attempts to find the up locator used in the original aim constraint, if it exists.
If no up locator is found, it creates a new position locator and parents it to the base joint of the feather.
Removes the old aim constraint from the feather’s parent.
Applies a new aim constraint using the new aim target with the appropriate up vector and world up type.
Selects the feather after updating the aim target.
- Parameters:
f – <PyNode> # The feather or similar object whose aim target needs updating.
aimObj – <PyNode> # The new target object for the aim constraint.
fParent – <PyNode> # Parent of the feather, typically a group node.
aimCon – <PyNode> # Existing aim constraint on the feather’s parent.
aimUpLoc – <PyNode> # Locator object used as an up vector reference for the aim constraint.
- Returns:
None # The function does not return a value but modifies the aim constraints in the rig.
Code Examples:
>>> as_ReplaceAimTarget()
# This example replaces the aim target of the first selected object with the second selected object.
graph TB Start[("fa:fa-play Start")] --> SelectObjects{"/fas:fa-mouse-pointer Select Objects"} SelectObjects --"Select feather and aim object" --> RetrieveFeatherParent[("/fas:fa-sitemap Retrieve Feather Parent")] RetrieveFeatherParent --> IdentifyAimConstraint[("/fas:fa-crosshairs Identify Aim Constraint")] IdentifyAimConstraint --> CheckUpLocator{{"/fas:fa-map-marker-alt Check Up Locator"}} CheckUpLocator --"Up locator exists" --> UseExistingUpLocator[("/fas:fa-clone Use Existing Up Locator")] CheckUpLocator --"No up locator" --> CreateUpLocator[("/fas:fa-plus-circle Create Up Locator")] UseExistingUpLocator --> RemoveOldAimConstraint[("/fas:fa-trash-alt Remove Old Aim Constraint")] CreateUpLocator --> RemoveOldAimConstraint RemoveOldAimConstraint --> ApplyNewAimConstraint[("/fas:fa-link Apply New Aim Constraint")] ApplyNewAimConstraint --> End[("fas:fa-stop End")] style Start fill:#00cc00,stroke:#000,stroke-width:3px style SelectObjects fill:#ffcc00,stroke:#000,stroke-width:2px style RetrieveFeatherParent fill:#99ccff,stroke:#000,stroke-width:2px style IdentifyAimConstraint fill:#cc99ff,stroke:#000,stroke-width:2px style CheckUpLocator fill:#ffcc99,stroke:#000,stroke-width:2px style UseExistingUpLocator fill:#ccffcc,stroke:#000,stroke-width:2px style CreateUpLocator fill:#99ff99,stroke:#000,stroke-width:2px style RemoveOldAimConstraint fill:#ff9999,stroke:#000,stroke-width:2px style ApplyNewAimConstraint fill:#ff6666,stroke:#000,stroke-width:2px style End fill:#ff6666,stroke:#000,stroke-width:3px- Flow Chart Description:
This flowchart illustrates the as_ReplaceAimTarget function:
Starts by selecting the feather and the new aim object.
Retrieves the parent of the feather, typically a group node.
Identifies the existing aim constraint on the feather’s parent.
Checks if an up locator exists in the current aim constraint.
Uses the existing up locator or creates a new one if it doesn’t exist.
Removes the old aim constraint from the feather’s parent.
Applies a new aim constraint with the new aim object and up locator.
Completes the process by selecting the feather.
- EasyBird.as_ReplaceFeathers(self, checkVtxCount=False, deleteSrcFeathers=True)#
Purpose:
:: Facilitates the replacement of feather meshes in a rig, particularly useful in character animation and rigging workflows. This function enables the substitution of source feather meshes with target meshes, optionally transferring skinning information and deleting the original source feathers.
Scans the selected source feather group and optionally a destination group if specified.
If checkVtxCount is True, matches source and destination feathers based on their vertex count.
Replaces each source feather mesh with the corresponding target mesh in the rig.
Transfers skinning data from source to target meshes if they are skinned and the option is enabled.
Optionally deletes the source feather meshes after replacement.
- Parameters:
checkVtxCount – <bool> # If True, matches feathers based on vertex count for replacement.
deleteSrcFeathers – <bool> # If True, deletes the source feather meshes after replacement.
srcPrefix – <str> # Prefix used to identify source feather meshes.
destGrp – <PyNode> # Destination group for target feather meshes.
srcList – <list> # List of source feather meshes for replacement.
destDict – <dict> # Dictionary mapping destination meshes to their vertex count.
skipList – <list> # List of source feathers that could not be matched or replaced.
dest_List – <list> # List of destination meshes that have been successfully replaced.
- Returns:
None # This function does not return a value but updates the feather meshes in the scene.
Code Examples:
>>> as_ReplaceFeathers(checkVtxCount=True, deleteSrcFeathers=True)
# This example replaces source feather meshes with corresponding target meshes, checks vertex count for matching, and deletes the source feathers post-replacement.
graph TB Start[("fa:fa-play Start")] --> IdentifyGroups{"/fas:fa-search Identify Groups"} IdentifyGroups --"If no groups selected" --> ErrorNoSelection[("/fas:fa-times-circle Error: No Selection")] IdentifyGroups --"If groups selected" --> CheckVertexCount{{"/fas:fa-question-circle Check Vertex Count"}} ErrorNoSelection --> End[("fas:fa-stop End")] CheckVertexCount --"If checkVtxCount is True" --> MapDestinationFeathers[("/fas:fa-sitemap Map Destination Feathers")] CheckVertexCount --"If checkVtxCount is False" --> SelectTargetMeshes[("/fas:fa-mouse-pointer Select Target Meshes")] MapDestinationFeathers --> SelectTargetMeshes SelectTargetMeshes --> ReplaceFeathers[("/fas:fa-exchange-alt Replace Feathers")] ReplaceFeathers --> CheckSkinning{{"/fas:fa-question-circle Check Skinning"}} CheckSkinning --"If skinning present" --> TransferSkinning[("/fas:fa-sync-alt Transfer Skinning")] CheckSkinning --"If no skinning" --> SkipSkinning[("/fas:fa-forward Skip Skinning")] TransferSkinning --> DeleteSourceFeathers{{"/fas:fa-trash-alt Delete Source Feathers"}} SkipSkinning --> DeleteSourceFeathers DeleteSourceFeathers --"If deleteSrcFeathers is True" --> DeleteFeathers[("/fas:fa-trash Delete Feathers")] DeleteSourceFeathers --"If deleteSrcFeathers is False" --> TemplateFeathers[("/fas:fa-eye Template Feathers")] DeleteFeathers --> End TemplateFeathers --> End style Start fill:#00cc00,stroke:#000,stroke-width:3px style IdentifyGroups fill:#ffcc00,stroke:#000,stroke-width:2px style ErrorNoSelection fill:#ff9999,stroke:#000,stroke-width:2px style CheckVertexCount fill:#99ccff,stroke:#000,stroke-width:2px style MapDestinationFeathers fill:#cc99ff,stroke:#000,stroke-width:2px style SelectTargetMeshes fill:#99ff99,stroke:#000,stroke-width:2px style ReplaceFeathers fill:#ffcc99,stroke:#000,stroke-width:2px style CheckSkinning fill:#ccffcc,stroke:#000,stroke-width:2px style TransferSkinning fill:#ccff99,stroke:#000,stroke-width:2px style SkipSkinning fill:#ffcc66,stroke:#000,stroke-width:2px style DeleteSourceFeathers fill:#cccccc,stroke:#000,stroke-width:2px style DeleteFeathers fill:#ff6666,stroke:#000,stroke-width:2px style TemplateFeathers fill:#ff9999,stroke:#000,stroke-width:2px style End fill:#ff6666,stroke:#000,stroke-width:3px- Flow Chart Description:
This flowchart illustrates the as_ReplaceFeathers function:
Starts by identifying the selected source and target feather groups.
Checks if checkVtxCount is enabled to match feathers based on vertex count.
Selects target meshes for replacement based on naming or vertex count.
Replaces each source feather mesh with the corresponding target mesh.
Checks if skinning data is present on source feathers.
Transfers skinning data from source to target meshes, if present.
Optionally deletes source feathers or templates them based on deleteSrcFeathers.
Completes the feather replacement process in the rig.
- EasyBird.as_RigBodyFeathers(self)#
Purpose:
:: Automates the process of rigging body feathers in a character model, particularly useful in character animation and rigging. This function iteratively configures aim constraints for each selected feather mesh, ensuring they are properly aligned and oriented based on their nearest neighboring feather.
Iterates through a list of selected feather meshes.
For each feather, identifies the longest vertex and its nearest neighboring feather.
Creates an aim constraint on each feather to align it towards its nearest neighbor.
An up locator is created and parented to the neighboring feather for consistent orientation.
If a feather is not the last in the list, its aim locator is parented to its neighbor for proper hierarchical setup.
Refreshes the viewport to update the changes made to each feather.
- Parameters:
featherList – <list> # List of selected feather meshes to be rigged.
vtxList – <list> # List of vertices for each feather mesh.
longVtx – <PyNode> # The longest vertex in a feather mesh.
nearFeth – <PyNode> # Nearest neighboring feather to the current one being processed.
aimUpLoc – <PyNode> # Locator object used as an up vector reference for aim constraints.
fethGrp – <PyNode> # Group node of the current feather.
- Returns:
None # This function does not return a value but updates the rigging of selected feather meshes.
Code Examples:
>>> as_RigBodyFeathers()
# This example rigs the selected body feather meshes, setting up aim constraints and orientation locators.
graph TB Start[("fa:fa-play Start")] --> IdentifyFeathers{"/fas:fa-search Identify Feathers"} IdentifyFeathers --"Select feathers" --> IterateFeathers{"/fas:fa-repeat Iterate through Feathers"} IterateFeathers --> IdentifyLongestVertex[("/fas:fa-long-arrow-alt-right Identify Longest Vertex")] IdentifyLongestVertex --> FindNearestFeather[("/fas:fa-arrows-alt-h Find Nearest Feather")] FindNearestFeather --> CreateAimConstraint[("/fas:fa-crosshairs Create Aim Constraint")] CreateAimConstraint --> CreateUpLocator[("/fas:fa-map-marker-alt Create Up Locator")] CreateUpLocator --> ParentUpLocator{{"/fas:fa-link Parent Up Locator"}} ParentUpLocator --"If not last feather" --> ParentToNeighbor[("/fas:fa-level-up-alt Parent to Neighbor")] ParentUpLocator --"If last feather" --> SkipParenting[("/fas:fa-forward Skip Parenting")] ParentToNeighbor --> RefreshViewport[("/fas:fa-sync-alt Refresh Viewport")] SkipParenting --> RefreshViewport RefreshViewport --> End[("fas:fa-stop End")] style Start fill:#00cc00,stroke:#000,stroke-width:3px style IdentifyFeathers fill:#ffcc00,stroke:#000,stroke-width:2px style IterateFeathers fill:#cc99ff,stroke:#000,stroke-width:2px style IdentifyLongestVertex fill:#99ccff,stroke:#000,stroke-width:2px style FindNearestFeather fill:#99ff99,stroke:#000,stroke-width:2px style CreateAimConstraint fill:#ffcc99,stroke:#000,stroke-width:2px style CreateUpLocator fill:#ccffcc,stroke:#000,stroke-width:2px style ParentUpLocator fill:#cccccc,stroke:#000,stroke-width:2px style ParentToNeighbor fill:#ff9999,stroke:#000,stroke-width:2px style SkipParenting fill:#ff6666,stroke:#000,stroke-width:2px style RefreshViewport fill:#ffcc66,stroke:#000,stroke-width:2px style End fill:#ff6666,stroke:#000,stroke-width:3px- Flow Chart Description:
This flowchart illustrates the as_RigBodyFeathers function:
Starts by identifying the selected body feather meshes.
Iterates through each feather mesh to process.
Identifies the longest vertex in each feather.
Finds the nearest neighboring feather to the current one.
Creates an aim constraint for the feather to align towards its neighbor.
Generates an up locator for consistent feather orientation.
Parents the up locator to the neighbor feather’s group unless it’s the last feather.
Refreshes the viewport to update rig changes for each feather.
Completes the rigging process for the selected body feathers.
- EasyBird.as_SelectMirrorEdge(self)#
[shArgs : ]
Purpose:
:: Identifies and selects the mirrored edges of a given edge selection in a 3D model.
This function is particularly useful in symmetric modeling tasks where identical modifications need to be made on both sides of a model.
It automates the process of finding and selecting the corresponding mirrored edges, streamlining the modeling workflow.
- Parameters:
edgeList – <list> #List of initially selected edges for which mirrored counterparts are to be found.
- Returns:
None # This function does not return a value but updates the selection to include mirrored edges.
Code Examples:
# Assuming edges are selected on one side of a symmetric 3D model. >>> as_SelectMirrorEdge() # This will mirror the selection to the opposite side of the model, selecting corresponding edges.
graph TB Start[("fa:fa-play Start")] --> CheckSelections{"/fas:fa-check-circle Check Selections"} CheckSelections --"If edges are selected" --> GetEdgeInfo[("/fas:fa-info-circle Get Edge Information")] GetEdgeInfo --> ProgressInit[("/fas:fa-spinner Start Progress Window")] ProgressInit --> IterateEdges{"/fas:fa-stream Iterate Selected Edges"} IterateEdges --"For each selected edge" --> CalculateMirroredEdge[("/fas:fa-arrows-alt Calculate Mirrored Edge")] CalculateMirroredEdge --> UpdateProgress[("/fas:fa-sync-alt Update Progress")] UpdateProgress --"Repeat for each edge" --> IterateEdges IterateEdges --"After iterating all edges" --> EndProgressWin[("/fas:fa-check-circle End Progress Window")] EndProgressWin --> SelectMirroredEdges[("/fas:fa-hand-pointer Select Mirrored Edges")] SelectMirroredEdges --> ValidateSelection{{"/fas:fa-check-double Validate Selection"}} ValidateSelection --"If mirrored edges match" --> DisplayInfo[("/fas:fa-info-circle Display Information")] ValidateSelection --"If mirrored edges do not match" --> DisplayError[("/fas:fa-exclamation-circle Display Error")] DisplayInfo --> End[("fas:fa-stop End")] DisplayError --> End style Start fill:#00cc00,stroke:#000,stroke-width:3px style CheckSelections fill:#ffcc00,stroke:#000,stroke-width:2px style GetEdgeInfo fill:#ff9999,stroke:#000,stroke-width:2px style ProgressInit fill:#99ccff,stroke:#000,stroke-width:2px style IterateEdges fill:#99ff99,stroke:#000,stroke-width:2px style CalculateMirroredEdge fill:#cc99ff,stroke:#000,stroke-width:2px style UpdateProgress fill:#99ff99,stroke:#000,stroke-width:2px style EndProgressWin fill:#99ff99,stroke:#000,stroke-width:2px style SelectMirroredEdges fill:#cc99ff,stroke:#000,stroke-width:2px style ValidateSelection fill:#ff9999,stroke:#000,stroke-width:2px style DisplayInfo fill:#99ff99,stroke:#000,stroke-width:2px style DisplayError fill:#ff6666,stroke:#000,stroke-width:3px style End fill:#ff6666,stroke:#000,stroke-width:3px- Flow Chart Description:
This flowchart illustrates the as_SelectMirrorEdge function:
Starts by checking if edges are selected.
Gathers information on selected edges and initializes a progress window.
Iterates through each selected edge to calculate its mirrored counterpart.
Updates progress after calculating each mirrored edge.
Once all edges are processed, the progress window is closed, and mirrored edges are selected.
Validates whether the number of mirrored edges matches the initial selection.
Displays information or an error message based on the validation result.
The process ends after selecting mirrored edges and providing feedback.
- EasyBird.as_SelectMirrorVtx(self)#
[shArgs : ]
Purpose:
:: Selects the mirror vertices of the currently selected vertices on a polygonal object in a 3D environment.
This function identifies and selects the mirror vertices of a given set of vertices, based on their positions.
It’s particularly useful in 3D modeling and rigging processes where symmetrical modifications are required.
- Returns:
None # This function does not return a value but selects mirror vertices in the 3D environment.
Code Examples:
# Assuming a list of vertices is already selected in the 3D viewport. >>> as_SelectMirrorVtx() # This example will find and select the mirror vertices of the currently selected vertices.
graph TB Start[("fa:fa-play Start")] --> GetSelectedVertices{"/fas:fa-object-group Get Selected Vertices"} GetSelectedVertices --> FindMirrorVertices[("/fas:fa-mirror Find Mirror Vertices")] FindMirrorVertices --"Identify mirror vertices for selection" --> UpdateSelection[("/fas:fa-sync-alt Update Selection")] UpdateSelection --"Select mirror vertices in 3D environment" --> End[("fas:fa-stop End")] style Start fill:#00cc00,stroke:#000,stroke-width:3px style GetSelectedVertices fill:#ffcc00,stroke:#000,stroke-width:2px style FindMirrorVertices fill:#99ff99,stroke:#000,stroke-width:2px style UpdateSelection fill:#99ff99,stroke:#000,stroke-width:2px style End fill:#ff6666,stroke:#000,stroke-width:3px- Flow Chart Description:
This flowchart illustrates the as_SelectMirrorVtx function:
The process begins by retrieving the list of currently selected vertices.
It then identifies the mirror vertices corresponding to the selected vertices.
The function updates the selection to include the identified mirror vertices.
The process concludes by having the mirror vertices selected in the 3D environment.
- EasyBird.as_SetNextSibling(self, pos=None)#
[shArgs : ]
Purpose:
:: Adjusts the sibling index of selected objects in the scene hierarchy to a new position.
This function is used in 3D scene management to reposition objects relative to their siblings within the hierarchy.
It is particularly useful for organizing and managing complex scenes with multiple objects.
- Parameters:
pos – <int, optional> #Defines the new position of the sibling index. None for next position, 0 for first position, -1 for end position.
selList –
<list> #List of selected objects to be repositioned in the hierarchy.
pos: None =Next Pos, 0=First Pos, -1 =End Pos
- Returns:
None # This function does not return a value but updates the sibling index of selected objects.
Code Examples:
# Assuming multiple objects are selected in the 3D scene. >>> as_SetNextSibling(pos=0) # This will set the selected objects as the first siblings in their respective parent hierarchy.
>>> as_SetNextSibling(pos=-1)
# This will set the selected objects as the last siblings in their respective parent hierarchy.
>>> as_SetNextSibling()
# This will move each selected object to the next position in their parent hierarchy.
graph TB Start[("fa:fa-play Start")] --> CheckSelections{"/fas:fa-check-circle Check Selections"} CheckSelections --"If multiple objects selected" --> CheckPosition{{"/fas:fa-arrows-alt Check Position"}} CheckPosition --"If pos is 0 or -1" --> StartProgressWin[("/fas:fa-spinner Start Progress Window")] StartProgressWin --> IterateSelList{"/fas:fa-stream Iterate Selected List"} IterateSelList --"Set to first position (pos 0)" --> SetFirstPosition[("/fas:fa-angle-double-up Set First Sibling Position")] IterateSelList --"Set to last position (pos -1)" --> SetLastPosition[("/fas:fa-angle-double-down Set Last Sibling Position")] SetFirstPosition --> EndProgressWin[("/fas:fa-check-circle End Progress Window")] SetLastPosition --> EndProgressWin CheckPosition --"If pos is None" --> StartProgressWin2[("/fas:fa-spinner Start Progress Window")] StartProgressWin2 --> IterateSelList2{"/fas:fa-stream Iterate Selected List"} IterateSelList2 --"Set to next position" --> SetNextPosition[("/fas:fa-angle-right Set Next Sibling Position")] SetNextPosition --> EndProgressWin2[("/fas:fa-check-circle End Progress Window")] CheckSelections --"If single object selected" --> CheckPosSingle{{"/fas:fa-arrows-alt Check Position for Single Object"}} CheckPosSingle --"If pos is 0" --> SetSingleFirst[("/fas:fa-angle-double-up Set Single First Position")] CheckPosSingle --"If pos is -1" --> SetSingleLast[("/fas:fa-angle-double-down Set Single Last Position")] SetSingleFirst --> End[("fas:fa-stop End")] SetSingleLast --> End EndProgressWin --> End EndProgressWin2 --> End style Start fill:#00cc00,stroke:#000,stroke-width:3px style CheckSelections fill:#ffcc00,stroke:#000,stroke-width:2px style CheckPosition fill:#ff9999,stroke:#000,stroke-width:2px style StartProgressWin fill:#99ccff,stroke:#000,stroke-width:2px style StartProgressWin2 fill:#99ccff,stroke:#000,stroke-width:2px style IterateSelList fill:#99ff99,stroke:#000,stroke-width:2px style IterateSelList2 fill:#99ff99,stroke:#000,stroke-width:2px style SetFirstPosition fill:#cc99ff,stroke:#000,stroke-width:2px style SetLastPosition fill:#cc99ff,stroke:#000,stroke-width:2px style SetNextPosition fill:#cc99ff,stroke:#000,stroke-width:2px style EndProgressWin fill:#99ff99,stroke:#000,stroke-width:2px style EndProgressWin2 fill:#99ff99,stroke:#000,stroke-width:2px style CheckPosSingle fill:#ff9999,stroke:#000,stroke-width:2px style SetSingleFirst fill:#cc99ff,stroke:#000,stroke-width:2px style SetSingleLast fill:#cc99ff,stroke:#000,stroke-width:2px style End fill:#ff6666,stroke:#000,stroke-width:3px- Flow Chart Description:
This flowchart illustrates the as_SetNextSibling function:
Starts by checking if multiple objects are selected.
If multiple objects, checks the pos parameter to determine sibling position.
For pos 0 or -1, initiates a progress window and iterates through the selected list to set first or last sibling positions.
For pos None, iterates through the list to set each object to the next sibling position.
If a single object is selected, directly sets the sibling position based on the pos value.
The process ends after updating the sibling positions of the selected objects.
- EasyBird.as_SnapFeatherPivots(self, toOrigin=0)#
[shArgs : ]
Purpose:
:: Snaps the pivot points of selected feathers to specified vertices or to the origin.
This function is used in 3D modeling and rigging to accurately position the pivot points of feather objects.
It allows for precise manipulation and animation of feathers, especially in character rigging for birds or similar creatures.
- Parameters:
featherList – <list> #List of feather objects whose pivots need adjustment.
toOrigin – <int> #If set to 1, pivots will be snapped to the origin. If 0, pivots will be snapped to specified vertices.
- Returns:
None # This function does not return a value but updates the pivot positions of selected feathers.
Code Examples:
# Assuming a list of feather objects is already selected in the 3D viewport. >>> as_SnapFeatherPivots(toOrigin=0) # This will snap the pivots of selected feathers to specified vertices.
>>> as_SnapFeatherPivots(toOrigin=1)
# This will snap the pivots of selected feathers to the origin.
graph TB Start[("fa:fa-play Start")] --> GetFeathers{"/fas:fa-feather-alt Get Feathers"} GetFeathers --> CheckToOrigin{{"/fas:fa-map-marker-alt Check To Origin"}} CheckToOrigin --"If toOrigin is 1" --> SnapToOrigin[("/fas:fa-dot-circle Snap To Origin")] CheckToOrigin --"If toOrigin is 0" --> GetVertexNumbers{"/fas:fa-th-list Get Vertex Numbers"} GetVertexNumbers --> SnapToVertices[("/fas:fa-map-pin Snap To Specified Vertices")] SnapToOrigin --> UpdatePivots[("/fas:fa-sync-alt Update Pivot Positions")] SnapToVertices --> UpdatePivots UpdatePivots --"Update pivot positions of feathers" --> End[("fas:fa-stop End")] style Start fill:#00cc00,stroke:#000,stroke-width:3px style GetFeathers fill:#ffcc00,stroke:#000,stroke-width:2px style CheckToOrigin fill:#ff9999,stroke:#000,stroke-width:2px style SnapToOrigin fill:#99ff99,stroke:#000,stroke-width:2px style GetVertexNumbers fill:#99ccff,stroke:#000,stroke-width:2px style SnapToVertices fill:#99ff99,stroke:#000,stroke-width:2px style UpdatePivots fill:#99ff99,stroke:#000,stroke-width:2px style End fill:#ff6666,stroke:#000,stroke-width:3px- Flow Chart Description:
This flowchart illustrates the as_SnapFeatherPivots function:
Begins by acquiring a list of selected feather objects.
It checks if the pivot points should be snapped to the origin based on the toOrigin parameter.
If toOrigin is set to 1, snaps the pivot points of all feathers to the origin.
If toOrigin is 0, retrieves the specified vertex numbers for pivot point placement.
Snaps the pivot points to the specified vertices.
Updates the pivot positions of the selected feather objects.
Completes the process by leaving the feathers with updated pivot positions selected.
- EasyBird.as_TwistFeathers(self, animCtrl=None, tailSetupRH=False)#
[shArgs : ac=animCtrl, tsr=tailSetupRH]
Purpose:
:: Applies twist deformation to feather geometry based on control attributes.
- Parameters:
animCtrl – (<str, optional>) # The control object driving the twist deformation. If not provided, the control is retrieved based on UI elements.
tailSetupRH – (<bool, optional>) # Indicates whether it’s a tail setup for the right side. Defaults to False.
- Returns:
None
Code Examples:
>>> EasyBird.as_TwistFeathers()
graph TD Start[("fa:fa-play Start")] --> CheckShArgs{"/fas:fa-question-circle Check shArgs"} CheckShArgs --"If shArgs Exist"--> ParseShArgs["/fas:fa-cogs Parse shArgs"] CheckShArgs --"If shArgs Does Not Exist"--> GetControlsFeatherList{"/fas:fa-mouse-pointer Get Controls, Feather List"} ParseShArgs --> GetControlsFeatherList GetControlsFeatherList --> SetDefaultAttributes["Set Default Attributes"] SetDefaultAttributes --> CreateTwistHands["Create Twist Hands"] CreateTwistHands --> HideTwistHands["Hide Twist Hands"] HideTwistHands --> End["/fas:fa-stop End"] style Start fill:#00cc00,stroke:#000,stroke-width:3px style CheckShArgs fill:#ffcc00,stroke:#000,stroke-width:2px style ParseShArgs fill:#ffcc00,stroke:#000,stroke-width:2px style GetControlsFeatherList fill:#ffcc00,stroke:#000,stroke-width:2px style SetDefaultAttributes fill:#ffcc00,stroke:#000,stroke-width:2px style CreateTwistHands fill:#ffcc00,stroke:#000,stroke-width:2px style HideTwistHands fill:#ffcc00,stroke:#000,stroke-width:2px style End fill:#ff6666,stroke:#000,stroke-width:3px- Flow Chart Description:
This flowchart illustrates the as_TwistFeathers function:
Checks if shArgs exist, and if so, parses the parameters from it.
If shArgs do not exist, gets the controls and feather list.
Sets default attributes for twist deformation.
Creates twist hands for each feather geometry.
Hides the twist hands.
Ends the process.
- EasyBird.as_Update_UIOptions(self, onlyWings=1)#
[shArgs : ow=onlyWings]
Purpose:
:: Updates the state of UI checkboxes based on the ‘Only Wings Setup’ option in a user interface.
This function is used to manage the interactivity of UI elements, specifically checkboxes, in a 3D rigging tool.
It ensures that the settings for wing setup, reverse foot, and bendy setup are appropriately enabled or disabled based on user selection.
- Parameters:
onlyWings – <int> # Determines if the setup is focused only on wings. 1 for ‘Only Wings Setup’, 0 otherwise.
- Returns:
None # This function does not return a value but updates the UI elements based on the given parameters.
Code Examples:
>>> as_Update_UIOptions(1)
# This example updates the UI options assuming 'Only Wings Setup' is selected.
graph TB Start[("fa:fa-play Start")] --> CheckOnlyWingsOption{{"/fas:fa-question-circle Check Only Wings Option"}} CheckOnlyWingsOption --"If Only Wings Setup is selected" --> DisableOtherOptions[("/fas:fa-ban Disable Reverse Foot & Wing Setup Options")] CheckOnlyWingsOption --"If Only Wings Setup is not selected" --> EnableOtherOptions[("/fas:fa-check Enable Reverse Foot & Wing Setup Options")] DisableOtherOptions --> End[("fas:fa-stop End")] EnableOtherOptions --> End style Start fill:#00cc00,stroke:#000,stroke-width:3px style CheckOnlyWingsOption fill:#ffcc00,stroke:#000,stroke-width:2px style DisableOtherOptions fill:#99ff99,stroke:#000,stroke-width:2px style EnableOtherOptions fill:#99ff99,stroke:#000,stroke-width:2px style End fill:#ff6666,stroke:#000,stroke-width:3px- Flow Chart Description:
This flowchart illustrates the as_Update_UIOptions function:
The process starts by checking if the ‘Only Wings Setup’ option is selected in the UI.
If ‘Only Wings Setup’ is selected, it disables the options for Reverse Foot and Wing Setup.
If ‘Only Wings Setup’ is not selected, it enables the options for Reverse Foot and Wing Setup.
The process ends after updating the UI elements based on the ‘Only Wings Setup’ selection.
- EasyBird.attach_FeatherInfs(self, infList=None, skinMesh=None, useGeoInf=0)#
[shArgs : ]
Purpose:
:: Attaches specified influence objects to a skin cluster in Autodesk Maya, typically used in the context of feather rigging.
Prompts the user to confirm that the feathers are prepared (unfrozen and rigged) before proceeding.
If confirmed, the function adds the provided influences to the skin cluster of the specified mesh.
Useful in character rigging, especially for attaching feathers or similar objects to a character’s skin.
- Parameters:
infList – <list> # List of influence objects to be attached to the skin cluster.
skinMesh – <str> # The name of the mesh to which the influences are to be attached.
useGeoInf – <int> # A flag indicating whether to use geometric influences (0 or 1).
- Returns:
None # This function does not return a value but modifies the skin cluster of the specified mesh.
Code Examples:
>>> influences = ["featherJnt1", "featherJnt2"]
>>> skinMeshName = "characterMesh"
>>> attach_FeatherInfs(influences, skinMeshName, 0)
# Attaches 'featherJnt1' and 'featherJnt2' as influences to the skin cluster of 'characterMesh'.
graph TB Start[("fa:fa-play Start")] --> ConfirmPreparation{"/fas:fa-question-circle Confirm Feather Preparation"} ConfirmPreparation --"If Confirmed"--> AttachInfluences["/fas:fa-link Attach Influences to Skin Cluster"] ConfirmPreparation --"If Not Confirmed"--> EndAction["/fas:fa-ban Action Terminated"] AttachInfluences --> End["/fas:fa-stop End"] style Start fill:#00cc00,stroke:#000,stroke-width:3px style ConfirmPreparation fill:#ffcc99,stroke:#000,stroke-width:2px style AttachInfluences fill:#99ccff,stroke:#000,stroke-width:2px style EndAction fill:#ff6666,stroke:#000,stroke-width:2px style End fill:#ff6666,stroke:#000,stroke-width:3px- Flow Chart Description:
This flowchart illustrates the attach_FeatherInfs function:
The process begins with a confirmation step to ensure that feathers are prepared (unfrozen and rigged).
If the user confirms, the function proceeds to attach the specified influence objects to the skin cluster of the given mesh.
If the user does not confirm, the action is terminated.
The function ends after attaching influences or if the action is terminated.
- EasyBird.checkMirrorSelection(self)#
[shArgs : mc=mirrorCheck]
Purpose:
:: Determines which selection mirror function to call based on the user’s choice in a UI radio button group.
This function checks the state of a radio button group to decide whether to mirror vertex or edge selections.
It’s typically used in UIs where users can choose between mirroring vertices or edges on a 3D model.
- Parameters:
mirrorCheck – <int> # The selected option from the radio button group. 1 for mirroring vertices, 2 for mirroring edges.
- Returns:
None # This function does not return a value but calls the appropriate mirroring function based on the user’s selection.
Code Examples:
>>> checkMirrorSelection()
# This example checks the current selection state from a UI and calls the corresponding mirror function.
graph TB Start[("fa:fa-play Start")] --> GetMirrorOption[("/fas:fa-list-alt Get Mirror Option")] GetMirrorOption --> CheckOption{{"/fas:fa-question-circle Check Option"}} CheckOption --"Option 1: Mirror Vertices" --> CallMirrorVtx[("/fas:fa-object-group Call Select Mirror Vertices")] CheckOption --"Option 2: Mirror Edges" --> CallMirrorEdge[("/fas:fa-clone Call Select Mirror Edges")] CallMirrorVtx --> End[("fas:fa-stop End")] CallMirrorEdge --> End style Start fill:#00cc00,stroke:#000,stroke-width:3px style GetMirrorOption fill:#99ccff,stroke:#000,stroke-width:2px style CheckOption fill:#ffcc00,stroke:#000,stroke-width:2px style CallMirrorVtx fill:#cc99ff,stroke:#000,stroke-width:2px style CallMirrorEdge fill:#cc99ff,stroke:#000,stroke-width:2px style End fill:#ff6666,stroke:#000,stroke-width:3px- Flow Chart Description:
This flowchart illustrates the checkMirrorSelection function:
The process begins by obtaining the selected option from a UI radio button group.
It checks if the selected option is for mirroring vertices or edges.
If the option for mirroring vertices is selected, it calls the function to mirror vertex selections.
If the option for mirroring edges is selected, it calls the function to mirror edge selections.
The process ends after calling the appropriate mirroring function.
- EasyBird.confirmAction(self, action, raiseErr=False, trueVal='Yes', falseVal='No', ex1Btn=None, ex1Action=None, ex2Btn=None, ex2Action=None, ex3Btn=None, ex3Action=None, **shortArgs)#
[shArgs : a=action, e=raiseErr, tv=trueVal, fv=falseVal, eb1=ex1Btn, ea1=ex1Action, eb2=ex2Btn, ea2=ex2Action, eb3=ex3Btn, ea3=ex3Action]
Purpose:
:: Requests the user to confirm an action displayed in a dialog window.
- Parameters:
action – (<str>) # The action to be confirmed.
raiseErr – (<bool, optional>) # Whether to raise an error if the action is confirmed. Default is False.
trueVal – (<str, optional>) # The label for the true button in the confirmation dialog. Default is ‘Yes’.
falseVal – (<str, optional>) # The label for the false button in the confirmation dialog. Default is ‘No’.
ex1Btn – (<str, optional>) # Label for an additional button in the confirmation dialog. Default is None.
ex1Action – (<function, optional>) # Action to perform when the additional button is clicked. Default is None.
ex2Btn – (<str, optional>) # Label for a second additional button in the confirmation dialog. Default is None.
ex2Action – (<function, optional>) # Action to perform when the second additional button is clicked. Default is None.
ex3Btn – (<str, optional>) # Label for a third additional button in the confirmation dialog. Default is None.
ex3Action – (<function, optional>) # Action to perform when the third additional button is clicked. Default is None.
- Returns:
<bool/str/None> # True if the action is confirmed as ‘Yes’, False if confirmed as ‘No’, the label of the additional button if clicked, or None if no action is taken.
Code Examples:
>>> confirmation = confirmAction('Are you sure?', trueVal='Confirm', falseVal='Cancel')
>>> if confirmation:
...     print("Action confirmed.")
... else:
...     print("Action canceled.")
graph TD Start[("fa:fa-play Start")] --> CheckShArgs{"/fas:fa-question-circle Check shArgs"} CheckShArgs --"If shArgs Exist"--> ParseShArgs["/fas:fa-cogs Parse shArgs"] CheckShArgs --"If shArgs Does Not Exist"--> InitializeParameters["/fas:fa-wrench Initialize Parameters"] ParseShArgs --> ProcessDialog{"/fas:fa-tasks Process Dialog"} ProcessDialog --> End["/fas:fa-stop End"] style Start fill:#00cc00,stroke:#000,stroke-width:3px style CheckShArgs fill:#ffcc00,stroke:#000,stroke-width:2px style ParseShArgs fill:#ff9999,stroke:#000,stroke-width:2px style InitializeParameters fill:#ff9999,stroke:#000,stroke-width:2px style ProcessDialog fill:#99ccff,stroke:#000,stroke-width:2px style End fill:#ff6666,stroke:#000,stroke-width:3px- Flow Chart Description:
This flowchart illustrates the confirmAction function:
Checks if shArgs exist, and if so, parses the parameters from it.
If shArgs do not exist, initializes parameters with default values.
Processes the dialog window based on the provided parameters.
Ends the process.
- EasyBird.constrain_Ctrl2Feather(self, ctrlName=None, featherGeo=None, updateTF=True)#
[shArgs : cn=ctrlName, fg=featherGeo, ut=updateTF]
Purpose:
:: Constrains a control to a feather geometry, optionally updating a text field with the feather control location.
- Parameters:
ctrlName – (<str, optional>) # The name of the control to constrain. If not provided, the first curve or space locator in the selection is used.
featherGeo – (<str/list, optional>) # The feather geometry to constrain to. If not provided, the selected mesh is used.
updateTF – (<bool, optional>) # Whether to update a text field with the feather control location. Default is True.
- Returns:
None
Code Examples:
>>> ctrlName = 'R_Shoulder_Feather_Ctrl'
>>> featherGeo = 'middle_r_027'
>>> constrain_Ctrl2Feather(ctrlName, featherGeo, updateTF=True)
graph TD Start[("fa:fa-play Start")] --> CheckShArgs{"/fas:fa-question-circle Check shArgs"} CheckShArgs --"If shArgs Exist"--> ParseShArgs["/fas:fa-cogs Parse shArgs"] CheckShArgs --"If shArgs Does Not Exist"--> InitializeParameters["/fas:fa-wrench Initialize Parameters"] ParseShArgs --> LoopFeatherGeo{"/fas:fa-clone Loop Feather Geo"} LoopFeatherGeo --"Iterate Over Each Feather Geo"--> GetFeatherGrp["/fas:fa-database Get Feather Group"] GetFeatherGrp --> CreateFeatherConLoc{"/fas:fa-plus Create Feather Con Loc"} CreateFeatherConLoc --> UpdateTextField{"/fas:fa-edit Update Text Field"} UpdateTextField --> ConstrainCtrl{"/fas:fa-link Constrain Ctrl"} ConstrainCtrl --> CheckRightSide{"/fas:fa-question-circle Check Right Side"} CheckRightSide --"If Ctrl is Left Side"--> CheckRightFeather{"/fas:fa-question-circle Check Right Feather"} CheckRightFeather --"If Feather is Left Side"--> ConstrainRight{"/fas:fa-link Constrain Right"} ConstrainRight --> End["/fas:fa-stop End"] style Start fill:#00cc00,stroke:#000,stroke-width:3px style CheckShArgs fill:#ffcc00,stroke:#000,stroke-width:2px style ParseShArgs fill:#ff9999,stroke:#000,stroke-width:2px style InitializeParameters fill:#ff9999,stroke:#000,stroke-width:2px style LoopFeatherGeo fill:#99ccff,stroke:#000,stroke-width:2px style GetFeatherGrp fill:#99ccff,stroke:#000,stroke-width:2px style CreateFeatherConLoc fill:#99ccff,stroke:#000,stroke-width:2px style UpdateTextField fill:#99ccff,stroke:#000,stroke-width:2px style ConstrainCtrl fill:#99ccff,stroke:#000,stroke-width:2px style CheckRightSide fill:#ffcc00,stroke:#000,stroke-width:2px style CheckRightFeather fill:#ffcc00,stroke:#000,stroke-width:2px style ConstrainRight fill:#99ccff,stroke:#000,stroke-width:2px style End fill:#ff6666,stroke:#000,stroke-width:3px- Flow Chart Description:
This flowchart illustrates the constrain_Ctrl2Feather function:
Checks if shArgs exist, and if so, parses the parameters from it.
If shArgs do not exist, initializes the function parameters.
Iterates over each provided feather geometry.
Gets the feather group associated with the feather geometry.
Creates a position locator at the feather group’s position.
Updates the text field with the feather control location if specified.
Constrains the control to the feather group’s orientation.
Checks if the control is on the left side, if so, checks if the feather is on the right side.
If both control and feather are on the left side, constrains the right control to the right feather.
Ends the process.
- EasyBird.createBasicHierarchy(self)#
[**shArgs : tg=topGrp, tgr=transGrp, jg=jntGrp, gg=geoGrp, ig=ikGrp, bg=blendsGrp, gcg=gCtrlGrp, gc=globalControl, gcc=globalControlGrp, lhcg=LHandCtrlGrp, rhcg=RHandCtrlGrp, llcg=LLegCtrlGrp, rlcg=RLegCtrlGrp]
Purpose:
:: Constructs a basic hierarchical structure for rigging in Autodesk Maya, including groups for joints, geometry, IK, blendshapes, and global controls.
This function streamlines the setup process for complex rigging in Maya by creating essential groups and controls.
It sets up a base hierarchy that can be further developed for advanced rigging functionalities.
Provide Argument | Description in below format [Note: <Sub Title in Bold Lettters> Format below 3 lines including ‘:’s & ‘#’ as per sphinx documentation format needs]
- Parameters:
topGrp – <asNode> # Main group for the entire rig setup.
transGrp – <asNode> # Group for transformations.
jntGrp – <asNode> # Group for joints.
geoGrp – <asNode> # Group for geometry.
ikGrp – <asNode> # Group for IK handles.
blendsGrp – <asNode> # Group for blendshapes.
gCtrlGrp – <asNode> # Group for global controls.
globalControl – <asNode> # Main global control node.
globalControlGrp – <asNode> # Group for the main global control.
LHandCtrlGrp – <asNode> # Group for left hand controls.
RHandCtrlGrp – <asNode> # Group for right hand controls.
LLegCtrlGrp – <asNode> # Group for left leg controls.
RLegCtrlGrp – <asNode> # Group for right leg controls.
- Returns:
None # This function does not return a value but sets up the basic hierarchy in the Maya scene.
Code Examples:
>>> createBasicHierarchy()
# This will create a basic hierarchical structure for rigging in the current Maya scene.
graph TD Start[("fa:fa-play Start")] --> CreateGlobalControl["/fas:fa-sitemap Create Global Control"] CreateGlobalControl --> CreateTopGrp["/fas:fa-sitemap Create Top Group"] CreateTopGrp --> CreateTransGrp["/fas:fa-sitemap Create Transform Group"] CreateTransGrp --> CreateGCtrlGrp["/fas:fa-sitemap Create Global Control Group"] CreateGCtrlGrp --> CreateJntGrp["/fas:fa-sitemap Create Joint Group"] CreateJntGrp --> CreateGeoGrp["/fas:fa-sitemap Create Geometry Group"] CreateGeoGrp --> CreateIKGrp["/fas:fa-sitemap Create IK Group"] CreateIKGrp --> CreateBlendsGrp["/fas:fa-sitemap Create Blendshapes Group"] CreateBlendsGrp --> CreateControlGroups["/fas:fa-sitemap Create Control Groups"] CreateControlGroups --> SetupGlobalControl["/fas:fa-cogs Setup Global Control"] SetupGlobalControl --> FinalizeHierarchy["/fas:fa-check-circle Finalize Hierarchy"] FinalizeHierarchy --> End[("fas:fa-stop End")] style Start fill:#00cc00,stroke:#000,stroke-width:3px style CreateGlobalControl fill:#99ccff,stroke:#000,stroke-width:2px style CreateTopGrp fill:#99ff99,stroke:#000,stroke-width:2px style CreateTransGrp fill:#cc99ff,stroke:#000,stroke-width:2px style CreateGCtrlGrp fill:#99ccff,stroke:#000,stroke-width:2px style CreateJntGrp fill:#99ff99,stroke:#000,stroke-width:2px style CreateGeoGrp fill:#cc99ff,stroke:#000,stroke-width:2px style CreateIKGrp fill:#99ccff,stroke:#000,stroke-width:2px style CreateBlendsGrp fill:#99ff99,stroke:#000,stroke-width:2px style CreateControlGroups fill:#cc99ff,stroke:#000,stroke-width:2px style SetupGlobalControl fill:#99ccff,stroke:#000,stroke-width:2px style FinalizeHierarchy fill:#99ff99,stroke:#000,stroke-width:2px style End fill:#ff6666,stroke:#000,stroke-width:3px- Flow Chart Description:
This flowchart illustrates the createBasicHierarchy function:
Begins with creating the global control.
Then, creates the top group for the rig.
Next, a transform group is created for transformations.
Followed by creating a global control group.
A joint group is created for joint organization.
Geometry group is then set up for geometry elements.
IK group is created for IK handles.
Blendshapes group is established for blendshape deformers.
Control groups are created for various parts like hands, legs, etc.
Global control is then configured with necessary attributes and connections.
Finally, the hierarchy is finalized, and the process ends.
- EasyBird.createClusterCtrl(self)#
[shArgs : mc=mirrCheck, sv=scaleVal]
Purpose:
:: Creates a new cluster control for selected vertices and optionally mirrors it to the opposite side.
This function streamlines the process of creating cluster controls on 3D models, enhancing the efficiency of rigging workflows.
It allows for easy manipulation of clusters in Maya and can mirror the setup for symmetrical models.
- Parameters:
mirrCheck – <int> # Indicates whether to mirror the cluster control (1) or not (0).
scaleVal – <float> # The scale value to be applied to the created cluster control.
- Returns:
None # This function does not return a value but creates cluster controls in the Maya scene.
Code Examples:
>>> createClusterCtrl()
# This will create a new cluster control on the selected vertices and mirror it if mirroring is enabled.
graph TB Start[("fa:fa-play Start")] --> CheckMirr[("/fas:fa-check-circle Check Mirror Option")] CheckMirr --"Mirroring Enabled" --> CreateClustL[("/fas:fa-sitemap Create Left Cluster Control")] CreateClustL --> CreateClustR[("/fas:fa-sitemap Create Right Cluster Control")] CreateClustR --> End[("fas:fa-stop End")] CheckMirr --"Mirroring Disabled" --> CreateClustSingle[("/fas:fa-sitemap Create Single Cluster Control")] CreateClustSingle --> End style Start fill:#00cc00,stroke:#000,stroke-width:3px style CheckMirr fill:#ffcc00,stroke:#000,stroke-width:2px style CreateClustL fill:#99ccff,stroke:#000,stroke-width:2px style CreateClustR fill:#99ccff,stroke:#000,stroke-width:2px style CreateClustSingle fill:#99ccff,stroke:#000,stroke-width:2px style End fill:#ff6666,stroke:#000,stroke-width:3px- Flow Chart Description:
This flowchart illustrates the createClusterCtrl function:
The process starts by checking if mirroring is enabled.
If mirroring is enabled, a cluster control is created for the selected vertices on the left side, then mirrored to the right side.
If mirroring is disabled, only a single cluster control is created for the selected vertices.
The process ends after creating the cluster controls.
- EasyBird.createEdgeLoopCtrls(self)#
[shArgs : ]
Purpose:
:: Creates control curves along the selected edge loops in a 3D model within Maya.
This function is particularly useful in rigging and animation, providing animators with more control over the deformation of meshes.
It automates the process of creating and placing control curves along edge loops, saving time and ensuring precision.
- Parameters:
makeCtrls – <int> # A flag to indicate whether to make control curves (1) or not (0).
- Returns:
None # This function does not return a value but creates control curves along selected edge loops.
Code Examples:
>>> createEdgeLoopCtrls()
# This will create control curves on the currently selected edge loops in the scene.
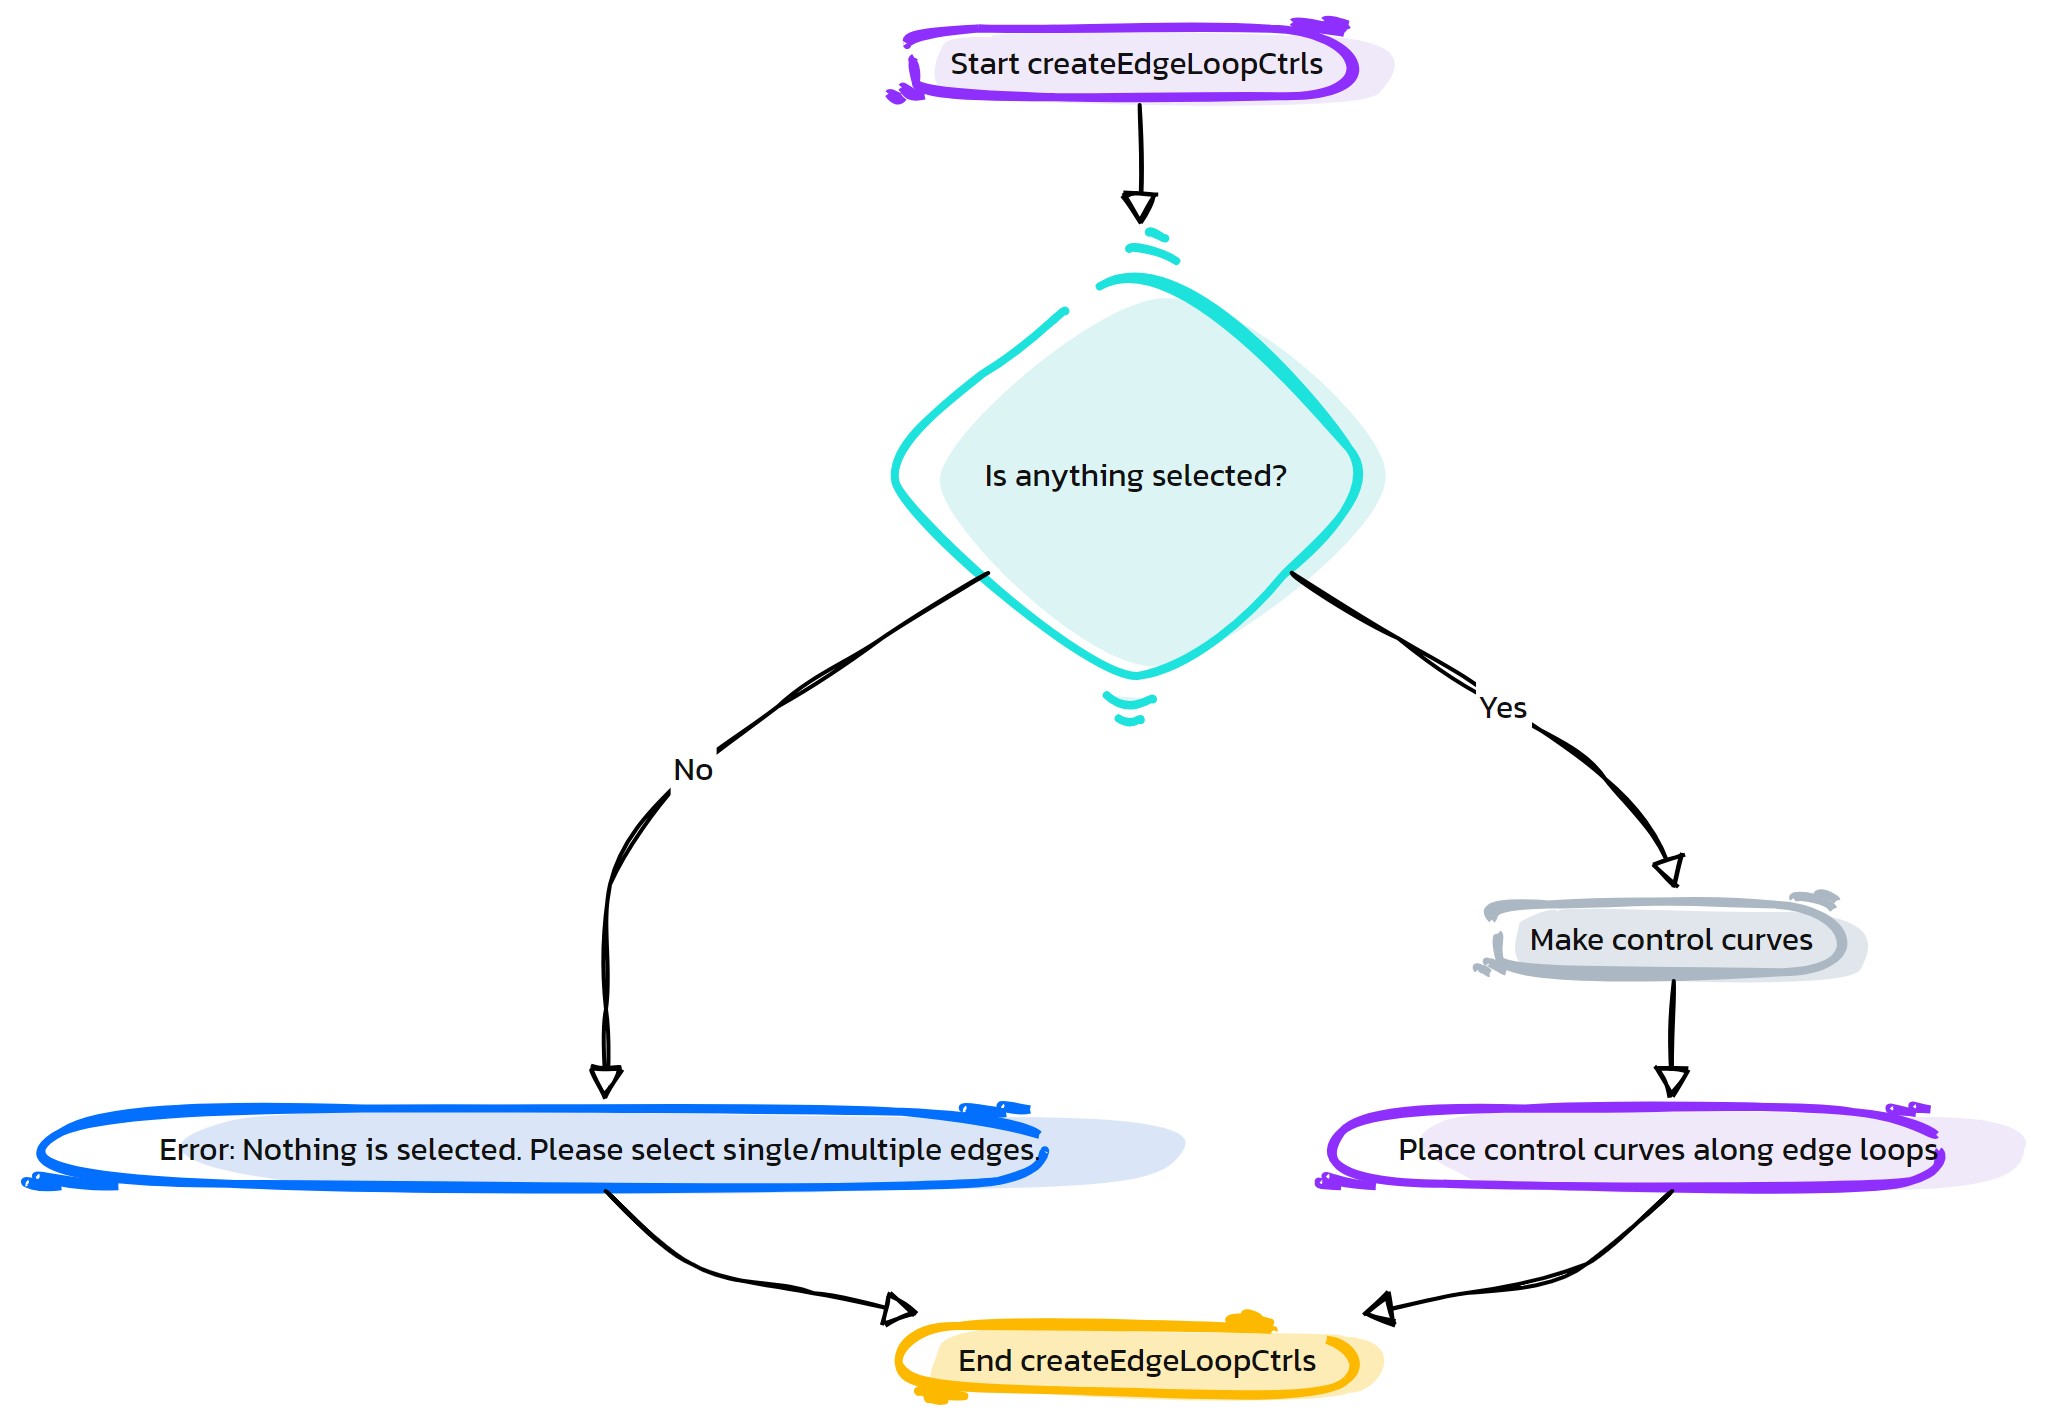
- Flow Chart Description:
This flowchart illustrates the createEdgeLoopCtrls function:
The process starts by checking if edges are selected.
If edges are selected, it proceeds to create control curves along these edge loops.
If no edges are selected, an error message is displayed.
The process ends after creating control curves or displaying an error.
- EasyBird.createLowResGeo(self)#
[shArgs : jl=jntList]
Purpose:
:: Generates low-resolution geometry aligned with specified joints for animation and rigging purposes in Autodesk Maya.
Ideal for creating simplified representations of complex models, aiding in the rigging and animation process.
Streamlines the process of aligning low-resolution geometries with joints, saving time and effort.
- Parameters:
jntList – <list of PyNode> # List of joints around which low-resolution geometries are created.
- Returns:
None # This function creates low-resolution geometries but does not return any value.
Code Examples:
>>> createLowResGeo()
# Automatically generates low-resolution geometries aligned with the selected joints.
graph TB Start[("fa:fa-play Start")] --> CheckSelection{"/fas:fa-check-circle Check Selection"} CheckSelection --> GetSelectedJoints[("fa:fa-object-ungroup Get Selected Joints")] GetSelectedJoints --> CheckJointList{"/fas:fa-question-circle Check Joint List"} CheckJointList --"If Joint List Exists"--> IterateJoints[("fas:fa-repeat Iterate Joints")] CheckJointList --"If Joint List Does Not Exist"--> ErrorNoJoints[("fas:fa-exclamation-triangle Error No Joints")] IterateJoints --> CheckJointType{"/fas:fa-question-circle Check Joint Type"} CheckJointType --"If Not a Joint"--> DisplayWarning[("fas:fa-exclamation-circle Display Warning")] CheckJointType --"If a Joint"--> CheckSide{"/fas:fa-question-circle Check Side"} DisplayWarning --> ContinueIteration[("fas:fa-arrow-right Continue Iteration")] CheckSide --"If Right Side"--> SkipMirror[("fas:fa-arrow-circle-right Skip Mirror")] CheckSide --"If Left or Center"--> CreateGeo[("fas:fa-cube Create Geometry")] SkipMirror --> ContinueIteration CreateGeo --> SetGeoProperties[("fas:fa-sliders-h Set Geometry Properties")] SetGeoProperties --> PositionGeometry[("fas:fa-arrows-alt Position Geometry")] PositionGeometry --> ParentToGroup[("fas:fa-object-group Parent To Group")] ParentToGroup --> ContinueIteration ContinueIteration --> IterateJoints IterateJoints --"If Joint List is Not Empty"--> CheckJointList IterateJoints --"If Joint List is Empty"--> End[("fas:fa-stop End")] style Start fill:#00cc00,stroke:#000,stroke-width:3px style CheckSelection fill:#ffcc00,stroke:#000,stroke-width:2px style GetSelectedJoints fill:#99ccff,stroke:#000,stroke-width:2px style CheckJointList fill:#99ff99,stroke:#000,stroke-width:2px style ErrorNoJoints fill:#ff6666,stroke:#000,stroke-width:3px style IterateJoints fill:#cc99ff,stroke:#000,stroke-width:2px style CheckJointType fill:#ffcc99,stroke:#000,stroke-width:2px style DisplayWarning fill:#ccffcc,stroke:#000,stroke-width:2px style ContinueIteration fill:#99ccff,stroke:#000,stroke-width:2px style CheckSide fill:#ff9999,stroke:#000,stroke-width:2px style SkipMirror fill:#99ff99,stroke:#000,stroke-width:2px style CreateGeo fill:#cc99ff,stroke:#000,stroke-width:2px style SetGeoProperties fill:#ffcc99,stroke:#000,stroke-width:2px style PositionGeometry fill:#ccffcc,stroke:#000,stroke-width:2px style ParentToGroup fill:#ff9999,stroke:#000,stroke-width:2px style End fill:#ff6666,stroke:#000,stroke-width:3px- Flow Chart Description:
This flowchart illustrates the createLowResGeo function:
The process starts by checking if the Joint List is provided or selected.
If the Joint List doesn’t exist, it throws an error.
If the Joint List exists, it iterates through each joint.
- For each joint:
Checks if it’s a valid joint.
If not a joint, displays a warning and continues to the next joint.
If it’s a joint, checks if it’s on the right side.
If on the right side, skips to mirror the geometry later.
If on the left or center, creates low-resolution geometry.
Sets properties for the generated geometry.
Positions the geometry according to the joint.
Parents the geometry to the appropriate group.
Continues iteration through the joint list.
The process ends after all joints are processed.
- EasyBird.createRivet(self)#
[shArgs : sv=scaleVal, el=edgeList_L]
Purpose:
:: Creates a rivet on a selected edge and optionally mirrors it to a corresponding edge on the opposite side.
This function is useful in rigging for attaching objects firmly to deforming meshes.
It allows precise placement of rivets on 3D models and can automatically handle symmetrical placement on mirrored geometry.
- Parameters:
scaleVal – <float> # Scale value to be applied to the created rivet.
edgeList_L – <list> # List of edges selected on the left side to create the rivet.
rivetName – <str> # The name to be assigned to the created rivet.
mirrCheck – <int> # Value to determine if a mirrored rivet should be created (1 for true).
- Returns:
None # This function does not return a value but creates rivets in the scene.
Code Examples:
>>> scale_val = 1.0
>>> selected_edges = ['pCube1.e[0]']
>>> createRivet()
# This will create a rivet on the selected edge of 'pCube1' with the given scale value.
# If mirrored edges are selected, rivets will be created on them as well.
graph TB Start[("fa:fa-play Start")] --> CheckEdges{"/fas:fa-check-circle Check Selected Edges"} CheckEdges --"If edges are selected" --> CreateRivetL[("/fas:fa-dot-circle Create Rivet Left Side")] CreateRivetL --> RenameRivetL[("/fas:fa-text-height Rename Rivet Left")] RenameRivetL --> ScaleRivetL[("/fas:fa-expand-arrows-alt Scale Rivet Left")] ScaleRivetL --> CheckMirror[("fa:fa-question Check Mirror")] CheckMirror --"If mirroring is enabled" --> SelectMirrorEdges[("/fas:fa-arrows-alt-h Select Mirror Edges")] SelectMirrorEdges --> CreateRivetR[("/fas:fa-dot-circle Create Rivet Right Side")] CreateRivetR --> RenameRivetR[("/fas:fa-text-height Rename Rivet Right")] RenameRivetR --> ScaleRivetR[("/fas:fa-expand-arrows-alt Scale Rivet Right")] ScaleRivetR --> End[("fas:fa-stop End")] CheckMirror --"If mirroring is not enabled" --> End style Start fill:#00cc00,stroke:#000,stroke-width:3px style CheckEdges fill:#ffcc00,stroke:#000,stroke-width:2px style CreateRivetL fill:#ff9999,stroke:#000,stroke-width:2px style RenameRivetL fill:#99ccff,stroke:#000,stroke-width:2px style ScaleRivetL fill:#cc99ff,stroke:#000,stroke-width:2px style CheckMirror fill:#ffcc00,stroke:#000,stroke-width:2px style SelectMirrorEdges fill:#ff9999,stroke:#000,stroke-width:2px style CreateRivetR fill:#99ccff,stroke:#000,stroke-width:2px style RenameRivetR fill:#cc99ff,stroke:#000,stroke-width:2px style ScaleRivetR fill:#99ff99,stroke:#000,stroke-width:2px style End fill:#ff6666,stroke:#000,stroke-width:3px- Flow Chart Description:
This flowchart depicts the createRivet function:
The process begins by verifying if edges are selected.
A rivet is created on the left side of the selected edge.
The created rivet on the left side is then renamed appropriately.
The left rivet is scaled based on the specified scale value.
The function checks if mirror rivet creation is enabled.
If enabled, mirror edges are selected and a rivet is created on the right side.
The right side rivet is renamed and scaled similar to the left side.
The process ends after creating and configuring rivets on both sides.
- EasyBird.deleteAll(self)#
[**shArgs : none]
Purpose:
:: Deletes all objects within the Autodesk Maya scene.
This function is designed to remove all elements in the Maya scene, providing a clean slate for new projects or testing.
It utilizes Maya’s built-in selection and deletion commands to ensure a thorough and efficient removal of all objects.
Primarily used in rigging and animation workflows for scene management and resetting the workspace.
No arguments are required for this function.
- Returns:
None # This function does not return a value but performs a global deletion action in the Maya scene.
Code Examples:
>>> deleteAll()
# This will delete all objects in the current Maya scene.
graph TB Start[("fa:fa-play Start")] --> SelectAll["/fas:fa-check-square Select All Objects"] SelectAll --> PerformDelete["/fas:fa-trash-alt Delete All Selected Objects"] PerformDelete --> End[("fas:fa-stop End")] style Start fill:#00cc00,stroke:#000,stroke-width:3px style SelectAll fill:#ffcc00,stroke:#000,stroke-width:2px style PerformDelete fill:#ff9999,stroke:#000,stroke-width:2px style End fill:#00cc00,stroke:#000,stroke-width:3px- Flow Chart Description:
This flowchart illustrates the deleteAll function:
The function starts by selecting all objects in the Maya scene.
Once all objects are selected, it proceeds to delete them, effectively clearing the entire scene.
The function concludes after all objects in the scene have been deleted.
- EasyBird.deleteBasicCurves(self)#
[**shArgs : none]
Purpose:
:: Deletes the basic curves from the Autodesk Maya scene, typically used in rigging setups.
This function presents a confirmation dialog to the user before deleting the basic curves, ensuring intentional usage.
It is useful for cleaning up the Maya scene by removing unnecessary curve objects.
Provide Argument | Description in below format [Note: <Sub Title in Bold Lettters> Format below 3 lines including ‘:’s & ‘#’ as per sphinx documentation format needs]
No arguments are required for this function.
- Returns:
None # This function does not return a value but performs an action in the Maya scene.
Code Examples:
>>> deleteBasicCurves()
# This will prompt for confirmation and then delete the basic curves from the Maya scene if confirmed.
graph TD Start[("fa:fa-play Start")] --> ConfirmDeletion{"/fas:fa-question-circle Confirm Deletion"} ConfirmDeletion --"Yes"--> DeleteCurves["/fas:fa-trash-alt Delete Curves"] DeleteCurves --> CheckDeletionSuccess{"/fas:fa-check-square Check Deletion Success"} CheckDeletionSuccess --"Success"--> DisplaySuccessMessage["/fas:fa-check Display Success Message"] CheckDeletionSuccess --"Failure"--> DisplayFailureMessage["/fas:fa-times Display Failure Message"] ConfirmDeletion --"No"--> DisplayCancelledMessage["/fas:fa-info-circle Display Cancelled Message"] DisplaySuccessMessage --> End[("fas:fa-stop End")] DisplayFailureMessage --> End DisplayCancelledMessage --> End style Start fill:#00cc00,stroke:#000,stroke-width:3px style ConfirmDeletion fill:#ffcc00,stroke:#000,stroke-width:2px style DeleteCurves fill:#99ccff,stroke:#000,stroke-width:2px style CheckDeletionSuccess fill:#99ff99,stroke:#000,stroke-width:2px style DisplaySuccessMessage fill:#cc99ff,stroke:#000,stroke-width:2px style DisplayFailureMessage fill:#99ccff,stroke:#000,stroke-width:2px style DisplayCancelledMessage fill:#99ff99,stroke:#000,stroke-width:2px style End fill:#ff6666,stroke:#000,stroke-width:3px- Flow Chart Description:
This flowchart illustrates the deleteBasicCurves function:
The process starts with a confirmation dialog asking whether to delete basic curves.
If confirmed with ‘Yes’, it proceeds to delete the curves.
After deletion, the function checks if the curves were successfully deleted.
If successful, a success message is displayed. If failure, a warning message is shown.
If ‘No’ is selected in the confirmation dialog, a message indicating the cancellation of the delete action is displayed.
The process ends after displaying the relevant message.
- EasyBird.deleteEdgeLoops(self, edgeList=None)#
[**shArgs : el=edgeList]
Purpose:
:: Removes unwanted edge loops in Autodesk Maya from a selected mesh.
This function is designed to simplify the geometry of a mesh by removing unnecessary edge loops.
It confirms with the user before proceeding, ensuring no accidental deletions occur.
The function operates on the currently selected edges in Maya, identifying and deleting their associated edge loops.
It is particularly useful in modeling and rigging workflows where optimizing mesh topology is crucial.
- Parameters:
edgeList – <list> # List of edges from which to determine and delete associated edge loops.
- Returns:
None # This function does not return a value but performs a deletion action on edge loops in the selected Maya mesh.
Code Examples:
>>> deleteEdgeLoops()
# This will prompt the user for confirmation and then delete edge loops based on the currently selected edges in the Maya scene.
graph TB Start[("fa:fa-play Start")] --> ConfirmDeletion{{"/fas:fa-question-circle Confirm Deletion"}} ConfirmDeletion --"User confirms"--> CheckEdgeList{"/fas:fa-code-branch Check Edge List"} ConfirmDeletion --"User cancels"--> EndFunction[("fas:fa-ban End Function")] CheckEdgeList --"Edge List Provided"--> ProcessProvidedEdges["/fas:fa-list-ol Process Provided Edge List"] CheckEdgeList --"No Edge List"--> SelectCurrentEdges["/fas:fa-hand-pointer Select Current Edges"] ProcessProvidedEdges --> IdentifyLoops["/fas:fa-sync-alt Identify Edge Loops"] SelectCurrentEdges --> IdentifyLoops IdentifyLoops --> DeleteLoops["/fas:fa-trash-alt Delete Edge Loops"] DeleteLoops --> ClearSelection["/fas:fa-times-circle Clear Selection"] ClearSelection --> End[("fas:fa-stop End")] style Start fill:#00cc00,stroke:#000,stroke-width:3px style ConfirmDeletion fill:#ffcc00,stroke:#000,stroke-width:2px style CheckEdgeList fill:#ff9999,stroke:#000,stroke-width:2px style ProcessProvidedEdges fill:#99ccff,stroke:#000,stroke-width:2px style SelectCurrentEdges fill:#cc99ff,stroke:#000,stroke-width:2px style IdentifyLoops fill:#99ff99,stroke:#000,stroke-width:2px style DeleteLoops fill:#ff6666,stroke:#000,stroke-width:2px style ClearSelection fill:#cccccc,stroke:#000,stroke-width:2px style EndFunction fill:#ff6666,stroke:#000,stroke-width:2px style End fill:#ff6666,stroke:#000,stroke-width:3px- Flow Chart Description:
This flowchart illustrates the deleteEdgeLoops function:
The function begins with a confirmation prompt to the user for deletion.
If confirmed, it checks if an edge list is provided. If not, it selects the currently active edges in the scene.
It then identifies all edge loops associated with the selected or provided edges.
These identified edge loops are subsequently deleted from the mesh.
The function ends by clearing the current selection in Maya.
- EasyBird.deleteSetup(self)#
[**shArgs : l=label]
Purpose:
:: Deletes the main rig setup in Autodesk Maya based on a specified label.
The function primarily focuses on removing the ‘Rig_Main’ group, which is central to most rigging setups in Maya.
It prompts for confirmation before proceeding with the deletion to prevent accidental data loss.
The function is designed to be adaptable, allowing for the removal of differently labeled rig setups by specifying a unique label prefix.
- Parameters:
initialLabel – <str> # The prefix label of the rig to be deleted. If specified, the function attempts to delete a rig setup with this label.
- Returns:
None # This function does not return a value but performs a deletion action on a specific rig setup in the Maya scene.
Code Examples:
>>> deleteSetup()
# This will attempt to delete the 'Rig_Main' group or a rig setup with a specified label in the current Maya scene.
graph TB Start[("fa:fa-play Start")] --> PromptLabel["/fas:fa-tag Prompt for Rig Label"] PromptLabel --> ConfirmDeletion{{"/fas:fa-question-circle Confirm Deletion"}} ConfirmDeletion --"Confirmation: Yes" --> TryDeleteRigMain["/fas:fa-trash-alt Try Delete 'Rig_Main'"] TryDeleteRigMain --"If 'Rig_Main' exists" --> DeleteRigMain["/fas:fa-check Delete 'Rig_Main'"] TryDeleteRigMain --"If 'Rig_Main' does not exist" --> TryDeleteLabelledRig["/fas:fa-search-plus Try Delete Labelled Rig"] TryDeleteLabelledRig --"If Labelled Rig exists" --> DeleteLabelledRig["/fas:fa-check Delete Labelled Rig"] TryDeleteLabelledRig --"If Labelled Rig does not exist" --> DisplayError["/fas:fa-exclamation-triangle Display Error"] ConfirmDeletion --"Confirmation: No" --> CancelDeletion["/fas:fa-ban Cancel Deletion"] DeleteRigMain --> End[("fas:fa-stop End")] DeleteLabelledRig --> End DisplayError --> End CancelDeletion --> End style Start fill:#00cc00,stroke:#000,stroke-width:3px style PromptLabel fill:#ffcc00,stroke:#000,stroke-width:2px style ConfirmDeletion fill:#ff9999,stroke:#000,stroke-width:2px style TryDeleteRigMain fill:#99ccff,stroke:#000,stroke-width:2px style DeleteRigMain fill:#99ff99,stroke:#000,stroke-width:2px style TryDeleteLabelledRig fill:#cc99ff,stroke:#000,stroke-width:2px style DeleteLabelledRig fill:#99ff99,stroke:#000,stroke-width:2px style DisplayError fill:#ff6666,stroke:#000,stroke-width:2px style CancelDeletion fill:#cccccc,stroke:#000,stroke-width:2px style End fill:#ff6666,stroke:#000,stroke-width:3px- Flow Chart Description:
This flowchart illustrates the deleteSetup function:
The process begins with prompting the user for the rig label.
It then seeks confirmation from the user before proceeding with the deletion.
If confirmed, it attempts to delete ‘Rig_Main’. If ‘Rig_Main’ doesn’t exist or is already deleted, it tries to delete the rig setup with the specified label.
If the labelled rig is not found, an error message is displayed.
The process is canceled if the user chooses not to proceed with the deletion.
The function concludes after the deletion or cancellation action.
- EasyBird.delete_All_Setup(self)#
[**shArgs : none]
Purpose:
:: Facilitates the deletion of either all components or just the setup components within an Autodesk Maya scene.
This function provides an interactive choice to the user to either delete all components or only the setup components in the Maya scene.
The function utilizes a confirmation dialog to ensure the user’s intent before proceeding with the deletion process.
It is a utility function in rigging and animation workflows to help manage scene cleanliness and efficiency.
No arguments are required for this function.
- Returns:
None # This function does not return a value but performs a deletion action based on the user’s selection.
Code Examples:
>>> delete_All_Setup()
# This will present a confirmation dialog for the user to choose between deleting all components or only setup components in the Maya scene.
graph TB Start[("fa:fa-play Start")] --> ConfirmAction{{"/fas:fa-question-circle Confirm Action"}} ConfirmAction --"User confirms 'All'"--> DeleteAll["/fas:fa-trash-alt Delete All Components"] ConfirmAction --"User selects 'Setup'"--> DeleteSetup["/fas:fa-tools Delete Setup Components"] DeleteAll --> End[("fas:fa-stop End")] DeleteSetup --> End style Start fill:#00cc00,stroke:#000,stroke-width:3px style ConfirmAction fill:#ffcc00,stroke:#000,stroke-width:2px style DeleteAll fill:#ff9999,stroke:#000,stroke-width:2px style DeleteSetup fill:#99ccff,stroke:#000,stroke-width:2px style End fill:#00cc00,stroke:#000,stroke-width:3px- Flow Chart Description:
This flowchart illustrates the delete_All_Setup function:
The function initiates by presenting a confirmation dialog to the user.
The user is given a choice between two options: ‘All’ or ‘Setup’.
If the user selects ‘All’, the function proceeds to delete all components in the Maya scene.
If the user selects ‘Setup’, the function only deletes the setup components.
The function concludes after performing the selected deletion action.
- EasyBird.error(self, errorMsg)#
[shArgs : em=errorMsg]
Purpose:
:: Displays an error message through a confirmation dialog window and raises a RuntimeError after the dialog is closed.
- Parameters:
errorMsg – (<str/list>) # The error message to be displayed. If a list is provided, it is joined into a single string.
- Returns:
None
Code Examples:
>>> error('An error occurred!')
After closing the window, RuntimeError will be raised
graph TD Start[("fa:fa-play Start")] --> CheckShArgs{"/fas:fa-question-circle Check shArgs"} CheckShArgs --"If shArgs Exist"--> ParseShArgs["/fas:fa-cogs Parse shArgs"] CheckShArgs --"If shArgs Does Not Exist"--> InitializeParameters["/fas:fa-wrench Initialize Parameters"] ParseShArgs --> DisplayDialog{"/fas:fa-desktop Display Dialog"} DisplayDialog --> RaiseError{"/fas:fa-exclamation-circle Raise Error"} RaiseError --> End["/fas:fa-stop End"] style Start fill:#00cc00,stroke:#000,stroke-width:3px style CheckShArgs fill:#ffcc00,stroke:#000,stroke-width:2px style ParseShArgs fill:#ff9999,stroke:#000,stroke-width:2px style InitializeParameters fill:#ff9999,stroke:#000,stroke-width:2px style DisplayDialog fill:#99ccff,stroke:#000,stroke-width:2px style RaiseError fill:#ff6666,stroke:#000,stroke-width:3px style End fill:#ff6666,stroke:#000,stroke-width:3px- Flow Chart Description:
This flowchart illustrates the error function:
Checks if shArgs exist, and if so, parses the error message from it.
If shArgs do not exist, initializes the error message parameter.
Displays the error message in a dialog window.
Raises a RuntimeError with the error message after the dialog window is closed.
Ends the process.
- EasyBird.exportCtrlShapes(self, filePath=None, fileName=None, ctrlList=None, sufxList='_Ctrl', exFolder='asEB_Lib')#
[shArgs : fp=filePath, fn=fileName, cl=ctrlList, sl=sufxList, ef=exFolder]
Purpose:
:: Exports the vertex information for given controls or controls with given suffixes to a specified file path.
- Parameters:
filePath – (<str, optional>) # The path where the file will be saved. If not provided, the current scene directory is used.
fileName – (<str, optional>) # The name of the file. Defaults to ‘ctrlShapes.py’.
ctrlList – (<list, optional>) # A list of control objects to export. If not provided, controls with specified suffixes are selected.
sufxList – (<str/list, optional>) # A single suffix or a list of suffixes to identify controls. Defaults to ‘_Ctrl’.
exFolder – (<str, optional>) # The name of the folder within the file path to save the file in. Defaults to ‘asEB_Lib’.
- Returns:
<str> # The full path to the exported file.
Code Examples:
>>> exporter = ExportControlShapes()
>>> exporter.exportCtrlShapes()
- Purpose:
Exports the vertex information for given ctrls or ctrls with given ctrlSufx to a given file path
- Returns:
filePath + fileName + ‘_CtrlShapes.mel’
- Usage:
- if not ctrlList:
- try:
mc.select (‘*’ + ctrlSufx, r=1) ctrlList =asN._selected()
- except:
eRig.error(‘No Ctrls are selected with this suffix %s’ %ctrlSufx)
graph TD Start[("fa:fa-play Start")] --> CheckShArgs{"/fas:fa-question-circle Check shArgs"} CheckShArgs --"If shArgs Exist"--> ParseShArgs["/fas:fa-cogs Parse shArgs"] CheckShArgs --"If shArgs Does Not Exist"--> InitializeParameters["/fas:fa-wrench Initialize Parameters"] InitializeParameters --> ConfirmAction{"/fas:fa-check-square Confirm Action"} ConfirmAction --"If User Continues"--> GetSelectedObjects{"/fas:fa-mouse-pointer Get Selected Objects"} ConfirmAction --"If User Cancels"--> DisplayWarning["/fas:fa-exclamation-triangle Display Warning"] GetSelectedObjects --"If Ctrl List Provided"--> LoopThroughControls["/fas:fa-hourglass-start Loop Through Controls"] GetSelectedObjects --"If Ctrl List Not Provided"--> SelectControlsBySuffix["/fas:fa-hourglass-start Select Controls By Suffix"] LoopThroughControls --> ExportControlShapes["/fas:fa-download Export Control Shapes"] SelectControlsBySuffix --> ExportControlShapes ExportControlShapes --> ConfirmOverwrite["/fas:fa-question-circle Confirm Overwrite"] ConfirmOverwrite --"If User Confirms"--> WriteToFile["/fas:fa-file-export Write To File"] ConfirmOverwrite --"If User Cancels"--> End["/fas:fa-stop End"] WriteToFile --> OpenFile["/fas:fa-folder-open Open File Location"] OpenFile --> End style Start fill:#00cc00,stroke:#000,stroke-width:3px- Flow Chart Description:
This flowchart illustrates the exportCtrlShapes function:
Checks if shArgs exist, and if so, parses the parameters from it.
If shArgs do not exist, initializes parameters with default values.
Asks the user to confirm the action.
- If the user continues:
Retrieves selected objects.
If a control list is provided, iterates through each control.
If a control list is not provided, selects controls based on specified suffixes.
Exports the vertex information for the controls to a specified file path.
Asks the user to confirm overwriting an existing file.
If the user confirms overwriting, writes the information to the file.
If the user cancels overwriting, ends the process.
Opens the file location.
- EasyBird.exportSkinWeights(self, vtxList=None, filePath=None, fileName=None, exFolder='asEB_Lib')#
[shArgs : vl=vtxList, fp=filePath, fn=fileName, ef=exFolder]
Purpose:
:: Exports skin weights for specified vertex list to a given file path.
- Parameters:
vtxList – (<list, optional>) # A list of vertices to export skin weights from. If not provided, selected vertices or all vertices of the skin mesh are used.
filePath – (<str, optional>) # The path where the file will be saved. If not provided, the current scene directory is used.
fileName – (<str, optional>) # The name of the file. If not provided, a default name based on the first vertex in the list is used.
exFolder – (<str, optional>) # The name of the folder within the file path to save the file in. Defaults to ‘asEB_Lib’.
- Returns:
<str> # The full path to the exported file.
Code Examples:
>>> EasyBird.exportSkinWeights()
graph TD Start[("fa:fa-play Start")] --> CheckShArgs{"/fas:fa-question-circle Check shArgs"} CheckShArgs --"If shArgs Exist"--> ParseShArgs["/fas:fa-cogs Parse shArgs"] CheckShArgs --"If shArgs Does Not Exist"--> InitializeParameters["/fas:fa-wrench Initialize Parameters"] InitializeParameters --> GetVertices{"/fas:fa-mouse-pointer Get Vertices"} GetVertices --> ConfirmSkinMesh{"/fas:fa-check Confirm Skin Mesh"} ConfirmSkinMesh --> SetFilePath{"/fas:fa-folder Set File Path"} SetFilePath --> SetFileName{"/fas:fa-file Set File Name"} SetFileName --> ExportSkinWeights["/fas:fa-download Export Skin Weights"] ParseShArgs --> ExportSkinWeights ExportSkinWeights --> End["/fas:fa-stop End"] End --> DisplaySuccessMessage["/fas:fa-check-circle Display Success Message"] style Start fill:#00cc00,stroke:#000,stroke-width:3px style CheckShArgs fill:#ffcc00,stroke:#000,stroke-width:2px style ParseShArgs fill:#ffcc00,stroke:#000,stroke-width:2px style InitializeParameters fill:#ffcc00,stroke:#000,stroke-width:2px style GetVertices fill:#ffcc00,stroke:#000,stroke-width:2px style ConfirmSkinMesh fill:#ffcc00,stroke:#000,stroke-width:2px style SetFilePath fill:#ffcc00,stroke:#000,stroke-width:2px style SetFileName fill:#ffcc00,stroke:#000,stroke-width:2px style ExportSkinWeights fill:#ffcc00,stroke:#000,stroke-width:2px style End fill:#ff6666,stroke:#000,stroke-width:3px style DisplaySuccessMessage fill:#00cc00,stroke:#000,stroke-width:3px- Flow Chart Description:
This flowchart illustrates the exportSkinWeights function:
Checks if shArgs exist, and if so, parses the parameters from it.
If shArgs do not exist, initializes parameters with default values.
Retrieves the list of vertices to export skin weights from.
Confirms the skin mesh and its corresponding skin cluster.
Sets the file path based on the provided or default scene directory.
Sets the file name based on the first vertex in the list if not provided.
Exports skin weights for the specified vertices to the specified file path.
Displays a success message.
- EasyBird.generateSmoothGeo(self)#
[shArgs : g=geo]
Purpose:
:: Automates the smoothing of geometry skin weights in Autodesk Maya using the ArtPaintSkinWeightsTool.
This function streamlines the process of smoothing skin weights across selected geometries.
It allows for more efficient and uniform weight distribution, improving the deformation of rigged models.
- Parameters:
geo – <PyNode> # The geometry whose skin weights are to be smoothed.
- Returns:
None # This function smooths the skin weights of the specified geometry but does not return a value.
Code Examples:
>>> generateSmoothGeo()
# Automatically smooths skin weights for the selected geometry in Maya, optimizing deformation.
graph TB Start[("fa:fa-play Start")] --> CheckSelection{"/fas:fa-check-circle Check Selection"} CheckSelection --> GetSelectedGeometries[("fa:fa-object-group Get Selected Geometries")] GetSelectedGeometries --> CheckGeometry{"/fas:fa-question-circle Check Geometry"} CheckGeometry --"If Geometry Exists"--> RetrieveSkinCluster[("fas:fa-sitemap Retrieve Skin Cluster")] CheckGeometry --"If Geometry Does Not Exist"--> ErrorNoGeometry[("fas:fa-exclamation-triangle Error No Geometry")] RetrieveSkinCluster --> OpenArtPaintSkinWeightsTool[("fas:fa-paint-brush Open ArtPaintSkinWeightsTool")] OpenArtPaintSkinWeightsTool --> SetPaintToolOptions[("fas:fa-cogs Set Paint Tool Options")] SetPaintToolOptions --> IterateInfluences[("fas:fa-repeat Iterate Influences")] IterateInfluences --> SelectInfluence[("fas:fa-mouse-pointer Select Influence")] SelectInfluence --> ClearPaintContext[("fas:fa-eraser Clear Paint Context")] ClearPaintContext --> CheckMoreInfluences{"/fas:fa-question-circle Check More Influences"} CheckMoreInfluences --"If More Influences Exist"--> IterateInfluences CheckMoreInfluences --"If No More Influences"--> End[("fas:fa-stop End")] style Start fill:#00cc00,stroke:#000,stroke-width:3px style CheckSelection fill:#ffcc00,stroke:#000,stroke-width:2px style GetSelectedGeometries fill:#99ccff,stroke:#000,stroke-width:2px style CheckGeometry fill:#99ff99,stroke:#000,stroke-width:2px style ErrorNoGeometry fill:#ff6666,stroke:#000,stroke-width:3px style RetrieveSkinCluster fill:#ffcc99,stroke:#000,stroke-width:2px style OpenArtPaintSkinWeightsTool fill:#ccffcc,stroke:#000,stroke-width:2px style SetPaintToolOptions fill:#ff9999,stroke:#000,stroke-width:2px style IterateInfluences fill:#cc99ff,stroke:#000,stroke-width:2px style SelectInfluence fill:#ffcc99,stroke:#000,stroke-width:2px style ClearPaintContext fill:#ccffcc,stroke:#000,stroke-width:2px style CheckMoreInfluences fill:#99ff99,stroke:#000,stroke-width:2px style End fill:#ff6666,stroke:#000,stroke-width:3px- Flow Chart Description:
This flowchart illustrates the generateSmoothGeo function:
The process starts by checking if the Geometry is provided or selected.
If Geometry doesn’t exist, it throws an error.
If Geometry exists, it retrieves the associated skin cluster.
Opens the ArtPaintSkinWeightsTool for skin weight smoothing.
Sets the options for the paint tool to smoothing mode.
Iterates through each influence (joint) in the skin cluster.
Selects each influence for smoothing.
Clears the paint context after smoothing each influence.
Checks if more influences exist, if so, continues the iteration.
The process ends after smoothing all influences.
- EasyBird.generateWireCtrls(self)#
[shArgs : fg=feathersGrp, wc=wireCurv]
Purpose:
:: Generates wire controllers for a specified wire curve in Autodesk Maya, typically used for controlling elements like feathers or hair.
This function is ideal for rigging complex geometries where individual control over elements is required.
It allows for dynamic and flexible control over wire curves by generating controllers and associated joints.
- Parameters:
feathersGrp – <PyNode> # The group node containing the feather meshes to be controlled.
wireCurv – <PyNode> # The wire curve to which the controllers will be attached.
- Returns:
None # This function creates wire controllers and does not return a value.
Code Examples:
>>> generateWireCtrls()
# Generates controllers for the selected wire curve, providing individual control over elements like feathers.
graph TB Start[("fa:fa-play Start")] --> CheckSelection{"/fas:fa-check-circle Check Selection"} CheckSelection --> GetFeathersGrp[("fa:fa-object-group Get FeathersGrp")] CheckSelection --> GetWireCurv[("fa:fa-object-group Get WireCurv")] GetFeathersGrp --> CheckFeathersGrp{"/fas:fa-question-circle Check FeathersGrp"} CheckFeathersGrp --"If FeathersGrp Exists"--> CheckWireCurv{"/fas:fa-question-circle Check WireCurv"} CheckFeathersGrp --"If FeathersGrp Not Exists"--> ErrorNoFeathersGrp[("fas:fa-exclamation-triangle Error No FeathersGrp")] GetWireCurv --> CheckWireCurv CheckWireCurv --"If WireCurv Exists"--> CreateWireNode[("/fas:fa-plus-square Create Wire Node")] CheckWireCurv --"If WireCurv Not Exists"--> ErrorNoWireCurv[("fas:fa-exclamation-triangle Error No WireCurv")] CreateWireNode --> GetCVList[("fas:fa-list Get CV List from WireCurv")] GetCVList --> SetupFeatherControlDict[("fas:fa-brain Setup Feather Control Dict")] SetupFeatherControlDict --> InitializeWindSwitch[("fas:fa-wind Initialize Wind Switch")] InitializeWindSwitch --> CreateWireJointsAndCtrls[("fas:fa-sitemap Create Wire Joints and Ctrls")] CreateWireJointsAndCtrls --> BindSkinToWireCurv[("fas:fa-anchor Bind Skin to WireCurv")] BindSkinToWireCurv --> HideWireCurv[("fas:fa-eye-slash Hide WireCurv")] HideWireCurv --> End[("fas:fa-stop End")] style Start fill:#00cc00,stroke:#000,stroke-width:3px style CheckSelection fill:#ffcc00,stroke:#000,stroke-width:2px style GetFeathersGrp fill:#99ccff,stroke:#000,stroke-width:2px style GetWireCurv fill:#cc99ff,stroke:#000,stroke-width:2px style CheckFeathersGrp fill:#99ff99,stroke:#000,stroke-width:2px style ErrorNoFeathersGrp fill:#ff6666,stroke:#000,stroke-width:3px style CheckWireCurv fill:#ffcc99,stroke:#000,stroke-width:2px style ErrorNoWireCurv fill:#ff6666,stroke:#000,stroke-width:3px style CreateWireNode fill:#ccffcc,stroke:#000,stroke-width:2px style GetCVList fill:#ff9999,stroke:#000,stroke-width:2px style SetupFeatherControlDict fill:#cc99ff,stroke:#000,stroke-width:2px style InitializeWindSwitch fill:#99ccff,stroke:#000,stroke-width:2px style CreateWireJointsAndCtrls fill:#99ff99,stroke:#000,stroke-width:2px style BindSkinToWireCurv fill:#ffcc99,stroke:#000,stroke-width:2px style HideWireCurv fill:#ccffcc,stroke:#000,stroke-width:2px style End fill:#ff6666,stroke:#000,stroke-width:3px- Flow Chart Description:
This flowchart illustrates the generateWireCtrls function:
The process starts by checking if the FeatherGrp and WireCurv are provided.
If FeatherGrp doesn’t exist, it throws an error. If WireCurv doesn’t exist, it also throws an error.
If both exist, it creates a wire deformer node using the WireCurv on the FeatherGrp.
It retrieves the CV list from the WireCurv.
Sets up a dictionary to map CVs to their respective feather controls.
Initializes a wind switch attribute for feather dynamics.
Creates joints and controls for each CV on the wire curve.
Binds the skin of the wire curve and the wire base curve to the created joints.
Hides the original wire curve.
The process ends after setting up the wire controls.
- EasyBird.generateWireCurv(self)#
[shArgs : ig=innerGrp, fc=feathersGrp, gl=globalCtrl, cc=clustCtrlGrp, cm=clustMainGrp]
Purpose:
:: Generates a wire curve based on the positions of feather controls and their nearest feather geometries.
This function is essential for creating dynamic wire curves that conform to the shape and position of feather controls.
It automates the process of wire curve generation, making it more efficient and accurate for rigging purposes.
- Parameters:
innerGrp – <str> # Inner group of feather controls.
feathersGrp – <str> # Group containing the feather geometries.
globalCtrl – <str> # Name of the global control node.
clustCtrlGrp – <str> # Name of the cluster control group.
clustMainGrp – <str> # Name of the main cluster group.
- Returns:
<str> # The name of the generated wire curve.
Code Examples:
>>> generateWireCurv()
# Generates a wire curve based on the provided feather controls and geometries.
- Flow Chart Description:
This flowchart illustrates the generateWireCurv function:
The process starts by checking for the existence of the specified feather group in the scene.
It then selects the appropriate feather controls based on the side of the feathers (left or right).
The function generates the wire curve based on the positions of the selected feather controls and their nearest feather geometries.
The process completes with the creation of the wire curve, which is returned as the output.
- EasyBird.getAimTo(self)#
[shArgs : selList=selList, ctrl=ctrlName, rotateDir=’rz’]
Purpose:
:: Determines the aiming direction of a control based on its name and the type of geometry being aimed at.
- Parameters:
selList – (<list>) # The selection list containing the objects to aim at.
ctrlName – (<str, optional>) # The name of the control to aim. If not provided, it is derived from the selection list.
rotateDir – (<str>) # The rotation direction to adjust. Default is ‘rz’.
- Returns:
None
Code Examples:
>>> selList = nselected()
>>> getAimTo(selList, ctrlName='R_Shoulder_Feather_Ctrl', rotateDir='rz')
graph TD Start[("fa:fa-play Start")] --> CheckShArgs{"/fas:fa-question-circle Check shArgs"} CheckShArgs --"If shArgs Exist"--> ParseShArgs["/fas:fa-cogs Parse shArgs"] CheckShArgs --"If shArgs Does Not Exist"--> InitializeParameters["/fas:fa-wrench Initialize Parameters"] ParseShArgs --> GetSelection{"/fas:fa-mouse-pointer Get Selection"} GetSelection --> DetermineObjects{"/fas:fa-project-diagram Determine Objects"} DetermineObjects --> AdjustRotation{"/fas:fa-retweet Adjust Rotation"} AdjustRotation --> AdjustPosition{"/fas:fa-arrows-alt-h Adjust Position"} AdjustPosition --> End["/fas:fa-stop End"] style Start fill:#00cc00,stroke:#000,stroke-width:3px style CheckShArgs fill:#ffcc00,stroke:#000,stroke-width:2px style ParseShArgs fill:#ff9999,stroke:#000,stroke-width:2px style InitializeParameters fill:#ff9999,stroke:#000,stroke-width:2px style GetSelection fill:#99ccff,stroke:#000,stroke-width:2px style DetermineObjects fill:#99ccff,stroke:#000,stroke-width:2px style AdjustRotation fill:#99ccff,stroke:#000,stroke-width:2px style AdjustPosition fill:#99ccff,stroke:#000,stroke-width:2px style End fill:#ff6666,stroke:#000,stroke-width:3px- Flow Chart Description:
This flowchart illustrates the getAimTo function:
Checks if shArgs exist, and if so, parses the parameters from it.
If shArgs do not exist, initializes the function parameters.
Retrieves the selection list to determine the objects to aim at and the control to aim.
Determines the objects to aim at based on the selection.
Adjusts the rotation of the control based on the type of object being aimed at.
Adjusts the position of the control accordingly.
Ends the process.
- EasyBird.getAimTo_old(self)#
- EasyBird.getFeatherJnt(self, ctrlName, featherGeo)#
[shArgs : c=ctrlName, fg=featherGeo]
Purpose:
:: Creates joints for feathers based on a control’s position and the geometry of the feathers.
- Parameters:
ctrlName – (<str>) # The name of the control to base the joint positions on.
featherGeo – (<str>) # The name of the geometry representing the feathers.
- Returns:
None
Code Examples:
>>> ctrlName = asNode('R_Shoulder_Feather_Ctrl')
>>> featherGeo = asNode('middle_r_027')
>>> getFeatherJnt(ctrlName, featherGeo)
graph TD Start[("fa:fa-play Start")] --> CheckShArgs{"/fas:fa-question-circle Check shArgs"} CheckShArgs --"If shArgs Exist"--> ParseShArgs["/fas:fa-cogs Parse shArgs"] CheckShArgs --"If shArgs Does Not Exist"--> InitializeParameters["/fas:fa-wrench Initialize Parameters"] ParseShArgs --> SelectControl{"/fas:fa-mouse-pointer Select Control"} SelectControl --> SelectFeatherGeo{"/fas:fa-mouse-pointer Select Feather Geometry"} SelectFeatherGeo --> CreateFeatherJoints["/fas:fa-project-diagram Create Feather Joints"] CreateFeatherJoints --> End["/fas:fa-stop End"] style Start fill:#00cc00,stroke:#000,stroke-width:3px style CheckShArgs fill:#ffcc00,stroke:#000,stroke-width:2px style ParseShArgs fill:#ff9999,stroke:#000,stroke-width:2px style InitializeParameters fill:#ff9999,stroke:#000,stroke-width:2px style SelectControl fill:#99ccff,stroke:#000,stroke-width:2px style SelectFeatherGeo fill:#99ccff,stroke:#000,stroke-width:2px style CreateFeatherJoints fill:#99ccff,stroke:#000,stroke-width:2px style End fill:#ff6666,stroke:#000,stroke-width:3px- Flow Chart Description:
This flowchart illustrates the getFeatherJnt function:
Checks if shArgs exist, and if so, parses the parameters from it.
If shArgs do not exist, initializes the function parameters.
Selects the control based on the provided name.
Selects the feather geometry based on the provided name.
Creates joints for the feathers based on the control’s position and the geometry of the feathers.
Ends the process.
- EasyBird.getNextEdge(self, currentEdge=None, featherGrp=None)#
[shArgs : ce=currentEdge, fg=featherGrp]
Purpose:
:: Finds the next edge in a loop from the current edge and selects it along with the corresponding feather group.
- Parameters:
currentEdge – (<str, optional>) # The current edge to start the search from. Default is None.
featherGrp – (<str, optional>) # The feather group associated with the current edge. Default is None.
- Returns:
None
Code Examples:
>>> getNextEdge('wing_vs001.e[555]', 'grp_middle_l_root_013')
# Selects the next edge in the loop from the provided current edge and the corresponding feather group.

>>> getNextEdge()
# Uses the currently selected edge and feather group to find the next edge.
- Usage Examples:
EasyBird.getNextEdge(‘wing_vs001.e[555]’, ‘grp_middle_l_root_013’)
- Args:
currentEdge =’wing_vs001Shape.e[555]’ | ‘wing_vs001.e[555]’ featherGrp =’grp_middle_l_root_013’
- For Testing:
currentEdge =filterExpand(sm=32)[0] featherGrp =mc.ls(sl=1)[1]
graph TD Start[("fa:fa-play Start")] --> CheckShArgs{"/fas:fa-question-circle Check shArgs"} CheckShArgs --"If shArgs Exist"--> ParseShArgs["/fas:fa-cogs Parse shArgs"] CheckShArgs --"If shArgs Does Not Exist"--> InitializeParameters["/fas:fa-wrench Initialize Parameters"] ParseShArgs --> GetSelectedEdge{"/fas:fa-mouse-pointer Get Selected Edge"} GetSelectedEdge --> FindEdgeLoop["/fas:fa-search Find Edge Loop"] FindEdgeLoop --> FindNextEdge["/fas:fa-arrow-right Find Next Edge"] FindNextEdge --> FindNextSibGrp["/fas:fa-arrow-right Find Next Sibling Group"] FindNextSibGrp --> SelectNextEdgeAndSibGrp["/fas:fa-mouse-pointer Select Next Edge and Sibling Group"] SelectNextEdgeAndSibGrp --> End["/fas:fa-stop End"] style Start fill:#00cc00,stroke:#000,stroke-width:3px style CheckShArgs fill:#ffcc00,stroke:#000,stroke-width:2px style ParseShArgs fill:#ff9999,stroke:#000,stroke-width:2px style InitializeParameters fill:#ff9999,stroke:#000,stroke-width:2px style GetSelectedEdge fill:#99ccff,stroke:#000,stroke-width:2px style FindEdgeLoop fill:#99ccff,stroke:#000,stroke-width:2px style FindNextEdge fill:#99ccff,stroke:#000,stroke-width:2px style FindNextSibGrp fill:#99ccff,stroke:#000,stroke-width:2px style SelectNextEdgeAndSibGrp fill:#99ccff,stroke:#000,stroke-width:2px style End fill:#ff6666,stroke:#000,stroke-width:3px- Flow Chart Description:
This flowchart illustrates the getNextEdge function:
Checks if shArgs exist, and if so, parses the parameters from it.
If shArgs do not exist, initializes the function parameters.
Retrieves the currently selected edge and finds the edge loop.
Finds the next edge in the loop.
Finds the next sibling group associated with the next edge.
Selects the next edge and the corresponding sibling group.
Ends the process.
- EasyBird.getPosLocators(self, makeChild=1, snapRot=0, hideLoc=1, oppAxis=None)#
[shArgs : mc=makeChild, sr=snapRot, hl=hideLoc, oa=oppAxis]
Purpose:
:: Retrieves the position locators of selected objects.
- Parameters:
makeChild – (<bool, optional>) # Indicates whether to make the locator a child of the selected object. Default is True.
snapRot – (<bool, optional>) # Indicates whether to snap the locator’s rotation to the selected object. Default is False.
hideLoc – (<bool, optional>) # Indicates whether to hide the locator. Default is True.
oppAxis – (<str, optional>) # Indicates the axis to mirror the locators along. Default is None.
- Returns:
<list> # A list of position locators.
Code Examples:
>>> locator_list = getPosLocators(makeChild=True, snapRot=False, hideLoc=True, oppAxis='X')
>>> print(locator_list)
graph TD Start[("fa:fa-play Start")] --> CheckShArgs{"/fas:fa-question-circle Check shArgs"} CheckShArgs --"If shArgs Exist"--> ParseShArgs["/fas:fa-cogs Parse shArgs"] CheckShArgs --"If shArgs Does Not Exist"--> InitializeParameters["/fas:fa-wrench Initialize Parameters"] ParseShArgs --> GetSelectedObjects{"/fas:fa-mouse-pointer Get Selected Objects"} GetSelectedObjects --> CreatePositionLocators["/fas:fa-map-marker Create Position Locators"] CreatePositionLocators --> MirrorLocators["/fas:fa-arrows-alt-h Mirror Locators"] MirrorLocators --> SelectLocators{"/fas:fa-mouse-pointer Select Locators"} SelectLocators --> End["/fas:fa-stop End"] style Start fill:#00cc00,stroke:#000,stroke-width:3px style CheckShArgs fill:#ffcc00,stroke:#000,stroke-width:2px style ParseShArgs fill:#ff9999,stroke:#000,stroke-width:2px style InitializeParameters fill:#ff9999,stroke:#000,stroke-width:2px style GetSelectedObjects fill:#99ccff,stroke:#000,stroke-width:2px style CreatePositionLocators fill:#99ccff,stroke:#000,stroke-width:2px style MirrorLocators fill:#99ccff,stroke:#000,stroke-width:2px style SelectLocators fill:#99ccff,stroke:#000,stroke-width:2px style End fill:#ff6666,stroke:#000,stroke-width:3px- Flow Chart Description:
This flowchart illustrates the getPosLocators function:
Checks if shArgs exist, and if so, parses the parameters from it.
If shArgs do not exist, initializes the function parameters.
Retrieves the selected objects.
Creates position locators for each selected object.
Optionally mirrors the locators along the specified axis.
Selects the created locators.
Ends the process.
- EasyBird.importCtrlShapes(self, filePath=None, fileName=None)#
[shArgs : fp=filePath, fn=fileName]
Purpose:
:: Imports control shapes from a specified file.
- Parameters:
filePath – (<str, optional>) # The path of the file containing control shapes. If not provided, the default library path is used.
fileName – (<str, optional>) # The name of the file containing control shapes. Defaults to ‘ctrlShapes.py’.
- Returns:
None
Code Examples:
>>> importCtrlShapes()
graph TD Start[("fa:fa-play Start")] --> CheckShArgs{"/fas:fa-question-circle Check shArgs"} CheckShArgs --"If shArgs Exist"--> ParseShArgs["/fas:fa-cogs Parse shArgs"] CheckShArgs --"If shArgs Does Not Exist"--> InitializeParameters["/fas:fa-wrench Initialize Parameters"] InitializeParameters --> GetLibraryPath{"/fas:fa-folder Get Library Path"} GetLibraryPath --> ImportFile["/fas:fa-download Import File"] ImportFile --> End["/fas:fa-stop End"] ParseShArgs --> ImportFile End --> DisplaySuccessMessage["/fas:fa-check-circle Display Success Message"] style Start fill:#00cc00,stroke:#000,stroke-width:3px- Flow Chart Description:
This flowchart illustrates the importCtrlShapes function:
Checks if shArgs exist, and if so, parses the parameters from it.
If shArgs do not exist, initializes parameters with default values.
Retrieves the library path if not provided.
Imports the control shapes file from the specified or default library path.
Displays a success message.
- EasyBird.importSkinWeights(self, filePath=None, fileName=None)#
[shArgs : fp=filePath, fn=fileName]
Purpose:
:: Imports skin weights from a specified file and applies them to the selected skinned mesh.
- Parameters:
filePath – (<str, optional>) # The path of the file containing skin weights. If not provided, the default library path is used.
fileName – (<str, optional>) # The name of the file containing skin weights. If not provided, a default name based on the selected skinned mesh is used.
- Returns:
None
Code Examples:
>>> EasyBird.importSkinWeights()
graph TD Start[("fa:fa-play Start")] --> CheckShArgs{"/fas:fa-question-circle Check shArgs"} CheckShArgs --"If shArgs Exist"--> ParseShArgs["/fas:fa-cogs Parse shArgs"] CheckShArgs --"If shArgs Does Not Exist"--> GetSelectedMesh["/fas:fa-mouse-pointer Get Selected Mesh"] GetSelectedMesh --> SetFilePath{"/fas:fa-folder Set File Path"} SetFilePath --> SetFileName{"/fas:fa-file Set File Name"} SetFileName --> ImportSkinWeights["/fas:fa-upload Import Skin Weights"] ParseShArgs --> ImportSkinWeights ImportSkinWeights --> End["/fas:fa-stop End"] End --> DisplaySuccessMessage["/fas:fa-check-circle Display Success Message"] style Start fill:#00cc00,stroke:#000,stroke-width:3px style CheckShArgs fill:#ffcc00,stroke:#000,stroke-width:2px style ParseShArgs fill:#ffcc00,stroke:#000,stroke-width:2px style GetSelectedMesh fill:#ffcc00,stroke:#000,stroke-width:2px style SetFilePath fill:#ffcc00,stroke:#000,stroke-width:2px style SetFileName fill:#ffcc00,stroke:#000,stroke-width:2px style ImportSkinWeights fill:#ffcc00,stroke:#000,stroke-width:2px style End fill:#ff6666,stroke:#000,stroke-width:3px style DisplaySuccessMessage fill:#00cc00,stroke:#000,stroke-width:3px- Flow Chart Description:
This flowchart illustrates the importSkinWeights function:
Checks if shArgs exist, and if so, parses the parameters from it.
If shArgs do not exist, gets the selected skinned mesh.
Sets the file path based on the provided or default scene directory.
Sets the file name based on the selected skinned mesh if not provided.
Imports skin weights from the specified file and applies them to the selected skinned mesh.
Displays a success message.
- EasyBird.message(self, messageTxt)#
[**shArgs : mt=messageTxt]
Purpose:
:: Sends a given message through confirmDialog window.
Provide Argument | Description:
- Parameters:
messageTxt – (<str>) # The message to be displayed in the dialog window.
- Returns:
(<NoneType>) # No return value.
Code Examples:
>>> message("This is a sample message!")
- EasyBird.mirrorCtrlShapes(self)#
[**shArgs : cl=ctrlList, ss=srcStr, rs=repStr, rc=repCount, l=letters]
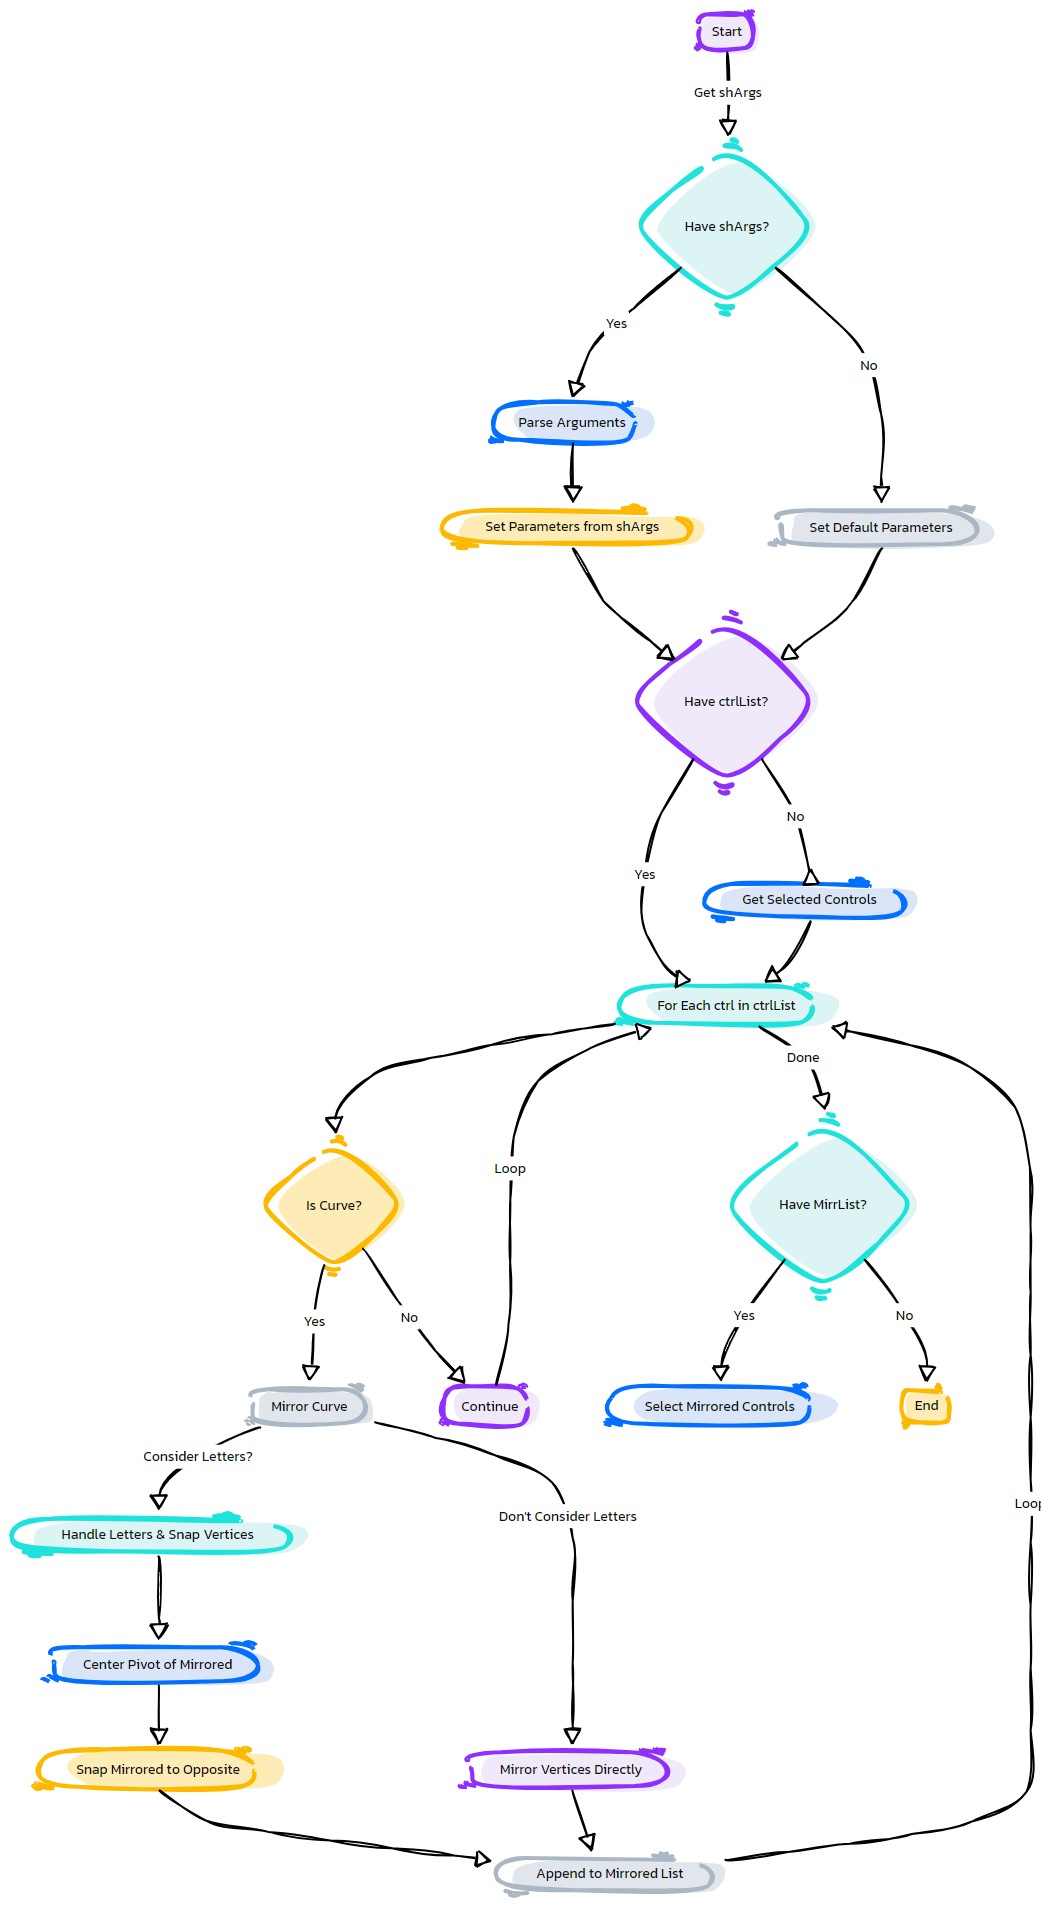
Purpose:
:: Mirrors control shapes in Autodesk Maya from one side to another, with options for control list, source string, replacement string, replacement count, and letter consideration.
- Parameters:
ctrlList – (<type list, optional>) # List of control shapes to mirror. If not provided, function relies on the selection list.
srcStr – (<type str, optional>) # Source string for identifying the side to mirror from.
repStr – (<type str, optional>) # Replacement string for the mirrored side.
repCount – (<type int, optional>) # Number of times to replace the string. Default is 1.
letters – (<type bool, optional>) # Whether to consider letters in the mirroring process. Default is False.
- Returns:
(<type None>) # None. The control shapes are mirrored in the Maya scene.
Code Examples:
>>> ctrl_list = ['LeftArm_Ctrl', 'RightArm_Ctrl']  # Specify a list of control names
>>> source_string = 'L_'  # Specify the source string
>>> replacement_string = 'R_'  # Specify the replacement string
>>> replacement_count = 2  # Specify the replacement count
>>> consider_letters = True  # Specify whether to consider letters in mirroring process
>>> mirrored_controls = mirrorCtrlShapes(ctrl_list, source_string, replacement_string, replacement_count, consider_letters)
graph TB Start[("fa:fa-play Start")] --> CheckShArgs{"/fas:fa-question-circle Check shArgs"} CheckShArgs --"If shArgs Exist"--> ParseShArgs["/fas:fa-cogs Parse shArgs"] CheckShArgs --"If shArgs Does Not Exist"--> InitializeParameters["/fas:fa-wrench Initialize Parameters"] InitializeParameters --> GetSelectedObjects{"/fas:fa-check-square Get Selected Objects"} GetSelectedObjects --"For Each Selected Object"--> CheckCtrlList{"/fas:fa-question-circle Check Control List"} CheckCtrlList --"If Control List Exists"--> IterateCtrlList["/fas:fa-clipboard Iterate Control List"] CheckCtrlList --"If Control List Does Not Exist"--> SelectControls["/fas:fa-mouse-pointer Select Controls"] IterateCtrlList --> CheckControlType{"/fas:fa-question-circle Check Control Type"} CheckControlType --"If Control is Not a Curve"--> ContinueIteration["/fas:fa-arrow-right Continue Iteration"] CheckControlType --"If Control is a Curve"--> MirrorControl["/fas:fa-clone Mirror Control"] ContinueIteration --> IterateCtrlList MirrorControl --"If Letters are Considered"--> SnapVertices["/fas:fa-magnet Snap Vertices"] MirrorControl --"If Letters are Not Considered"--> MirrorVertices["/fas:fa-arrows Mirror Vertices"] SnapVertices --> CenterPivot["/fas:fa-crosshairs Center Pivot"] CenterPivot --> SnapShapeToOpposite["/fas:fa-hand-rock Snap Shape to Opposite"] SnapShapeToOpposite --> AppendToMirrList["/fas:fa-plus Append to Mirrored List"] MirrorVertices --> SelectVertices["/fas:fa-mouse-pointer Select Vertices"] SelectVertices --> CalculateOppositePosition["/fas:fa-calculator Calculate Opposite Position"] CalculateOppositePosition --> SetOppositePosition["/fas:fa-crosshairs Set Opposite Position"] SetOppositePosition --> AppendToMirrList AppendToMirrList --"For Each Control"--> IterateCtrlList IterateCtrlList --"If Control List is Not Empty"--> SelectMirroredControls["/fas:fa-mouse-pointer Select Mirrored Controls"] IterateCtrlList --"If Control List is Empty"--> End["/fas:fa-stop End"] style Start fill:#00cc00,stroke:#000,stroke-width:3px style CheckShArgs fill:#ffcc00,stroke:#000,stroke-width:2px style ParseShArgs fill:#ff9999,stroke:#000,stroke-width:2px style InitializeParameters fill:#99ccff,stroke:#000,stroke-width:2px style GetSelectedObjects fill:#cc99ff,stroke:#000,stroke-width:2px style CheckCtrlList fill:#99ff99,stroke:#000,stroke-width:2px style IterateCtrlList fill:#ffcc99,stroke:#000,stroke-width:2px style CheckControlType fill:#ccffcc,stroke:#000,stroke-width:2px style ContinueIteration fill:#99ccff,stroke:#000,stroke-width:2px style MirrorControl fill:#cc99ff,stroke:#000,stroke-width:2px style SnapVertices fill:#ffcc99,stroke:#000,stroke-width:2px style CenterPivot fill:#ccffcc,stroke:#000,stroke-width:2px style SnapShapeToOpposite fill:#99ff99,stroke:#000,stroke-width:2px style AppendToMirrList fill:#ffcc99,stroke:#000,stroke-width:2px style SelectVertices fill:#ccffcc,stroke:#000,stroke-width:2px style CalculateOppositePosition fill:#99ccff,stroke:#000,stroke-width:2px style SetOppositePosition fill:#cc99ff,stroke:#000,stroke-width:2px style SelectMirroredControls fill:#ffcc99,stroke:#000,stroke-width:2px style End fill:#ff6666,stroke:#000,stroke-width:3px- Flow Chart Description:
This flowchart illustrates the mirrorCtrlShapes function:
Checks if shArgs exist, and if so, parses the ctrlList, srcStr, repStr, repCount, and letters from it.
If shArgs do not exist, initializes parameters with default values.
Retrieves a list of selected controls (control curves).
- For each selected control:
Checks if it’s a curve shape (control shape).
If it’s not a curve shape, continues to the next control.
If it’s a curve shape, proceeds to mirror it.
- If letters are considered in the mirroring process:
Snaps vertices to their opposite positions.
Centers the pivot of the mirrored control.
Snaps the shape to the opposite location.
- If letters are not considered:
Mirrors vertices by changing their X-coordinates to the opposite side.
Appends the mirrored control to the list of mirrored controls.
After processing all controls, selects the mirrored controls if the list is not empty.
- EasyBird.mirrorLowResGeo(self)#
[shArgs : og=origGeoGrp]
Purpose:
:: Mirrors low-resolution geometry from one side (e.g., left) to the other (e.g., right), ensuring symmetry in rigging and animation setups.
Useful for creating mirrored geometry for characters or objects that require symmetrical design.
Automates the process of duplicating and mirroring geometry, saving significant time in rigging workflows.
- Parameters:
origGeoGrp – <str> # Name of the original geometry group (e.g., ‘L_Geo_Grp’) to be mirrored.
- Returns:
None # This function mirrors the low-resolution geometry but does not return any value.
Code Examples:
>>> mirrorLowResGeo('L_Geo_Grp')
# Mirrors the geometries in 'L_Geo_Grp' to create a corresponding 'R_Geo_Grp'.
graph TB Start[("fa:fa-play Start")] --> CheckOrigGeoGroup{"/fas:fa-search-plus Check Original Geometry Group"} CheckOrigGeoGroup --"If Original Geometry Group Exists"--> DuplicateGeoGroup[("fas:fa-clone Duplicate Geometry Group")] CheckOrigGeoGroup --"If Original Geometry Group Does Not Exist"--> ErrorNoOrigGroup[("fas:fa-exclamation-triangle Error No Original Group")] DuplicateGeoGroup --> RenameToMirror[("fas:fa-i-cursor Rename to Mirror Group")] RenameToMirror --> SearchReplaceNames[("fas:fa-sync-alt Search and Replace Names")] SearchReplaceNames --> MirrorGeometry[("fas:fa-exchange-alt Mirror Geometry")] MirrorGeometry --> UnfreezeRotation[("fas:fa-snowflake Unfreeze Rotation")] UnfreezeRotation --> End[("fas:fa-stop End")] ErrorNoOrigGroup --> End style Start fill:#00cc00,stroke:#000,stroke-width:3px style CheckOrigGeoGroup fill:#ffcc00,stroke:#000,stroke-width:2px style DuplicateGeoGroup fill:#99ccff,stroke:#000,stroke-width:2px style RenameToMirror fill:#99ff99,stroke:#000,stroke-width:2px style SearchReplaceNames fill:#ff9999,stroke:#000,stroke-width:2px style MirrorGeometry fill:#cc99ff,stroke:#000,stroke-width:2px style UnfreezeRotation fill:#ffcc99,stroke:#000,stroke-width:2px style ErrorNoOrigGroup fill:#ff6666,stroke:#000,stroke-width:3px style End fill:#ff6666,stroke:#000,stroke-width:3px- Flow Chart Description:
This flowchart illustrates the mirrorLowResGeo function:
The process starts by checking if the Original Geometry Group (e.g., ‘L_Geo_Grp’) exists.
If the Original Geometry Group does not exist, it reports an error and ends the process.
If the Original Geometry Group exists, it duplicates the group to create a mirror group.
Renames the duplicated group to reflect the mirrored side (e.g., ‘R_Geo_Grp’).
Performs a search and replace operation on the names within the mirror group to change the side prefix (e.g., ‘L_’ to ‘R_’).
Mirrors the geometry by setting the scale X attribute to -1 and applying the transformation.
Unfreezes rotation on the mirrored geometries to correct orientation issues.
The process ends after all steps are completed.
- EasyBird.mirrorSDK_WingClose(self)#
[shArgs : sObjs=selectedObjs]
Purpose:
:: Mirrors Set Driven Key (SDK) animation for wing closing actions from one side of a character to the other.
Facilitates easy and symmetrical animation of wing movements, particularly for characters with complex wing structures.
Streamlines the process of animating wing closing actions by automating the mirroring of SDKs.
- Parameters:
selectedObjs – <list> # List of objects or control groups selected for mirroring SDKs. # Objects should be named according to a convention that distinguishes left from right (e.g., ‘L_’ for left and ‘R_’ for right).
- Returns:
None # This function mirrors the SDKs for wing closing actions but does not return any value.
Code Examples:
>>> mirrorSDK_WingClose()
# Mirrors the SDKs for wing closing actions from the left to the right side of the character.
graph TB Start[("fa:fa-play Start")] --> CheckSelection{"/fas:fa-question-circle Check Selection"} CheckSelection --"If Objects Are Selected"--> SelectSDKObjects[("fas:fa-mouse-pointer Select SDK Objects")] CheckSelection --"If No Objects Are Selected"--> ErrorNoSelection[("fas:fa-exclamation-triangle Error No Selection")] SelectSDKObjects --> MirrorSDKWingClose[("fas:fa-sync-alt Mirror SDK for Wing Closing")] MirrorSDKWingClose --> End[("fas:fa-stop End")] ErrorNoSelection --> End style Start fill:#00cc00,stroke:#000,stroke-width:3px style CheckSelection fill:#ffcc00,stroke:#000,stroke-width:2px style SelectSDKObjects fill:#99ccff,stroke:#000,stroke-width:2px style MirrorSDKWingClose fill:#99ff99,stroke:#000,stroke-width:2px style ErrorNoSelection fill:#ff6666,stroke:#000,stroke-width:3px style End fill:#ff6666,stroke:#000,stroke-width:3px- Flow Chart Description:
This flowchart illustrates the mirrorSDK_WingClose function:
The process begins by checking if objects are selected for mirroring SDKs.
If no objects are selected, it reports an error and ends the process.
If objects are selected, it selects specific SDK objects related to wing closing actions (e.g., ‘L_Finger01_Ctrl_GrpTp’, ‘L_FK_Shoulder_Ctrl_GrpTp’).
Mirrors the SDKs for wing closing actions from the selected objects on one side (e.g., left) to the other side (e.g., right).
The process ends after the mirroring of SDKs is completed.
- EasyBird.mirrorWireCurv(self)#
[shArgs : lc=LCurv]
Purpose:
:: Duplicates and mirrors a wire curve to create a symmetrical pair in Autodesk Maya.
This function is useful for rigging, allowing for the creation of symmetrical wire curves, such as feathers or hair strands.
It ensures consistency and efficiency in creating mirrored elements of a rig.
- Parameters:
LCurv – <PyNode> # The left-side wire curve to be mirrored.
- Returns:
None # This function does not return a value but creates a mirrored duplicate of the given curve.
Code Examples:
>>> mirrorWireCurv()
# Mirrors the selected left-side wire curve to create its right-side counterpart.
graph TB Start[("fa:fa-play Start")] --> CheckSelection{"/fas:fa-check-circle Check Selection"} CheckSelection --> GetLCurv[("fa:fa-object-group Get LCurv")] GetLCurv --> DuplicateLCurv[("/fas:fa-clone Duplicate LCurv")] DuplicateLCurv --> MirrorRCurv[("fa:fa-exchange-alt Mirror RCurv")] MirrorRCurv --> FreezeRCurv[("/fas:fa-snowflake Freeze RCurv")] FreezeRCurv --> CenterPivots[("fas:fa-dot-circle Center Pivots")] CenterPivots --> ParentCurves[("fas:fa-sitemap Parent Curves to WireCurvGrp")] ParentCurves --> End[("fas:fa-stop End")] style Start fill:#00cc00,stroke:#000,stroke-width:3px style CheckSelection fill:#ffcc00,stroke:#000,stroke-width:2px style GetLCurv fill:#99ccff,stroke:#000,stroke-width:2px style DuplicateLCurv fill:#cc99ff,stroke:#000,stroke-width:2px style MirrorRCurv fill:#99ff99,stroke:#000,stroke-width:2px style FreezeRCurv fill:#ffcc99,stroke:#000,stroke-width:2px style CenterPivots fill:#ccffcc,stroke:#000,stroke-width:2px style ParentCurves fill:#ff9999,stroke:#000,stroke-width:2px style End fill:#ff6666,stroke:#000,stroke-width:3px- Flow Chart Description:
This flowchart illustrates the mirrorWireCurv function:
The process starts by checking if a left-side wire curve (LCurv) is selected.
The LCurv is then duplicated to create a copy.
The duplicated curve (RCurv) is mirrored along the X-axis to create a right-side counterpart.
RCurv is then frozen to apply the transformations.
The pivots of both LCurv and RCurv are centered.
Finally, both curves are parented to the WireCurvGrp in the Maya scene.
- EasyBird.newCtrl01(self, ctrlName)#
[**shArgs : cn=ctrlName]
Purpose:
:: Creates a new control with specified name, consisting of an outer and inner circle, lofted to form a 3D control object in Autodesk Maya.
This function generates a visually distinct control object, aiding animators and riggers in identifying and manipulating rig components.
It uses Maya’s circle and loft commands to create a custom control shape, which is then styled with specific visual attributes.
The function is flexible, allowing the user to specify the name of the control, thereby customizing its application within the rig.
It is particularly useful in complex rigging scenarios where customized control shapes enhance the rig’s usability and clarity.
- Parameters:
ctrlName – <str> # The name for the new control. This name will be used to create the outer and inner circles and the final lofted control object.
- Returns:
None # This function does not return a value but creates a new control object in the Maya scene.
Code Examples:
>>> newCtrl01("Arm_Ctrl")
# This will create a new control named 'Arm_Ctrl' with customized shape and appearance settings.
graph TB Start[("fa:fa-play Start")] --> DefineParams["/fas:fa-pencil-alt Define Parameters"] DefineParams --> CreateOuterInnerCircles["/fas:fa-circle Create Outer & Inner Circles"] CreateOuterInnerCircles --> LoftCircles["/fas:fa-project-diagram Loft Circles"] LoftCircles --> SetVisualAttributes["/fas:fa-eye Set Visual Attributes"] SetVisualAttributes --> CheckCreateShader["/fas:fa-paint-brush Check/Create Shader"] CheckCreateShader --> AssignShader["/fas:fa-paint-roller Assign Shader"] AssignShader --> ColorTransparencyAdjust["/fas:fa-tint Color & Transparency Adjust"] ColorTransparencyAdjust --> AdjustAttributes["/fas:fa-sliders-h Adjust Attributes"] AdjustAttributes --> ParentCircles["/fas:fa-sitemap Parent Circles"] ParentCircles --> End[("fas:fa-stop End")] style Start fill:#00cc00,stroke:#000,stroke-width:3px style DefineParams fill:#ffcc00,stroke:#000,stroke-width:2px style CreateOuterInnerCircles fill:#99ccff,stroke:#000,stroke-width:2px style LoftCircles fill:#cc99ff,stroke:#000,stroke-width:2px style SetVisualAttributes fill:#99ff99,stroke:#000,stroke-width:2px style CheckCreateShader fill:#ff9999,stroke:#000,stroke-width:2px style AssignShader fill:#ffcc99,stroke:#000,stroke-width:2px style ColorTransparencyAdjust fill:#ccffcc,stroke:#000,stroke-width:2px style AdjustAttributes fill:#ffcc99,stroke:#000,stroke-width:2px style ParentCircles fill:#99ff99,stroke:#000,stroke-width:2px style End fill:#ff6666,stroke:#000,stroke-width:3px- Flow Chart Description:
This flowchart illustrates the newCtrl01 function:
The function starts by defining the name of the control object.
It creates an outer and an inner circle at the scene origin.
These circles are lofted to form a 3D control object.
Visual attributes of the object are set, including display overrides.
The function checks for an existing shader or creates a new one if needed.
The control object is assigned to the shader with adjusted color and transparency.
Various attributes of the control object are adjusted for desired appearance.
The original circles are parented to the final control object.
The function ends after completing these steps.
- EasyBird.old_as_CreateEyeSetup(self)#
- EasyBird.old_as_CreateFeathersRig(self)#
- EasyBird.old_setScale(self, ctrlGrp, refObj, attr, ratio)#
- EasyBird.openBlog(self)#
- EasyBird.paintSkin_byWorkBox(self, featherList=None, vtxList=None, workBox='containerObj')#
[**shArgs : fl=featherList, vl=vtxList, wb=workBox]
Purpose:
:: Paints skin weights based on a given work box and lists of influences and vertices.
Provide Argument | Description:
- Parameters:
featherList – (<list, optional>) # List of influences for skinning.
vtxList – (<list, optional>) # List of vertices related to the featherList.
workBox – (<str, optional>) # Name of the container object to determine the vertices’ association.
- Returns:
(<NoneType>) # No return value.
Code Examples:
>>> paintSkin_byWorkBox(featherList=["influence1", "influence2"], vtxList=["vtx1", "vtx2"], workBox="containerObj")
Args:
featherList =influences
vtxList = vtxList related to featherList only
workBox = pCube1 [A container to find out the vtxList falls in it]
Testing:
#_ featherList =asN._selected()
#_ mc.select(featherList, r=1)
#_ vtxList =asN._selected()
#_ mc.select(vtxList, r=1)
- EasyBird.refreshView(self, num)#
[shArgs : ]
Purpose:
:: Refreshes the Maya viewport to update changes.
- Returns:
None
Code Examples:
>>> EasyBird.refreshView(1)
graph TB Start[("fa:fa-play Start")] --> CheckNumValue{"/fas:fa-check-circle Check Num Value"} CheckNumValue --"If num value is provided" --> RefreshViewMultipleTimes["/fas:fa-sync-alt Refresh View Multiple Times"] CheckNumValue --"If num value is not provided" --> End[("fas:fa-stop End")] RefreshViewMultipleTimes --"Perform refresh on Maya viewport" --> End style Start fill:#00cc00,stroke:#000,stroke-width:3px style CheckNumValue fill:#99ccff,stroke:#000,stroke-width:2px style RefreshViewMultipleTimes fill:#ffcc00,stroke:#000,stroke-width:2px style End fill:#ff6666,stroke:#000,stroke-width:3px- Flow Chart Description:
This flowchart illustrates the refreshView function:
The process begins by checking if a numerical value (num) is provided.
If num is provided, it refreshes the Maya viewport as many times as the num value indicates.
If num is not provided, the function concludes without any action.
- EasyBird.renamePartsFromGrps(self)#
[shArgs : fg=featherGrps]
Purpose:
:: Renames parts of feather groups in Autodesk Maya based on a predefined naming convention.
Iterates through selected feather groups and renames each mesh within the groups using a set of specified part names.
Facilitates organization and identification of different parts within the feather groups.
- Parameters:
featherGrps – <list> # List of feather groups selected for renaming.
- Returns:
None # This function does not return any value but renames the parts of feather groups.
Code Examples:
>>> renamePartsFromGrps()
# Select feather groups in Maya and execute this function to rename parts within each group based on a specific naming convention.
graph TB Start[("fa:fa-play Start")] --> IterateFeatherGroups{"/fas:fa-sitemap Iterate Through Feather Groups"} IterateFeatherGroups --"For Each Feather Group" --> RenameMeshes["/fas:fa-i-cursor Rename Meshes in Group"] RenameMeshes --> UpdateProgress["/fas:fa-sync Update Progress"] UpdateProgress --> IterateFeatherGroups IterateFeatherGroups --"After All Groups Processed" --> End[("fas:fa-stop End")] style Start fill:#00cc00,stroke:#000,stroke-width:3px style IterateFeatherGroups fill:#ffcc99,stroke:#000,stroke-width:2px style RenameMeshes fill:#99ccff,stroke:#000,stroke-width:2px style UpdateProgress fill:#cc99ff,stroke:#000,stroke-width:2px style End fill:#ff6666,stroke:#000,stroke-width:3px- Flow Chart Description:
This flowchart illustrates the renamePartsFromGrps function:
The process begins when the function is executed, starting with the selected feather groups in Autodesk Maya.
The function iterates through each feather group in the selection.
Within each group, it renames the meshes according to a set of specified part names (e.g., ‘A’, ‘B’, ‘C’, etc.).
After renaming the meshes in a group, the function updates the progress.
The process loops back, continuing to iterate through the remaining feather groups.
Once all the groups have been processed, the function ends.
- EasyBird.reorderFeathers(self, initFeth=None, fList=None, fethPrfx='L_', fethName='WingFeather_01_Geo')#
[shArgs : inf=initFeth, fl=fList, fp=fethPrfx, fn=fethName]
Purpose:
:: Reorders feather objects in a sequence and renames them based on a given initial feather and naming convention in Autodesk Maya.
Provides an organized structure for feather objects by reordering and renaming them according to specified parameters.
Useful in rigging and animation where systematic naming and ordering are crucial for managing multiple feathers.
- Parameters:
initFeth – <str> # The initial feather object from which the reordering starts.
fList – <list> # List of feathers to be reordered.
fethPrfx – <str> # Prefix to be used for the feather names.
fethName – <str> # Base name for the feathers to generate sequential naming.
- Returns:
None # This function does not return any value but reorders and renames feather objects.
Code Examples:
>>> reorderFeathers(initFeth="feather1", fList=["feather2", "feather3"], fethPrfx='L_', fethName='WingFeather_01_Geo')
# Reorders and renames feathers starting from "feather1" with the specified prefix and base name.
graph TB Start[("fa:fa-play Start")] --> InitializeVariables{"/fas:fa-sliders-h Initialize Variables"} InitializeVariables --> SetInitialFeather["/fas:fa-map-pin Set Initial Feather"] SetInitialFeather --> CheckFeatherList{"/fas:fa-list Check Feather List"} CheckFeatherList --"If List is Provided" --> IterateFeathers["/fas:fa-repeat Iterate Through Feathers"] CheckFeatherList --"If List is Not Provided" --> GenerateFeatherList["/fas:fa-plus-circle Generate Feather List"] GenerateFeatherList --> IterateFeathers IterateFeathers --"For Each Feather" --> FindNearestFeather["/fas:fa-search-plus Find Nearest Feather"] FindNearestFeather --> RenameFeather["/fas:fa-i-cursor Rename Feather"] RenameFeather --> UpdateCounters["/fas:fa-calculator Update Counters"] UpdateCounters --> IterateFeathers IterateFeathers --"After Last Feather" --> CheckSiblingParts{"/fas:fa-sitemap Check if Feather Has Sibling Parts"} CheckSiblingParts --"If Siblings Exist" --> RenameSiblingParts["/fas:fa-sync-alt Rename Sibling Parts"] CheckSiblingParts --"No Siblings" --> End["/fas:fa-stop End"] RenameSiblingParts --> End style Start fill:#00cc00,stroke:#000,stroke-width:3px style InitializeVariables fill:#ffcc99,stroke:#000,stroke-width:2px style SetInitialFeather fill:#99ccff,stroke:#000,stroke-width:2px style CheckFeatherList fill:#cc99ff,stroke:#000,stroke-width:2px style GenerateFeatherList fill:#99ff99,stroke:#000,stroke-width:2px style IterateFeathers fill:#ffcc99,stroke:#000,stroke-width:2px style FindNearestFeather fill:#ccffcc,stroke:#000,stroke-width:2px style RenameFeather fill:#99ccff,stroke:#000,stroke-width:2px style UpdateCounters fill:#cc99ff,stroke:#000,stroke-width:2px style CheckSiblingParts fill:#ffcc99,stroke:#000,stroke-width:2px style RenameSiblingParts fill:#ccffcc,stroke:#000,stroke-width:2px style End fill:#ff6666,stroke:#000,stroke-width:3px- Flow Chart Description:
This flowchart illustrates the reorderFeathers function:
The process starts by initializing variables such as the initial feather, feather list, prefix, and base name.
Sets the initial feather as the starting point for reordering.
Checks if a feather list is provided. If not, it generates a list of feathers.
Iterates through each feather in the list.
Finds the nearest feather to the initial feather and sequentially orders it.
Renames the feather based on the given naming convention.
Updates counters for sequential naming and sibling index.
After processing all feathers, checks if feathers have sibling parts that need renaming.
If sibling parts exist, renames them accordingly.
The process ends after renaming all feathers and their sibling parts.
- EasyBird.replace_Driven2DriveCtrls(self)#
[shArgs : fg=fethGeoList, fc=fethCtrl]
Purpose:
:: Transforms a driven feather geometry system into a drive control system.
This function is essential for transitioning from a driven feather geometry setup to a more control-oriented system, providing increased flexibility for animation and rigging.
It handles the re-parenting of geometry and controls, deletion of unnecessary joints, and renaming of nodes to fit the new drive control system.
- Parameters:
fethGeoList – <list of asNode> # List of feather geometries selected for the conversion process.
fethCtrl – <asNode> # The control node associated with the feather geometry.
- Returns:
None # This function does not return a value but modifies the feather rigging setup.
Code Examples:
>>> replace_Driven2DriveCtrls()
# This example initiates the conversion process for the selected feather geometries.
graph TB Start[("fa:fa-play Start")] --> CheckFeathersSelected{{"/fas:fa-check-circle Check Feathers Selected"}} CheckFeathersSelected --"Feathers selected" --> IterateFeathers{"/fas:fa-repeat Iterate Feathers"} CheckFeathersSelected --"No feathers selected" --> End[("fas:fa-stop End")] IterateFeathers --> ReparentBendHandlers[("/fas:fa-object-group Reparent Bend Handlers")] ReparentBendHandlers --> DeleteJoints[("/fas:fa-bone Delete Joints")] DeleteJoints --> RenameNodes[("/fas:fa-text-height Rename Nodes")] RenameNodes --> CheckRightSideSetup{{"/fas:fa-check-circle Check Right Side Setup"}} CheckRightSideSetup --"Right side setup exists" --> InitiateRightSideSetup[("/fas:fa-sync-alt Initiate Right Side Setup")] CheckRightSideSetup --"No right side setup" --> RefreshView[("/fas:fa-sync-alt Refresh View")] InitiateRightSideSetup --> RefreshView RefreshView --> RebuildFeatherRig[("/fas:fa-tools Rebuild Feather Rig")] RebuildFeatherRig --> End style Start fill:#00cc00,stroke:#000,stroke-width:3px style CheckFeathersSelected fill:#ffcc00,stroke:#000,stroke-width:2px style IterateFeathers fill:#ffcc00,stroke:#000,stroke-width:2px style ReparentBendHandlers fill:#99ccff,stroke:#000,stroke-width:2px style DeleteJoints fill:#ff9999,stroke:#000,stroke-width:2px style RenameNodes fill:#99ccff,stroke:#000,stroke-width:2px style CheckRightSideSetup fill:#ffcc00,stroke:#000,stroke-width:2px style InitiateRightSideSetup fill:#cc99ff,stroke:#000,stroke-width:2px style RefreshView fill:#99ff99,stroke:#000,stroke-width:2px style RebuildFeatherRig fill:#cc99ff,stroke:#000,stroke-width:2px style End fill:#ff6666,stroke:#000,stroke-width:3px- Flow Chart Description:
This flowchart illustrates the replace_Driven2DriveCtrls function:
The process starts by checking if feather geometries are selected.
Iterates through each selected feather geometry.
Reparents bend handlers for each feather geometry.
Deletes joints associated with the feather geometry.
Renames nodes to fit the new drive control system.
Checks if there is a setup for the right side (if current is left side).
If right side setup exists, initiates the same process for the right side.
Refreshes the view to update the changes.
Rebuilds the feather rig to reflect the new drive control system.
- EasyBird.restrictedZone_EasyBird(self)#
[shArgs : ]
Purpose:
:: Handles access restriction for certain features in the EasyBird tool within Autodesk Maya.
Displays a message to the user when they attempt to access a feature not available in their version of EasyBird.
Redirects users to the EasyBird website for information on updates or to upgrade their tool version.
- Parameters:
selectedObjs – <list> # List of objects or elements selected when attempting to access the restricted feature.
- Returns:
None # This function does not return any value but shows a message regarding restricted access and opens the EasyBird website.
Code Examples:
>>> restrictedZone_EasyBird()
# Displays a message about restricted access and redirects to the EasyBird website for further information.
graph TB Start[("fa:fa-play Start")] --> DisplayMessage[("fas:fa-exclamation-circle Display Restricted Access Message")] DisplayMessage --> OpenWebsite[("fas:fa-external-link-alt Open EasyBird Website")] OpenWebsite --> End[("fas:fa-stop End")] style Start fill:#00cc00,stroke:#000,stroke-width:3px style DisplayMessage fill:#ffcc99,stroke:#000,stroke-width:2px style OpenWebsite fill:#99ccff,stroke:#000,stroke-width:2px style End fill:#ff6666,stroke:#000,stroke-width:3px- Flow Chart Description:
This flowchart illustrates the restrictedZone_EasyBird function:
The process starts when a user attempts to access a restricted feature in the EasyBird tool within Autodesk Maya.
A message is displayed to the user, informing them about the restricted access and suggesting to visit the EasyBird website for updates or upgrades.
The function then opens the EasyBird website, providing users with a direct link to obtain more information or upgrade their tool version.
The process ends after redirecting to the website.
- EasyBird.rivet(self)#
[shArgs : ]
Purpose:
:: Creates a rivet on a mesh surface based on selected edges or points.
- Returns:
str (name of the created locator)
Code Examples:
>>> rivet_name = EasyBird.rivet()
- EasyBird.selectAtGrpLevel(self, direction='down')#
[**shArgs : sl=selList, dl=direction, gl=grpLevel, mc=mc]
Purpose:
:: Selects objects at a specified group level within a hierarchy in Autodesk Maya.
This function allows the user to navigate through a hierarchy of groups and select objects at a specific level.
It is useful for organizing and selecting objects in complex scenes or rigs.
- Parameters:
selList – <list> # The list of currently selected objects.
direction – <str> # The direction to traverse in the hierarchy (‘up’ or ‘down’).
grpLevel – <int> # The group level to select. 0 is the current level, 1 is one level up/down, etc.
mc – <module> # Maya commands module for executing Maya specific commands.
- Returns:
None # This function does not return a value but changes the selection in the Maya scene.
Code Examples:
>>> selectAtGrpLevel('down')
# Selects objects one group level down in the hierarchy from the currently selected objects.

>>> selectAtGrpLevel('up')
# Selects objects one group level up in the hierarchy from the currently selected objects.
graph TB Start[("fa:fa-play Start")] --> GetParams["/fas:fa-sliders-h Get Parameters"] GetParams --> SelectCurrent["/fas:fa-mouse-pointer Select Current"] SelectCurrent --> IterateLevels{{"/fas:fa-level-up-alt Iterate Through Levels"}} IterateLevels --"For Each Level" --> PickWalkDirection["/fas:fa-arrow-alt-circle-right Pick Walk Direction"] PickWalkDirection --> CheckNextLevel{"/fas:fa-arrow-right Check Next Level"} CheckNextLevel --"If More Levels" --> IterateLevels CheckNextLevel --"No More Levels" --> End[("fas:fa-stop End")] style Start fill:#00cc00,stroke:#000,stroke-width:3px style GetParams fill:#ffcc00,stroke:#000,stroke-width:2px style SelectCurrent fill:#99ccff,stroke:#000,stroke-width:2px style IterateLevels fill:#cc99ff,stroke:#000,stroke-width:2px style PickWalkDirection fill:#99ff99,stroke:#000,stroke-width:2px style CheckNextLevel fill:#ffcc00,stroke:#000,stroke-width:2px style End fill:#ff6666,stroke:#000,stroke-width:3px- Flow Chart Description:
This flowchart illustrates the selectAtGrpLevel function:
The process starts by obtaining the parameters including the direction and group level.
The current selection is initially selected.
It then iterates through the specified number of group levels.
For each level, the function performs a ‘pick walk’ in the specified direction (up or down).
The iteration continues until the specified group level is reached.
The process concludes when the final level of selection is made.
- EasyBird.selectFromTF(self, textFld)#
[shArgs : tf=textFld, as=addSelection, us=useSuffix]
Purpose:
:: Adds selected object’s name as input in a window for <== button. :param textFld (str): The name of the text field to use. :param addSelection (int, optional): If 1, adds the selection. Default is 1. :param useSuffix (str, optional): Suffix to use for the object name. Default is ‘’. :return: None
Usage:
obj10 # Adds ‘obj10’ While pressing Enter.. <== button box25 # Adds ‘box25’ While pressing Enter.. <== button
Code Examples:
>>> text_field_name = "textField_name"  # Example text field name
>>> add_selection = 1  # Example addSelection value
>>> suffix = "_suffix"  # Example useSuffix value
>>> selectFromTF(textFld=text_field_name, addSelection=add_selection, useSuffix=suffix)
# Adds selected object's name as input in the specified text field.
This function allows you to add the selected object’s name as input in a window, with the option to add the selection and use a suffix.
graph TD Start[("fa:fa-play Start")] --> CheckShArgs{"/fas:fa-question-circle Check shArgs"} CheckShArgs --"If shArgs Exist"--> ParseShArgs["/fas:fa-cogs Parse shArgs"] CheckShArgs --"If shArgs Does Not Exist"--> InitializeParameters["/fas:fa-wrench Initialize Parameters"] InitializeParameters --> GetTextFromTextField{"/fas:fa-edit Get Text from Text Field"} GetTextFromTextField --> ProcessText{"/fas:fa-cog Process Text"} ProcessText --"If Text Contains Suffix"--> CheckObjectExistence{"/fas:fa-check-square Check Object Existence"} ProcessText --"If Text Does Not Contain Suffix"--> CheckObjectExistence{"/fas:fa-check-square Check Object Existence"} CheckObjectExistence --"If Object Exists"--> AddSelection["/fas:fa-plus-circle Add Selection"] CheckObjectExistence --"If Object Does Not Exist"--> End["/fas:fa-stop End"] AddSelection --> End["/fas:fa-stop End"] style Start fill:#00cc00,stroke:#000,stroke-width:3px style CheckShArgs fill:#ffcc00,stroke:#000,stroke-width:2px style ParseShArgs fill:#ff9999,stroke:#000,stroke-width:2px style InitializeParameters fill:#99ccff,stroke:#000,stroke-width:2px style GetTextFromTextField fill:#ccffcc,stroke:#000,stroke-width:2px style ProcessText fill:#99ccff,stroke:#000,stroke-width:2px style CheckObjectExistence fill:#cc99ff,stroke:#000,stroke-width:2px style AddSelection fill:#00cc00,stroke:#000,stroke-width:3px style End fill:#ff6666,stroke:#000,stroke-width:3px- Flow Chart Description:
This flowchart illustrates the selectFromTF function:
Checks if shArgs exist, and if so, parses the tf, as, and us from it.
If shArgs do not exist, initializes parameters with default values.
Gets the text from the specified text field.
Processes the text to check if it contains a suffix.
Checks if the object specified in the text exists.
If the object exists, it adds the selection.
If the object does not exist, the flowchart ends.
- EasyBird.selectFromTF_FeatherCtrls(self, textFld)#
[**shArgs : tf=textFld, mc=mc, oe=objExists]
Purpose:
:: Adds the name of the selected object as input in any window when the ‘<==’ button is pressed.
This function primarily serves to facilitate the transfer of selected object names into text fields within custom UIs in Maya.
It supports both single object selections and multiple objects with a comma-separated format.
- Parameters:
textFld – <str> # The name of the text field where the object name(s) will be inputted.
mc – <module> # Maya commands module for executing Maya specific commands.
oe – <function> # Function to check the existence of an object in the Maya scene.
- Returns:
<str/list/None> # The name of the selected object or list of objects if successful, None otherwise.
Code Examples:
>>> selectFromTF_FeatherCtrls('myTextField')
# Adds the name of the currently selected object to 'myTextField' when the '<==' button is pressed.

>>> selectFromTF_FeatherCtrls('multiSelectField')
# For multiple selections, adds a comma-separated list of selected object names to 'multiSelectField'.
graph TB Start[("fa:fa-play Start")] --> GetTextFieldValue["/fas:fa-edit Get Text Field Value"] GetTextFieldValue --> CheckObjectExistence{{"/fas:fa-search-plus Check Object Existence"}} CheckObjectExistence --"If Object Exists" --> ProcessObjectName["/fas:fa-pencil-alt Process Object Name"] CheckObjectExistence --"If Object Does Not Exist" --> End[("fas:fa-stop End")] ProcessObjectName --> SelectObject["/fas:fa-mouse-pointer Select Object"] SelectObject --> CheckMultipleObjects{{"/fas:fa-clone Check Multiple Objects"}} CheckMultipleObjects --"If Multiple Objects" --> SelectMultipleObjects["/fas:fa-hand-pointer Select Multiple Objects"] CheckMultipleObjects --"If Single Object" --> ActivateTool["/fas:fa-wrench Activate Translate Tool"] SelectMultipleObjects --> ActivateTool ActivateTool --> End style Start fill:#00cc00,stroke:#000,stroke-width:3px style GetTextFieldValue fill:#ffcc00,stroke:#000,stroke-width:2px style CheckObjectExistence fill:#cc99ff,stroke:#000,stroke-width:2px style ProcessObjectName fill:#99ccff,stroke:#000,stroke-width:2px style SelectObject fill:#99ccff,stroke:#000,stroke-width:2px style CheckMultipleObjects fill:#ff9999,stroke:#000,stroke-width:2px style SelectMultipleObjects fill:#99ff99,stroke:#000,stroke-width:2px style ActivateTool fill:#ffcc99,stroke:#000,stroke-width:2px style End fill:#ff6666,stroke:#000,stroke-width:3px- Flow Chart Description:
This flowchart illustrates the selectFromTF_FeatherCtrls function:
The process starts by retrieving the object name(s) from the specified text field.
It checks if the object(s) exist in the Maya scene.
If the object exists, the function processes the object name(s) to remove any suffixes.
The function then selects the object(s) in the scene.
If multiple objects are involved, it selects all of them.
Finally, the Translate Tool with Snap Marking Menu is activated, concluding the process.
- EasyBird.setLayerReference(self)#
[shArgs : tl=textList]
Purpose:
:: Sets the display type of the selected objects to reference in the layer.
This function modifies the display type of the selected nodes in Maya, setting them to a ‘reference’ state.
It’s commonly used to make objects non-editable and non-selectable, essentially locking their current state.
:param textList: <list> #List of text fields or objects to set as reference in the layer.
:return: None #No return value, as the function performs an action on the scene.
Code Examples:
>>> # Assuming 'cube1' is selected in Maya
>>> setLayerReference()
# 'cube1' is now set as reference in its layer.
graph TB Start[("fa:fa-play Start")] --> RetrieveSelectedObjects["/fas:fa-mouse-pointer Retrieve Selected Objects"] RetrieveSelectedObjects --> SetDisplayTypeToReference["/fas:fa-eye-slash Set Display Type to Reference"] SetDisplayTypeToReference --> UpdateLayerSettings["/fas:fa-layer-group Update Layer Settings"] UpdateLayerSettings --> End[("fas:fa-stop End")] style Start fill:#00cc00,stroke:#000,stroke-width:3px style RetrieveSelectedObjects fill:#ffcc00,stroke:#000,stroke-width:2px style SetDisplayTypeToReference fill:#99ccff,stroke:#000,stroke-width:2px style UpdateLayerSettings fill:#99ff99,stroke:#000,stroke-width:2px style End fill:#ff6666,stroke:#000,stroke-width:3px- Flow Chart Description:
This flowchart illustrates the setLayerReference function:
The process begins with retrieving the currently selected objects in Maya.
The function then sets the display type of these objects to ‘reference’.
This action updates the layer settings, making the objects non-editable and non-selectable.
The process concludes without returning any value, as it performs an action on the Maya scene.
- EasyBird.snapVtxToTrgtMesh(self, vtxList=None, trgtMesh='Body_Trgt')#
[**shArgs : vl=vtxList, tm=trgtMesh, mc=mc, ns=nselected, an=asNode, er=eRig]
Purpose:
:: Snaps each vertex in a provided list to a corresponding vertex on a target mesh.
This function enhances the process of aligning vertices from one mesh to another, streamlining tasks such as retopology or shape matching.
The function automatically matches each vertex in the list to a corresponding vertex on the target mesh by index.
- Parameters:
vtxList – <list, optional> # List of vertices to be snapped. If not provided, uses currently selected vertices.
trgtMesh – <str> # Name of the target mesh to which vertices will be snapped.
mc – <module> # Maya commands module for executing Maya specific commands.
ns – <function> # Function to get the currently selected objects in Maya.
an – <function> # Function to convert a string name to a Maya PyNode object.
er – <module> # Module containing utility functions for progress display and view refresh.
- Returns:
None
Code Examples:
>>> snapVtxToTrgtMesh(vtxList=['pCube1.vtx[0]', 'pCube1.vtx[1]'], trgtMesh='pSphere1')
# Snaps vertices 'pCube1.vtx[0]' and 'pCube1.vtx[1]' to the corresponding vertices on 'pSphere1'.

>>> snapVtxToTrgtMesh(trgtMesh='pSphere1')
# Snaps the currently selected vertices to the corresponding vertices on 'pSphere1'.
graph TB Start[("fa:fa-play Start")] --> CheckVtxList{"/fas:fa-list-ol Check Vertex List"} CheckVtxList --"If Vertex List is Provided"--> UseProvidedVtxList["/fas:fa-check-circle Use Provided Vertex List"] CheckVtxList --"If Vertex List is Not Provided"--> RetrieveSelectedVtx["/fas:fa-mouse-pointer Retrieve Selected Vertices"] RetrieveSelectedVtx --> AssignTrgtMesh["/fas:fa-project-diagram Assign Target Mesh"] UseProvidedVtxList --> AssignTrgtMesh AssignTrgtMesh --> StartProgress["/fas:fa-play-circle Start Progress"] StartProgress --> SnapEachVtx{"/fas:fa-arrows-alt Snap Each Vertex"} SnapEachVtx --> RefreshView["/fas:fa-sync-alt Refresh View"] RefreshView --> UpdateProgress["/fas:fa-chart-line Update Progress"] UpdateProgress --> CheckCompletion{"/fas:fa-tasks Check Completion"} CheckCompletion --"If All Vertices Processed"--> EndProgress["/fas:fa-flag-checkered End Progress"] CheckCompletion --"If More Vertices to Process"--> SnapEachVtx EndProgress --> End[("fas:fa-stop End")] style Start fill:#00cc00,stroke:#000,stroke-width:3px style CheckVtxList fill:#ffcc00,stroke:#000,stroke-width:2px style UseProvidedVtxList fill:#99ff99,stroke:#000,stroke-width:2px style RetrieveSelectedVtx fill:#99ccff,stroke:#000,stroke-width:2px style AssignTrgtMesh fill:#ccffcc,stroke:#000,stroke-width:2px style StartProgress fill:#99ff99,stroke:#000,stroke-width:2px style SnapEachVtx fill:#ffcc99,stroke:#000,stroke-width:2px style RefreshView fill:#99ccff,stroke:#000,stroke-width:2px style UpdateProgress fill:#cc99ff,stroke:#000,stroke-width:2px style CheckCompletion fill:#ffcc00,stroke:#000,stroke-width:2px style EndProgress fill:#00cc00,stroke:#000,stroke-width:2px style End fill:#ff6666,stroke:#000,stroke-width:3px- Flow Chart Description:
This flowchart illustrates the snapVtxToTrgtMesh function:
The process begins by checking if a vertex list is provided.
If provided, it uses this list, else it retrieves currently selected vertices.
The target mesh is then assigned.
A progress window is started to track the operation.
Each vertex in the list is snapped to the corresponding vertex on the target mesh.
The view is refreshed to update changes.
Progress is updated after each vertex snapping.
The process checks if all vertices in the list have been processed.
Once all vertices are processed, the progress window is closed, and the function ends.
- EasyBird.toggleMeshVis(self, birdMesh=None)#
[**shArgs : bm=birdMesh]
Purpose:
:: Toggles the visibility of a selected mesh, commonly used for bird rigging in Maya.
This function is useful in rigging and animation workflows where toggling the visibility of a mesh is frequently needed.
It checks and alters attributes related to visibility, level of detail, and template settings of the selected mesh.
- Parameters:
birdMesh – <asNode> # The selected bird mesh whose visibility attributes are to be toggled.
- Returns:
None # This function does not return a value but alters the visibility of the selected mesh.
Code Examples:
>>> toggleMeshVis()
# This will toggle the visibility of the selected bird mesh in Maya.
graph TB Start[("fa:fa-play Start")] --> CheckMeshSelected{{"/fas:fa-check-circle Check if Mesh is Selected"}} CheckMeshSelected --"If Mesh is Selected" --> CheckVisibility{{"/fas:fa-eye Check Mesh Visibility"}} CheckMeshSelected --"If No Mesh Selected" --> ErrorMsg[("/fas:fa-exclamation-triangle Error Message")] CheckVisibility --"If Not Visible" --> SetVisible["/fas:fa-eye-slash Set Mesh Visible"] CheckVisibility --"If Visible" --> SetInvisible["/fas:fa-eye Set Mesh Invisible"] SetVisible --> UpdateAttributes1["/fas:fa-sliders-h Update Visibility Attributes"] SetInvisible --> UpdateAttributes2["/fas:fa-sliders-h Update Invisibility Attributes"] UpdateAttributes1 --> End[("fas:fa-stop End")] UpdateAttributes2 --> End ErrorMsg --> End style Start fill:#00cc00,stroke:#000,stroke-width:3px style CheckMeshSelected fill:#ffcc00,stroke:#000,stroke-width:2px style CheckVisibility fill:#99ccff,stroke:#000,stroke-width:2px style SetVisible fill:#99ff99,stroke:#000,stroke-width:2px style SetInvisible fill:#ff9999,stroke:#000,stroke-width:2px style UpdateAttributes1 fill:#cc99ff,stroke:#000,stroke-width:2px style UpdateAttributes2 fill:#cc99ff,stroke:#000,stroke-width:2px style ErrorMsg fill:#ff6666,stroke:#000,stroke-width:2px style End fill:#ff6666,stroke:#000,stroke-width:3px- Flow Chart Description:
This flowchart illustrates the toggleMeshVis function:
The process starts by checking if a mesh is selected.
If a mesh is selected, the function checks its current visibility status.
Based on the visibility status, the function either sets the mesh to be visible or invisible.
The visibility attributes (such as ‘lodVisibility’, ‘visibility’, and ‘template’) of the mesh and its shape node are updated accordingly.
If no mesh is selected, an error message is displayed.
The process ends after updating the mesh’s visibility attributes or displaying an error message.
- EasyBird.transferSkin(self, srcMesh_Or_VtxList=None, destMesh_Or_VtxList=None, removeSrcClust=False, removeDestClust=True, trgtPrfx=None)#
[shArgs : s=srcMeshOrVtxList, d=destMeshOrVtxList, rsC=removeSrcClust, rdC=removeDestClust, tp=targetPrefix]
Purpose:
:: Transfers skin weights from one mesh to another.
- Parameters:
srcMeshOrVtxList – (<str/list, optional>) # Source mesh or vertex list to transfer skin weights from. If not provided, the first and second selected objects are used.
destMeshOrVtxList – (<str/list, optional>) # Destination mesh or vertex list to transfer skin weights to. If not provided, the first and second selected objects are used.
removeSrcClust – (<bool, optional>) # Whether to remove the source skin cluster after transferring skin weights. Default is False.
removeDestClust – (<bool, optional>) # Whether to remove existing skin clusters on the destination mesh before transferring skin weights. Default is True.
targetPrefix – (<str, optional>) # Prefix to be added to the names of the destination meshes. If provided, transfers skin weights only to meshes with matching names. Default is None.
- Returns:
None
Code Examples:
>>> transferSkin()
Usage:
Alternative One which is tested and proven one
srcMesh_Or_VtxList =selected()[0]
destMesh_Or_VtxList =selected()[1]
graph TD Start[("fa:fa-play Start")] --> CheckShArgs{"/fas:fa-question-circle Check shArgs"} CheckShArgs --"If shArgs Exist"--> ParseShArgs["/fas:fa-cogs Parse shArgs"] CheckShArgs --"If shArgs Does Not Exist"--> InitializeParameters["/fas:fa-wrench Initialize Parameters"] ParseShArgs --"Check trgtPrfx"--> CheckTrgtPrfx{"/fas:fa-check-square Check trgtPrfx"} CheckTrgtPrfx --"If trgtPrfx Exists"--> GetSelectedObjects{"/fas:fa-mouse-pointer Get Selected Objects"} CheckTrgtPrfx --"If trgtPrfx Does Not Exist"--> SelectMeshesFromPrefix["/fas:fa-text Select Meshes From Prefix"] SelectMeshesFromPrefix --> ProcessMeshes{"/fas:fa-hourglass-start Process Meshes"} GetSelectedObjects --> TransferSkinFromSelected["/fas:fa-hourglass Transfer Skin From Selected"] TransferSkinFromSelected --> End["/fas:fa-stop End"] style Start fill:#00cc00,stroke:#000,stroke-width:3px style CheckShArgs fill:#ffcc00,stroke:#000,stroke-width:2px style ParseShArgs fill:#ff9999,stroke:#000,stroke-width:2px style InitializeParameters fill:#ff9999,stroke:#000,stroke-width:2px style CheckTrgtPrfx fill:#ffcc00,stroke:#000,stroke-width:2px style GetSelectedObjects fill:#99ccff,stroke:#000,stroke-width:2px style SelectMeshesFromPrefix fill:#99ccff,stroke:#000,stroke-width:2px style TransferSkinFromSelected fill:#99ccff,stroke:#000,stroke-width:2px style End fill:#ff6666,stroke:#000,stroke-width:3px- Flow Chart Description:
This flowchart illustrates the transferSkin function:
Checks if shArgs exist, and if so, parses the parameters from it.
If shArgs do not exist, initializes parameters with default values.
Checks if trgtPrfx exists, and if so, selects meshes based on the prefix.
If trgtPrfx does not exist, gets selected objects.
Transfers skin weights from the source mesh or vertex list to the destination mesh or vertex list.
Ends the process.
- EasyBird.transferSkin_feather2Jnt(self, skinMesh=None, featherList=None, parentAtGrp=1)#
[shArgs : skinM=skinMesh, fl=featherList, pa=parentAtGrp]
Purpose:
:: Transfers skinning from feather geometry to joint hierarchy.
- Parameters:
skinMesh – (<str, optional>) # The skin mesh to transfer skinning to. If not provided, the last feather in the list is used.
featherList – (<list, optional>) # A list of feather geometries to transfer skinning from. If not provided, selected objects are used.
parentAtGrp – (<int, optional>) # Indicates whether to parent the joints at the group level. Default is 1.
- Returns:
None
Code Examples:
>>> transfer = TransferSkinFeatherToJoint()
>>> transfer.transferSkin_feather2Jnt()
graph TD Start[("fa:fa-play Start")] --> CheckShArgs{"/fas:fa-question-circle Check shArgs"} CheckShArgs --"If shArgs Exist"--> ParseShArgs["/fas:fa-cogs Parse shArgs"] CheckShArgs --"If shArgs Does Not Exist"--> InitializeParameters["/fas:fa-wrench Initialize Parameters"] InitializeParameters --> ConfirmAction{"/fas:fa-check-square Confirm Action"} ConfirmAction --"If User Continues"--> GetSelectedObjects{"/fas:fa-mouse-pointer Get Selected Objects"} ConfirmAction --"If User Cancels"--> DisplayWarning["/fas:fa-exclamation-triangle Display Warning"] GetSelectedObjects --"If Feather List Provided"--> LoopThroughFeathers["/fas:fa-hourglass-start Loop Through Feathers"] GetSelectedObjects --"If Feather List Not Provided"--> TransferSkinFromLastFeather["/fas:fa-hourglass-start Transfer Skin From Last Feather"] LoopThroughFeathers --> TransferSkinFromFeather["/fas:fa-hourglass Transfer Skin From Feather"] TransferSkinFromFeather --> UpdateProgressWindow["/fas:fa-tasks Update Progress Window"] UpdateProgressWindow --> LoopThroughFeathers TransferSkinFromLastFeather --> End["/fas:fa-stop End"] style Start fill:#00cc00,stroke:#000,stroke-width:3px- Flow Chart Description:
This flowchart illustrates the transferSkin_feather2Jnt function:
Checks if shArgs exist, and if so, parses the parameters from it.
If shArgs do not exist, initializes parameters with default values.
Asks the user to confirm the action.
- If the user continues:
Retrieves selected objects.
If a feather list is provided, iterates through each feather.
If a feather list is not provided, transfers skinning from the last feather in the list.
Updates the progress window during the process.
Ends the process.
- EasyBird.updateBasicBoneSize(self)#
[**shArgs : gc=globalCtrl, bs=boneSize, tx=textField, s=select, ns=nselected]
Purpose:
:: Adjusts the size of basic bones by setting the scale of the global control curve in Autodesk Maya.
This function is particularly useful for adapting the bone size in a rig to fit different character scales or proportions.
It allows for uniform scaling of all basic bones in the rig by adjusting the global control.
- Parameters:
globalCtrl – <str> #Name of the global control curve that affects the scale of the basic bones.
boneSize – <float> #Desired size for the basic bones. The global control’s scale will be set to this value.
textField – <function> #Function to query the value from a text field in the Maya UI.
nselected – <function> #Function to get the currently selected objects in Maya.
- Returns:
None #No return value. The function performs an action directly in the Maya scene.
Code Examples:
>>> updateBasicBoneSize()
# This will adjust the size of basic bones based on the value entered in the 'as_BasicBoneSize' text field.
graph TB Start[("fa:fa-play Start")] --> CheckGlobalCtrl{"/fas:fa-search-plus Check Global Control"} CheckGlobalCtrl --"If Global Control Exists"--> RetrieveBoneSize["/fas:fa-ruler-horizontal Retrieve Bone Size"] CheckGlobalCtrl --"If Global Control Does Not Exist"--> End["/fas:fa-stop End"] RetrieveBoneSize --> AdjustScale["/fas:fa-expand-arrows-alt Adjust Scale"] AdjustScale --> End[("fas:fa-stop End")] style Start fill:#00cc00,stroke:#000,stroke-width:3px style CheckGlobalCtrl fill:#ffcc00,stroke:#000,stroke-width:2px style RetrieveBoneSize fill:#99ccff,stroke:#000,stroke-width:2px style AdjustScale fill:#99ff99,stroke:#000,stroke-width:2px style End fill:#ff6666,stroke:#000,stroke-width:3px- Flow Chart Description:
This flowchart illustrates the updateBasicBoneSize function:
The process starts by checking for the existence of the Global Control.
If the Global Control exists, it retrieves the desired bone size from a text field.
The scale of the Global Control is then adjusted to the retrieved bone size.
The function ends after adjusting the scale.